Handling Groups in Trams Back Office and ClientBase
Introduction
In this document we follow the workflow of a group starting in Trams Back Office and following through to ClientBase including the Inventory Manager.
Topics
- Setting up Group Names in ClientBase or Trams Back Office
- Setting Up Group Profiles
- Setting Up Inventory in ClientBase
- Promoting the Group in ClientBase
- Selling from Inventory using Res Cards in ClientBase
- Using Reminders to Manage the Sales Process in ClientBase
- Documenting Client Payments in ClientBase
- Collecting Client Payments/Disbursing Vendor Payments in Trams Back Office
- Group Receipts/Expenses Report in Trams Back Office
- Managing Inventory Utilization in ClientBase
- Group Reporting in Trams Back Office
- Closing the Group in Trams Back Office
Trams and ClientBase Products and Services Group Policy
- Provide simplified group related enhancements to meet the needs of our customers and the changing marketplace.
- Continue to support our TCC’s and Crystal Report Writers that provide custom Crystal Reporting to meet your unique group reporting needs (these are in addition to the TCR (Trams Crystal Reports that we create in-house).
- Continue to support third party group vendors that are dedicated to providing powerful and flexible group management solutions.
Setting Up Group Names Before You Begin Selling
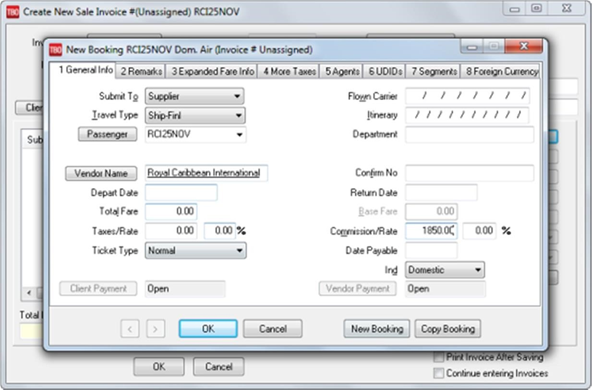
The group we are entering is a cruise with Royal Caribbean International on the Voyager departing November 25th. We have blocked 20 inside cabins and 10 outside cabins. All clients are paying us separately.
- Set up your Group Name in ClientBase or Trams Back Office
- Client and Vendor Profiles
- Identify the desired accounting method
Creating Group Names in ClientBase:
Since the Group table is shared by ClientBase and Trams Back Office, you may add the Group Name in either program. Any changes made in one program will make the same changes in the other program.
Go to Global Defaults > General Setup > Group List
- Select Add
- Enter the Group Name
- Select the drop-down lists where you want the Group Name to appear

Creating Group Names in Trams Back Office
On the main menu, click Utilities > Setup > Groups. The creation of a Group Code allows for consistent data entry and “ties” all the appropriate group invoices created in ClientBase and in Trams Back Office together.
Create "Invoice/Payment" Group Name
- Select 'Invoice/Payment' from the Group Type drop-down
- Enter the Group Name
- Select Add
- Select 'Ok' to save

Create "Client" Group Name
- Go to Utilities > Setup > Groups
- Select 'Client' from the Group Type drop-down
- Enter the Group Name
- Select Add
- Select 'Ok' to save

Create "Client" Group Profile
Creating a corporate client profiles allows you to take advantage of the long "Name" field (this can also be created in ClientBase).
- The creation of a client group profile is helpful for a number of purposes:
- It can be used as a temporary holding account for refunds and deposits.
- Use the profile when creating the final "Group Profit" invoice
- Use when creating vouchers to vendors before invoicing where the voucher covers multiple group clients.
Go to Profiles > Client > Corporate to create a corporate client profile

Who’s Paying for the Group Travel? - Creating Profiles in ClientBase
Use Leisure Profiles for each group member family as reservations are accepted. Create new profiles by clicking File > New > Leisure Profile in ClientBase.
- Be sure to use/create a Traveler Record for each traveler with all required immigration information
- Each profile should have a unique interface ID.
- Keep in mind that creating these profiles has marketing benefits in the future.

If you receive lump payments from a "Group Leader":
- You still have one profile for each family participating in the group, unless you are requested not to create separate Leisure Profiles for Group Members.
- In this case create a single Corporate "Client Profile" using the name of the Group. Each passenger has an “Employee” record under the profile. All Res Cards, Inventory buys and Invoices are created under this single “Group” Corporate Profile.

Which Vendor Profile to Use?
The ClientBase Inventory Manager requires using a different vendor for each travel component for the group. You do not need to create a separate vendor “group profile” when using both ClientBase and Trams Back Office for your groups.
You may use your normally used vendor profiles that are already in TBO/ClientBase. If you do not have a profile for the vendor, you can create one in TBO by clicking on Profiles > Vendor on the main menu. This will allow you to run your vendor reports for all business under that vendor or only business booked for the group with that vendor. You can create a vendor profile in ClientBase by selecting the Profile icon on the toolbar and selecting Vendor.
Which Accounting Method to use?
Using ClientBase along with Trams Back Office for your groups decreases your need to use the GDS to generate an invoice just to provide your clients with confirmation of their group purchases, group payments, and future payment dates.
You no longer need to generate your invoices through the GDS so you can get that information into Trams Back Office for accounting purposes.
Which method you choose is more dependent on how you want your Sales and Revenue to be shown on your financial statements. This choice should be the way to “Account” for your group from now on.
Using both Trams Back Office and ClientBase allows you to choose either method of accounting for Sales and Revenue. Your customer gets the documentation that shows what they have purchased, how much they have paid, and when they need to make future payments.
| Option #1: Accounting As Departing | Pros Using Both Back Office & ClientBase | Cons |
| The sales, cost of sales and income are all accounted for when the Group is completed or has departed. | Sales and Income are accounted for when all group members are final. | No significant Cons |
| Yield is not distorted as Revenue is reflected at the same time as sales are reflected. | ||
| Client and vendor vouchers are created as payments come in from clients and go out to vendors. | ||
| Invoices are created when the group is finalized, except for ARC/BSP airline tickets or any CC deposits that need to be run before finalizing the group | ||
| Client is given a “Trip Itinerary” and a “Trip Statement” from ClientBase. | ||
| Final invoices are created with commission in them, so that when looking at the travel history for a client, you can see the revenue value of that client to the agency. |
| Option #2: Accounting As Payments are Received | Pros Using Both Back Office & ClientBase | Cons |
| The sales and cost of sales for the Group are accounted for as payments are received from the clients for the amount received. | The maximum number of reports for the clients and management can be generated from both Trams Back Office and ClientBase, as invoices are being created as you go. | Since sales and cost of sales are being accounted for at different times, yield is distorted on a month-to-month basis. |
| The income is accounted for when the Group is completed or has departed. | The agent can document a payment immediately by easily generating an invoice in ClientBase. A vendor balance is also created for the bookkeeper reflecting the amount due out to the vendor. | We are accounting for sales every time a payment is received. |
| Financial statements will show high sales with no income in one month. Then in later months you will see low sales with high income. |
Note: Did you know that you can defer the Sale on Supplier bookings closed with a credit card until commission is received? Please refer to TBO help files for directions.
Setting up Inventory Records in ClientBase
Inventory items can be created from anywhere in the program:
- Clicking the Inventory button on the tool bar or
- Going to File > New > Inventory or
- Right-mouse clicking in the results screen of the Inventory Manager and selecting Add.
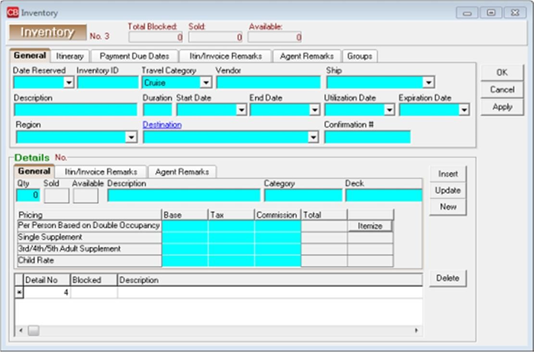
One inventory record can include multiple Inventory Details. Inventory Details include Quantity, Description and pricing. For example, we have blocked space for 2 different categories of cabins on a November sailing of Royal Caribbean’s Voyager. You would have one inventory record with 2 Inventory Details, one for each cabin category with the quantity blocked and it’s pricing.
General Tab (Top): Depending on the Travel Category selected, different tabs of information appear with different fields of information within those tabs.
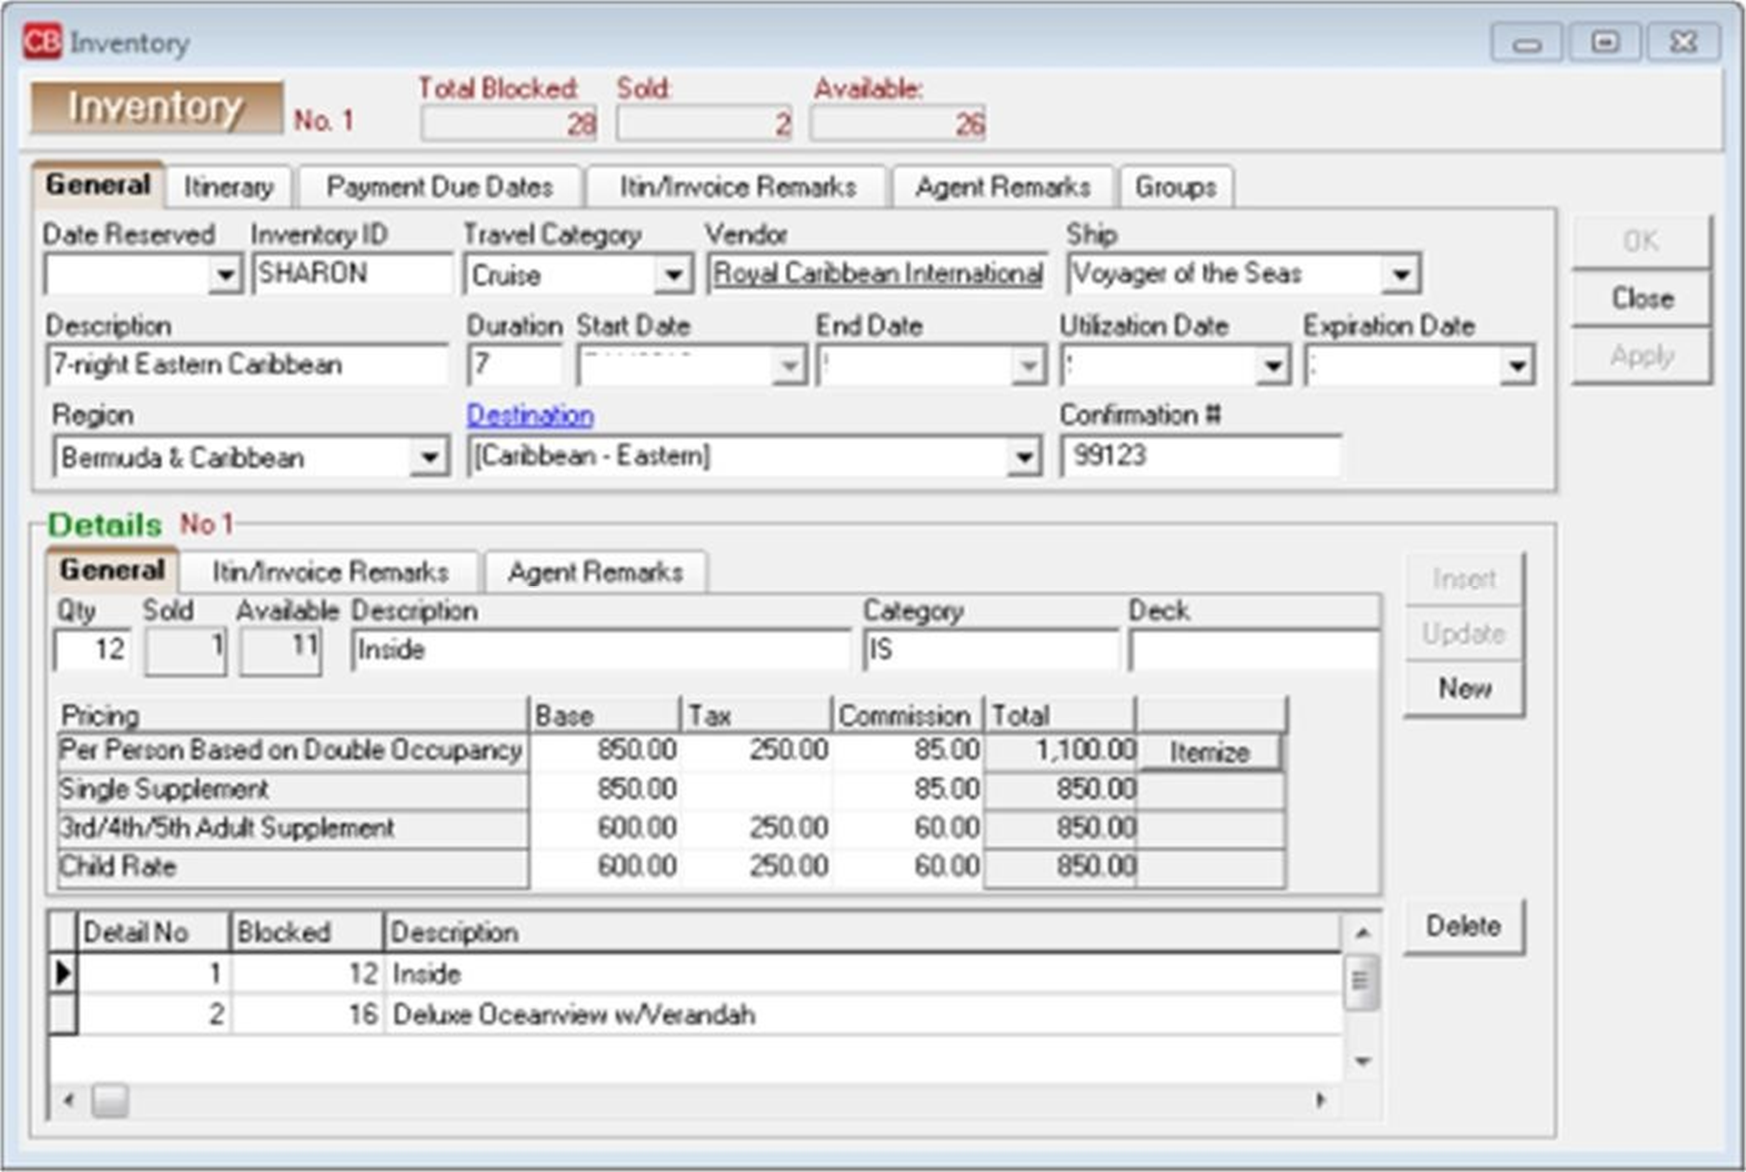
- Date Reserved: Manually enter or choose date from the drop-down menu. This is the date this block space is reserved.
- Inventory ID: This unique ID is user definable and can be used to query your inventory items. For example, our Cruise ID might read, CR110104 (using CR for cruise and the date).
- Travel Category: From the drop-down menu, select the appropriate Travel Category from Air, Cruise, Hotel, Miscellaneous, Rail or Tour.
- Vendor: Type in a few letters of the vendor's name and choose vendor from drop-down menu.
- Airline/Ship/Property/Rail/Service Provider: Fill in the Service Provider profile that applies. For example, our vendor is Royal Caribbean and the service provider would be Voyager.
- Description: Type in a unique description to identify this inventory item. For example, our cruise is described as Western Caribbean (Location of cruise)
- Duration: Type the number of days of the item.
- Start Date: Type the start date of the item or double-click the start date off the calendar accessible from the drop-down menu.
- End Date: Type the end date of the item or double-click end date off the calendar accessible from the drop –down menu.
- Utilization Date: Type when this item can be used or double-click the utilization date off the calendar accessible from the drop-down menu. The utilization date can also mean the date by which the Inventory must be sold to avoid penalty. Agency can choose either interpretation.
- Expiration Date: Enter date when this item can no longer be used or double-click the utilization date off the calendar accessible from the drop-down menu. This is important because by entering an expiration date, agents are prevented from pulling inventory into Res Cards after this date, and ClientBase automatically removes all expired inventory from any query results when launched from the Res Card Inventory button. You can still query expired inventory from your Inventory Manager, as the record still remains in the database. (If an inventory record has the Expiration Date set to today, the inventory continues to appear in query results and is not considered expired until the day after the expiration date.)
- Region: If you are tracking where clients are traveling, from the drop-down menu, select an area.
Itinerary Tab (Top): To enter detailed itinerary information to print on Itineraries|Invoices generated from Res cards click the Itinerary Tab:
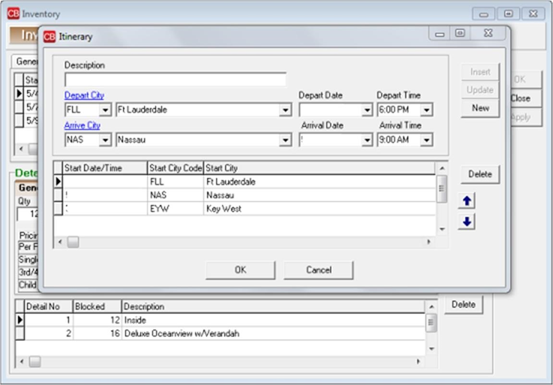
- Click Itinerary to complete all desired fields.
- Click Insert to add information
- To add an additional item, click New.
- To edit an item, select it, change the data, and click Update.
- To remove an item, select it, and click Delete.
Payment Due Dates Tab (Top): These dates will be used when you create Reminders.
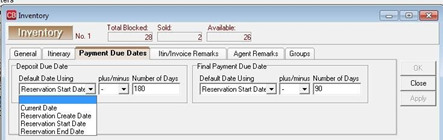
- Deposit Due Date: From the drop-down menu next to Default Date Using, select Current Date, Reservation Create Date, Reservation Start Date, or Reservation End Date. Next, from the drop-down menu select the plus or minus sign and choose the number of days from 1 to 2000 to use in combination with the Default Date Using field.
- Final Deposit Due Date: From the drop-down menu next to Default Date Using, select Current Date, Reservation Create Date, Reservation Start Date, or Reservation End Date. Next, from the drop-down menu select the plus or minus sign and choose the number of days from 1 to 2000 to use in combination with the Default Date Using field.
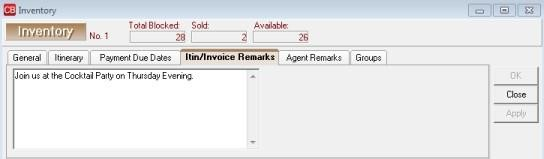
Itin/Invoice Remarks Tab (Top): Enter free-flowing Itinerary/Invoice Remarks that appear on the generated Itinerary and Invoice in the Res card.
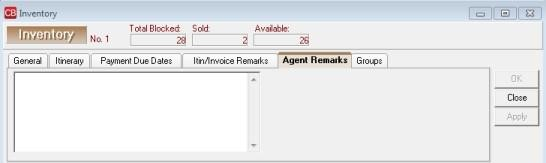
Agent Remarks Tab (Top): Enter free-flowing remarks that do not appear on the generated itinerary and invoice.
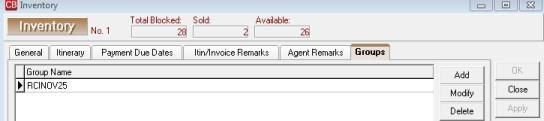
Groups Tab (Top): Add a Group name to the inventory record.
Details (Bottom)
- Qty: Type in the number of available items. For example, we have 20 inside cabins and 10 outside cabins.
- Sold/Available: This area keeps track of what has been sold and what is still available
- Description: Type in any identifying description such as with our cruise – outside cabins or inside cabins.
- Class of Service/Category-Deck/Room Type/Tour Name: Depending on the Travel Category selected in section above, fill in the appropriate data. With our cruise we are entering Category 8 Empress Deck.
- Pricing/Base/Tax/Commission: For each item, fill in the Base Price, Tax, and Commission on Per Person Based on Double Occupancy, Single Supplement, 3rd/4th/5th Adult Supplement, or Child Rate. Click Insert to add information to data entry screen below. To add an additional item, click New To edit an item, select it, change the data, and click Update. To remove an item, select it, and click Delete. The more complete your pricing information within your Inventory Detail, the more accurate the default pricing is when your agents are pulling from this inventory record.
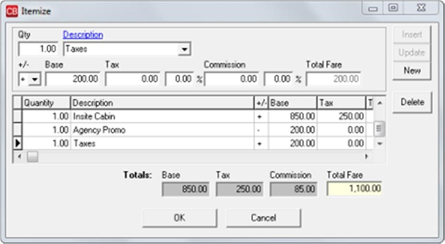
- Itemize: Click the Itemize tab to bring up a screen to itemize the total fare if you want more detail to print on the Itinerary/Invoices generated in the Res Card.
Promoting the Group
Generate interest in the group space you have reserved by targeting customers and sending a flyer, letter or email.
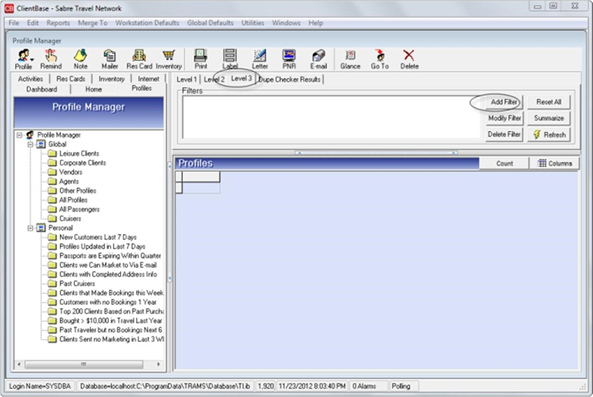
Targeting Customers: Click on the Profile Manager Tab
- Select Level 3 Query Tab/Add Filter
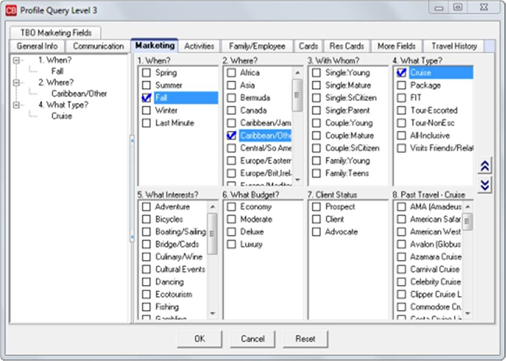
- From the Level 3 Query screen click on the Marketing Tab and select the marketing codes that match the cruise space we have reserved. For example, When? Fall, Where? Caribbean, What Type? Cruise. Click OK.
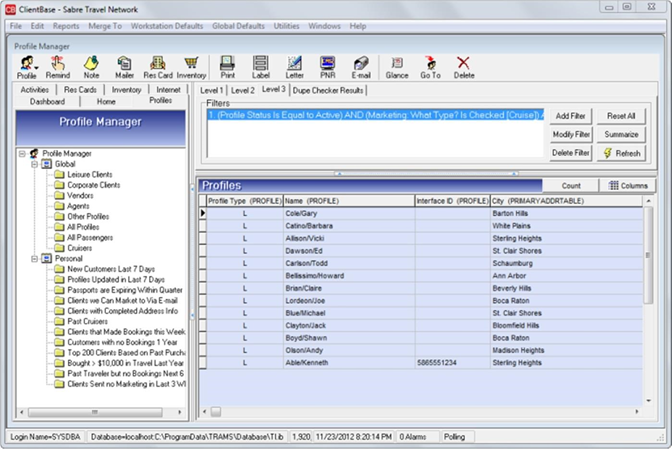
- In the Profile Manger click Refresh to display the results of the query.
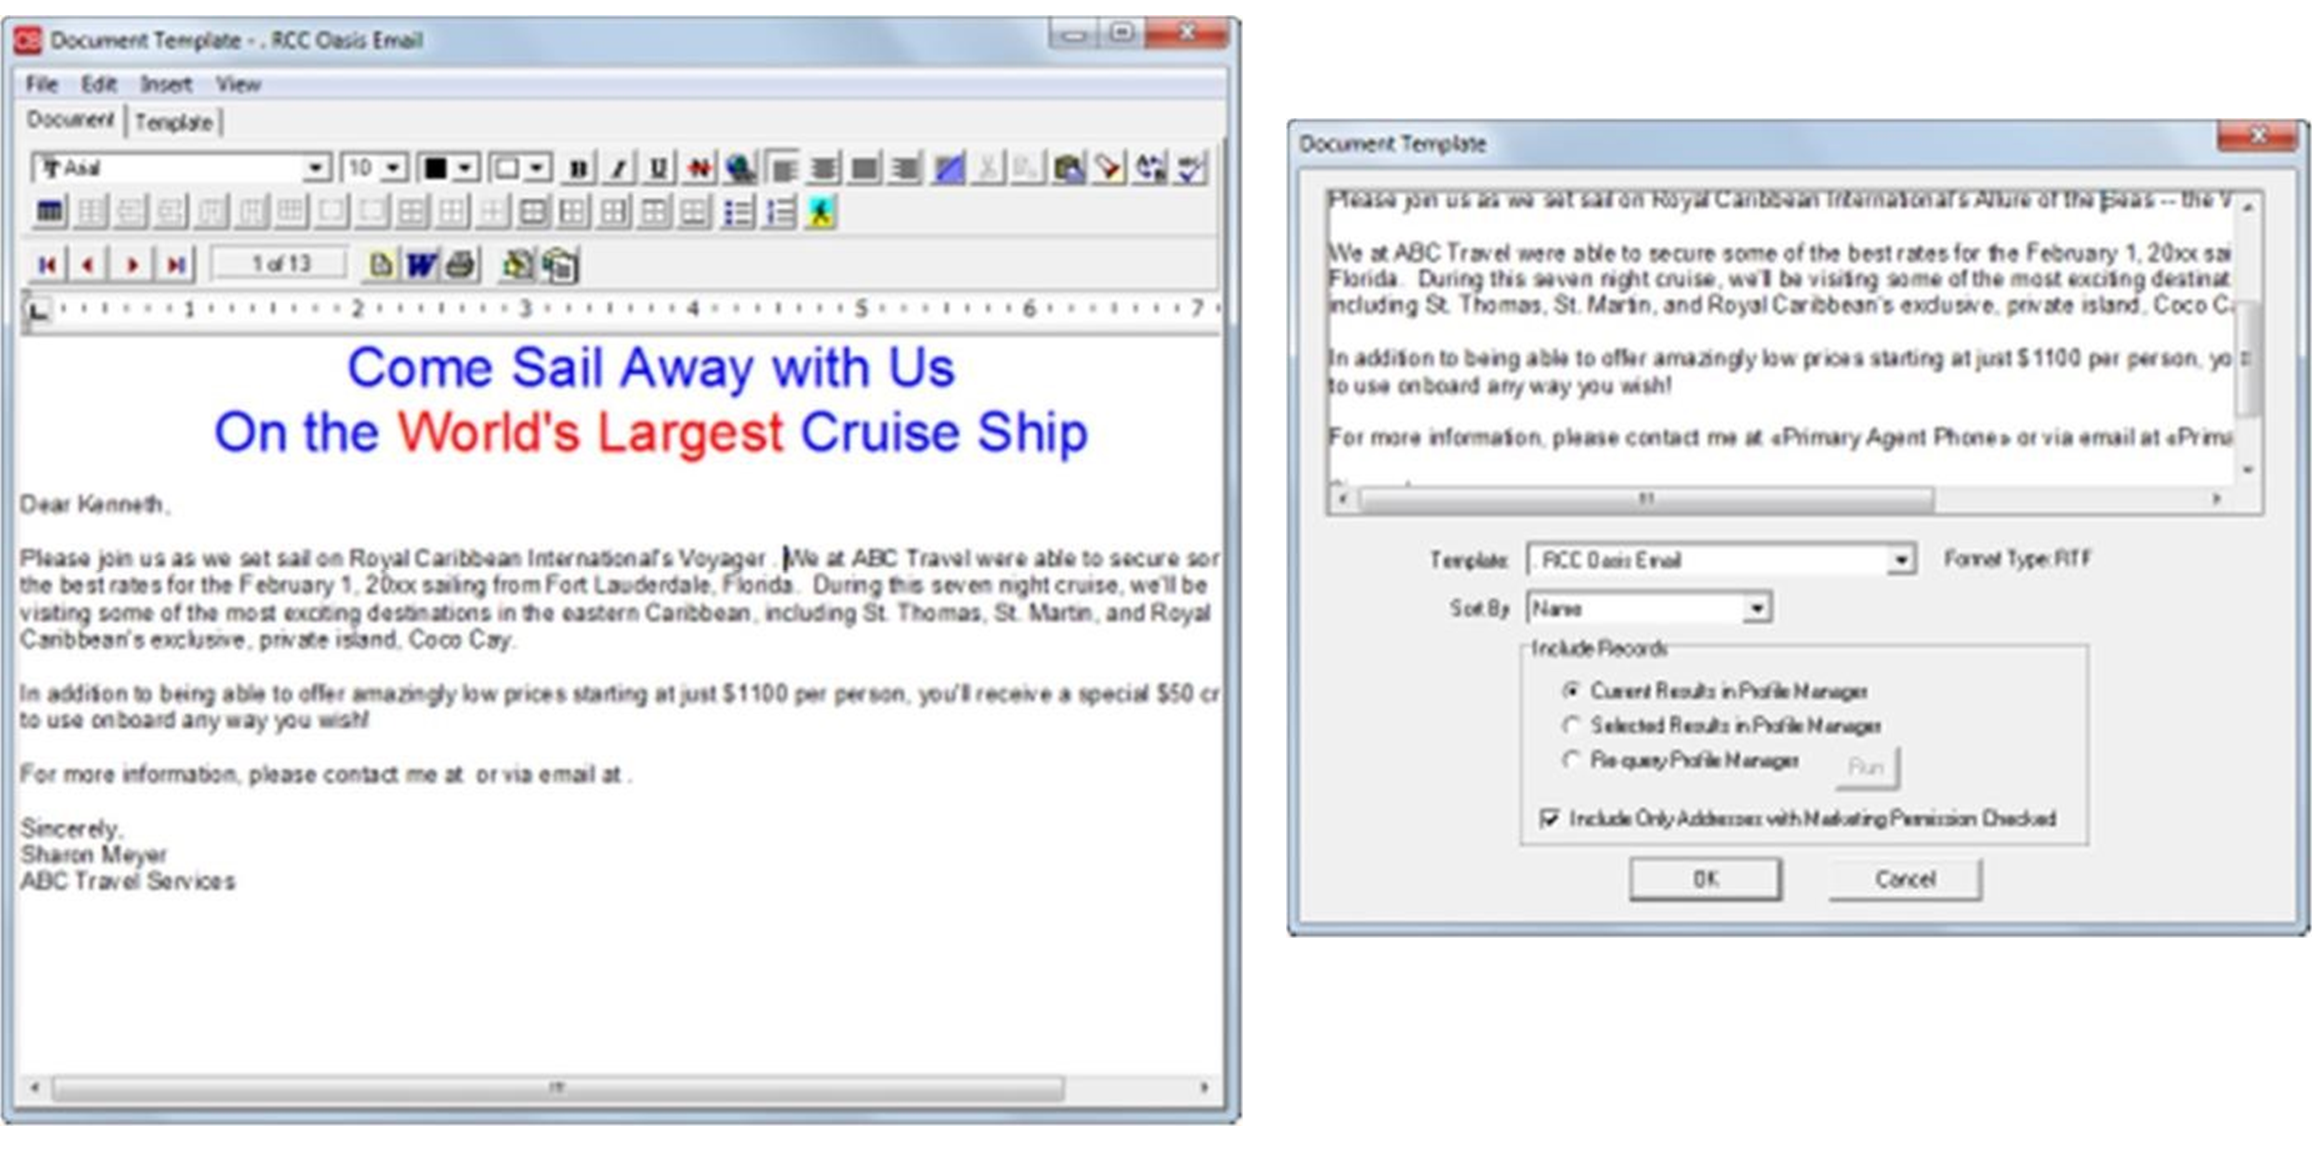
When merging information into an E-mail, merge the information to E-mail from the Results Screen by clicking the Tool Bar E-mail icon or select the menu item Merge To > E-Mail to merge all results.

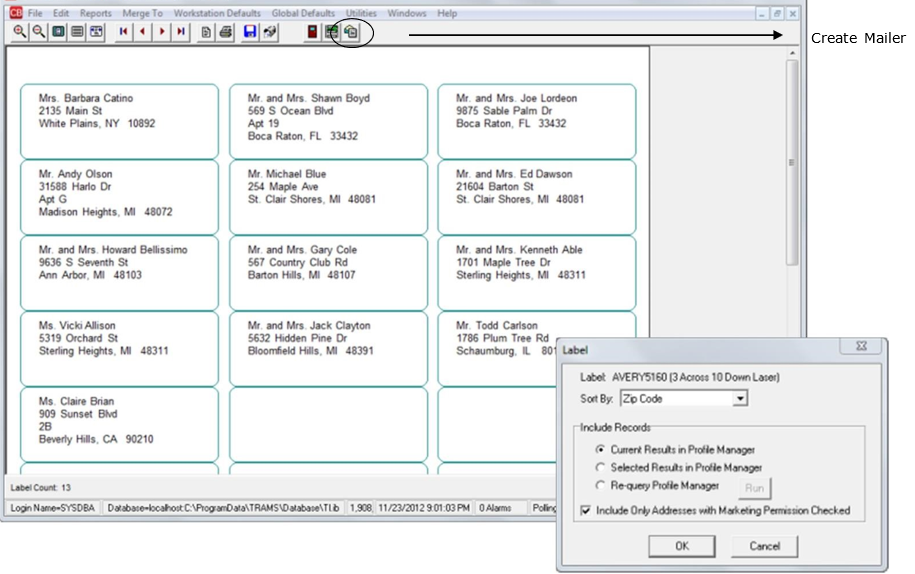
When merging information into a Label, merge the information to Label from the Results screen by clicking the Tool Bar Label icon or select the menu item Merge To > Label.
 Another option is to send personalized letters to the results of your query. You can merge the information to a Document Template on the Tool Bar Letter icon or on the menu item Merge To > Document Templates.
Selling from Inventory
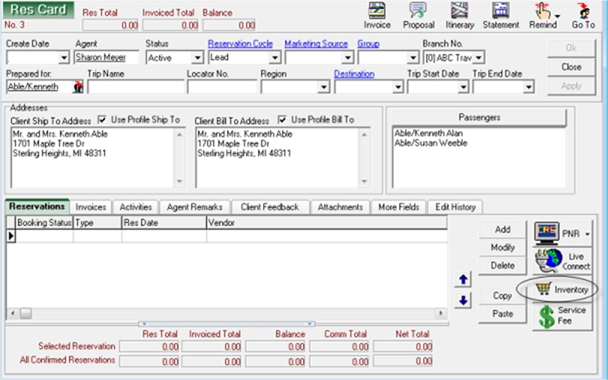
Utilize Res Card” Reservations” in ClientBase to link to your inventory records. Agents can connect to your database of group inventory while working in the Res card. To query inventory for a particular client's trip:
- Open a Res card for client
- To the far right Click on the Inventory Button
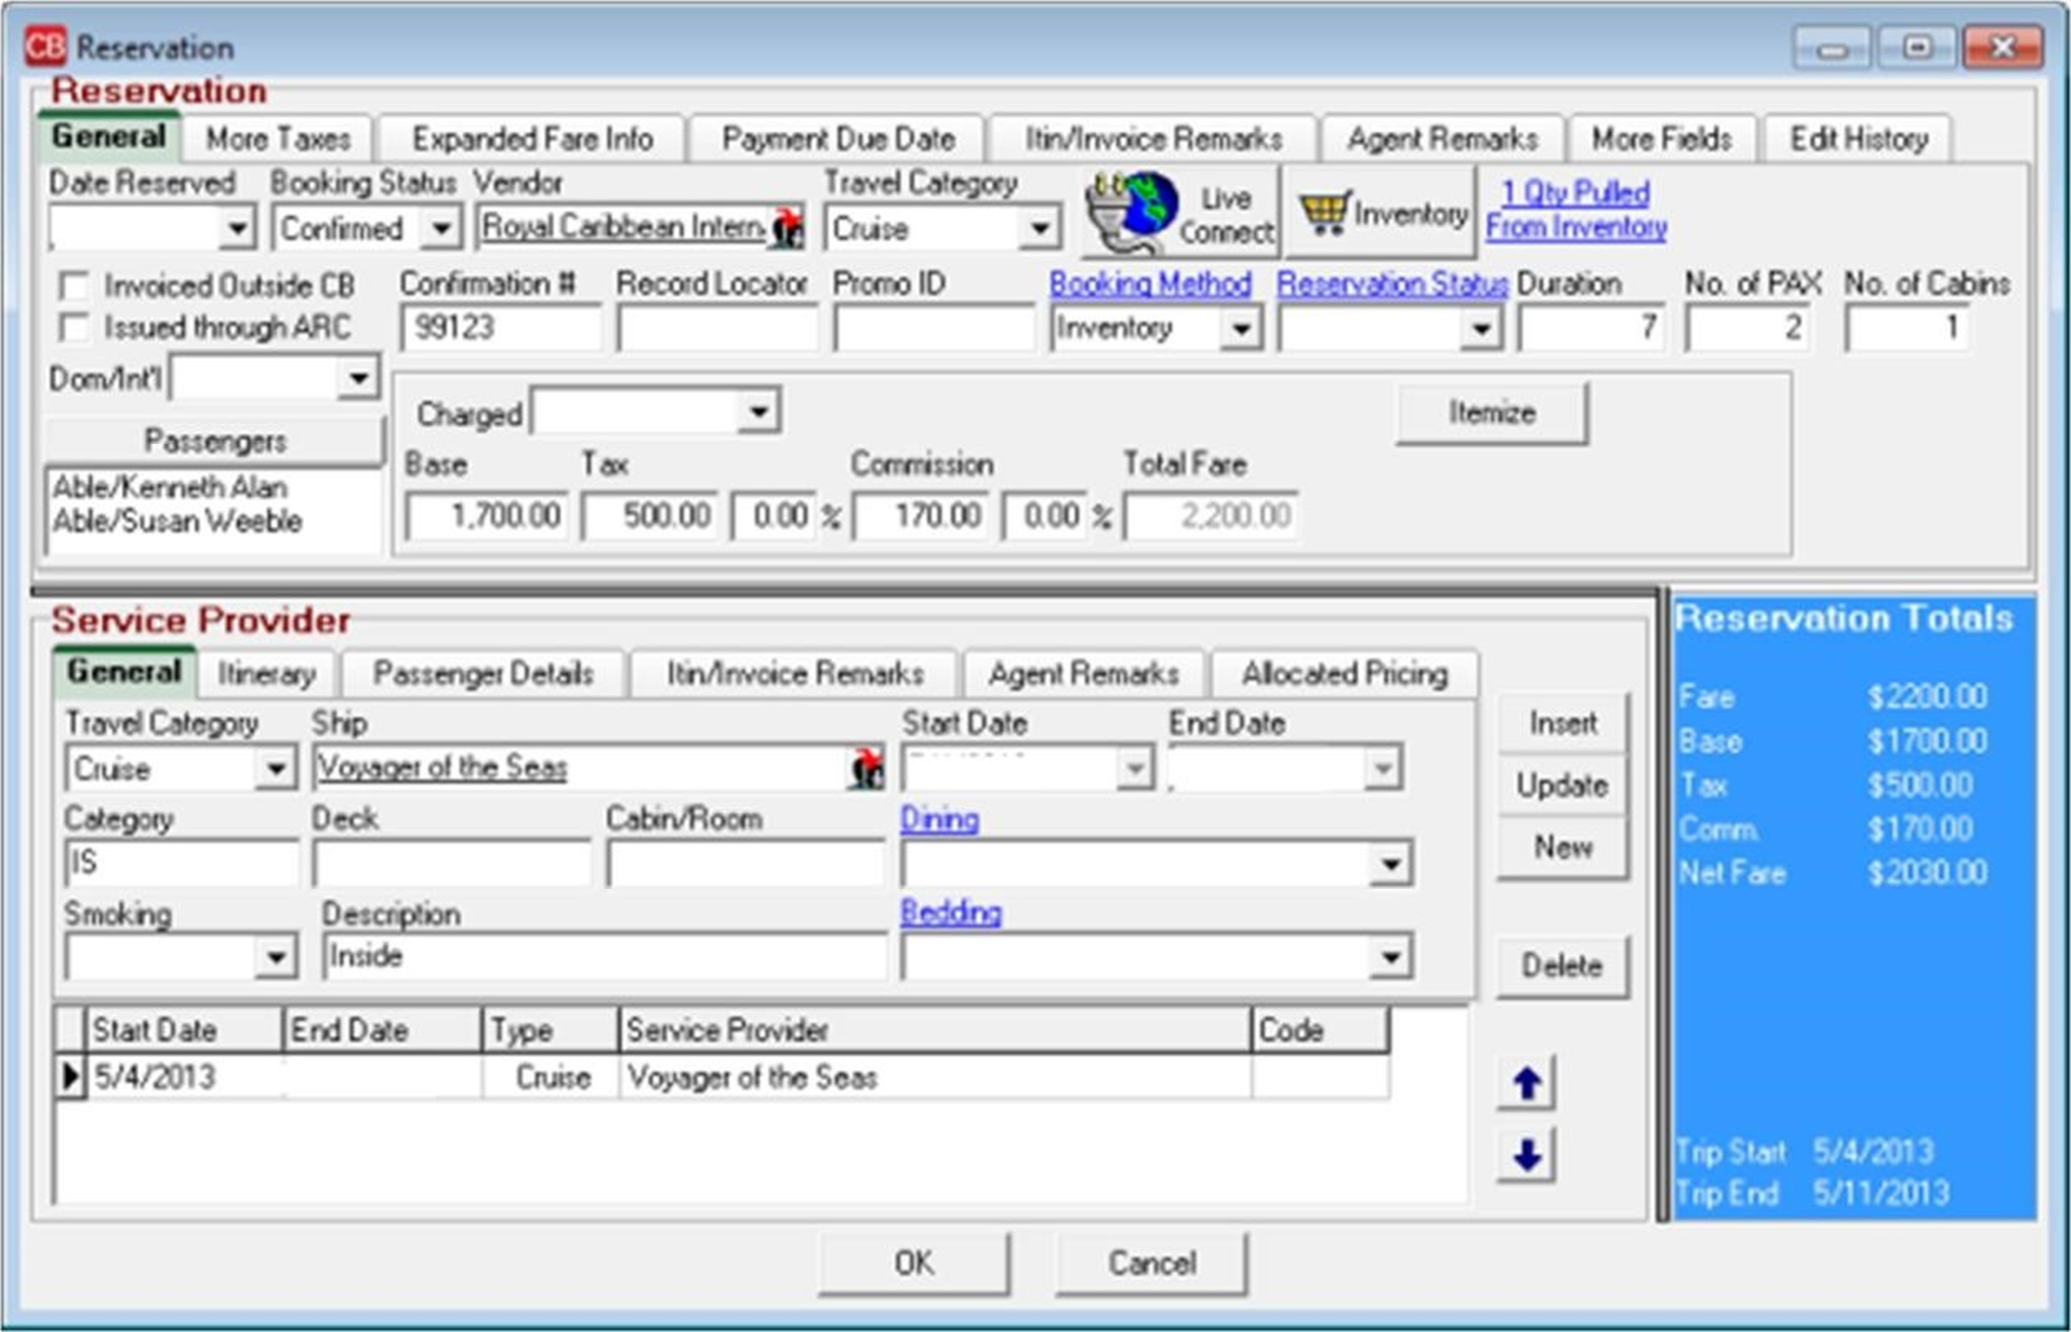
A Level 2 Inventory Query screen appears to query your inventory. We are querying for our group “RCINOV25”
If a Group has been captured within the ResCard the query may be performed automatically if you have the Default Inventory Filter set to Res Card Group Name. (See Screenshot Below) Click OK and view query results.
To view more information about the Inventory, click View Inventory Record at the bottom right hand corner. Click Pull from Inventory button to import the reservation details and link to the inventory record.

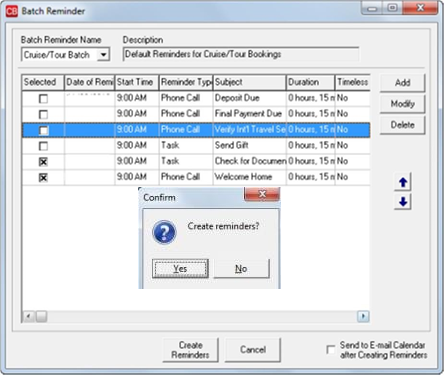
Using Res Card and Reminders to Manage the Sales Process
- Use batched reminders to quickly organize the future tasks to complete.
- Click Create Reminders and confirm by clicking
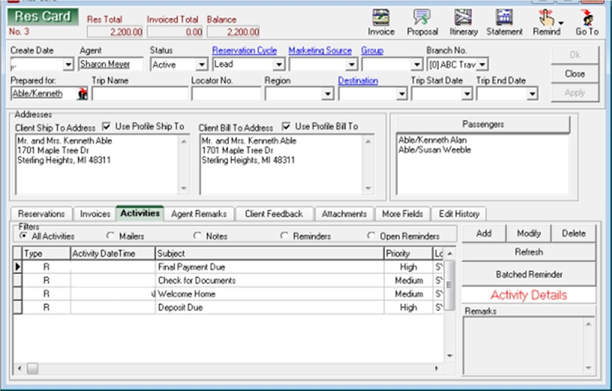
- All reminders are displayed in the Activities tab of the Res Card.
Documenting Client Payments in ClientBase
Generate an invoice from ClientBase if you have chosen to handle your group as “Accounting as Payments are Received". Select Generate Invoice in the Res Card.
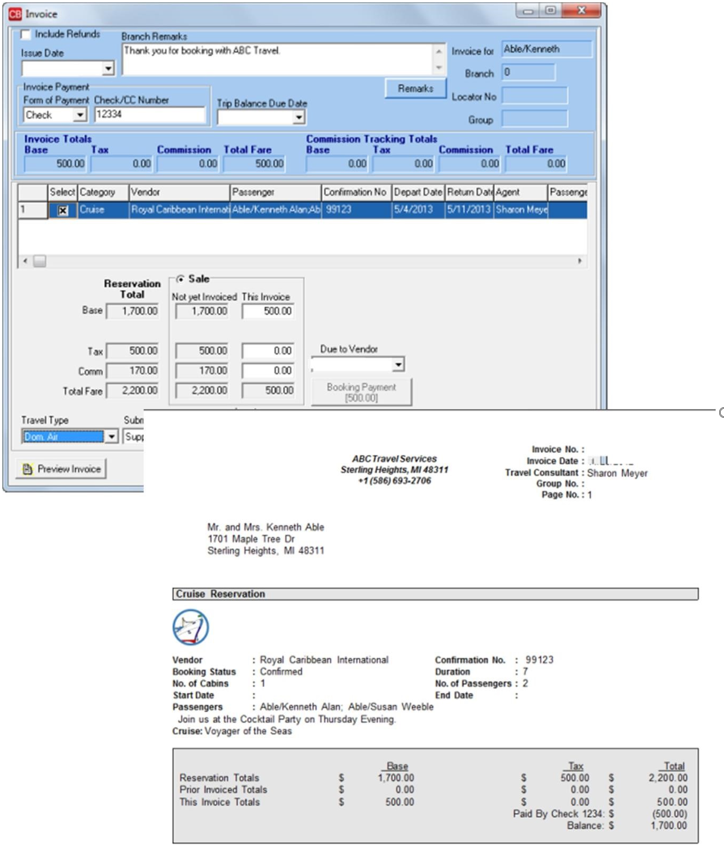
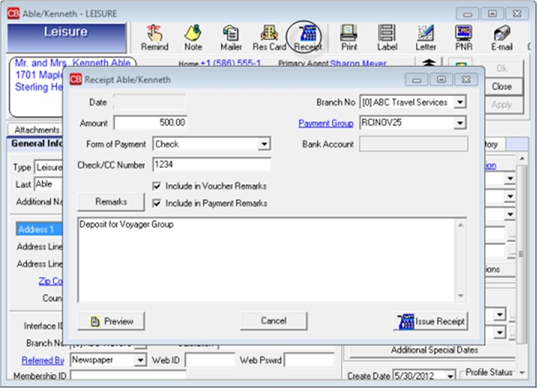
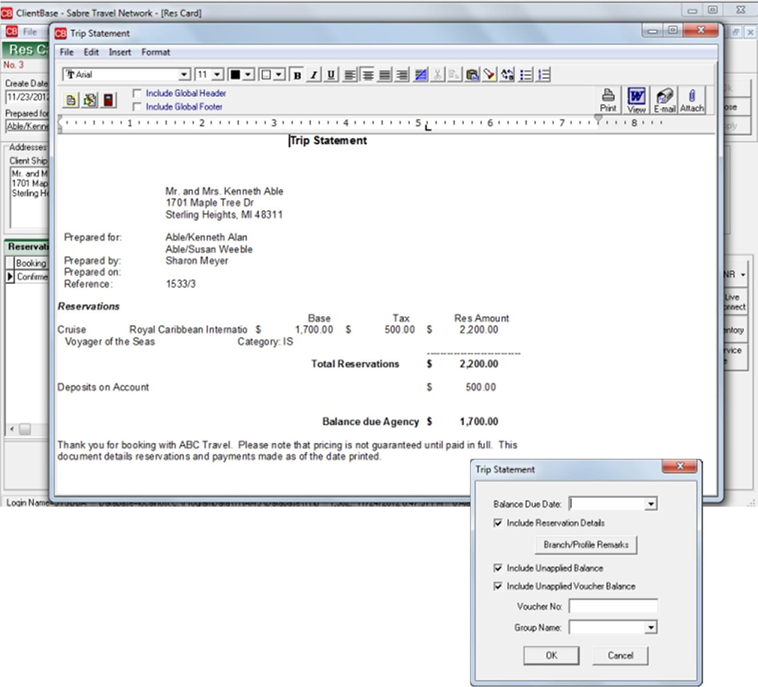
Create a Receipt from the Client Profile in ClientBase if using method “Accounting as Departing” for your Group. A ClientBase Receipt creates a Voucher in Trams Back Office.
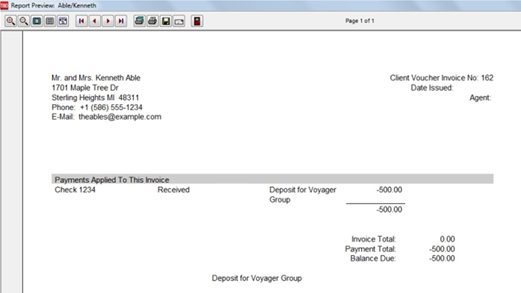
If you have chosen the “Accounting as Departing” method, use the ClientBase Trip Statement to document Trip Totals, Receipts and Balance Due for the client.
In ClientBase select from Trip Statement icon in the tool bar in the Res Card.
- Enter Balance Due Date
- Place check marks to include unapplied balances and Vouchers to include them.
- Select Group name from the drop-down menu in the Group Name field.
- Once a trip statement is generated, it appears in a word processor. Change the font, insert graphics and transform the trip statement anyway you want.
Collecting Client Payments/Disbursing Vendor Payments in Trams Back Office
Client Payments:
Enter all payments received from clients. Be sure to include the group code (RCCLVOYNOV1) on each payment. Filling in the group field gives you additional reporting capabilities. Also be sure to utilize the remarks field, this information shows on reports as well.
- Go to Payments|Received and fill in the information for each payment.
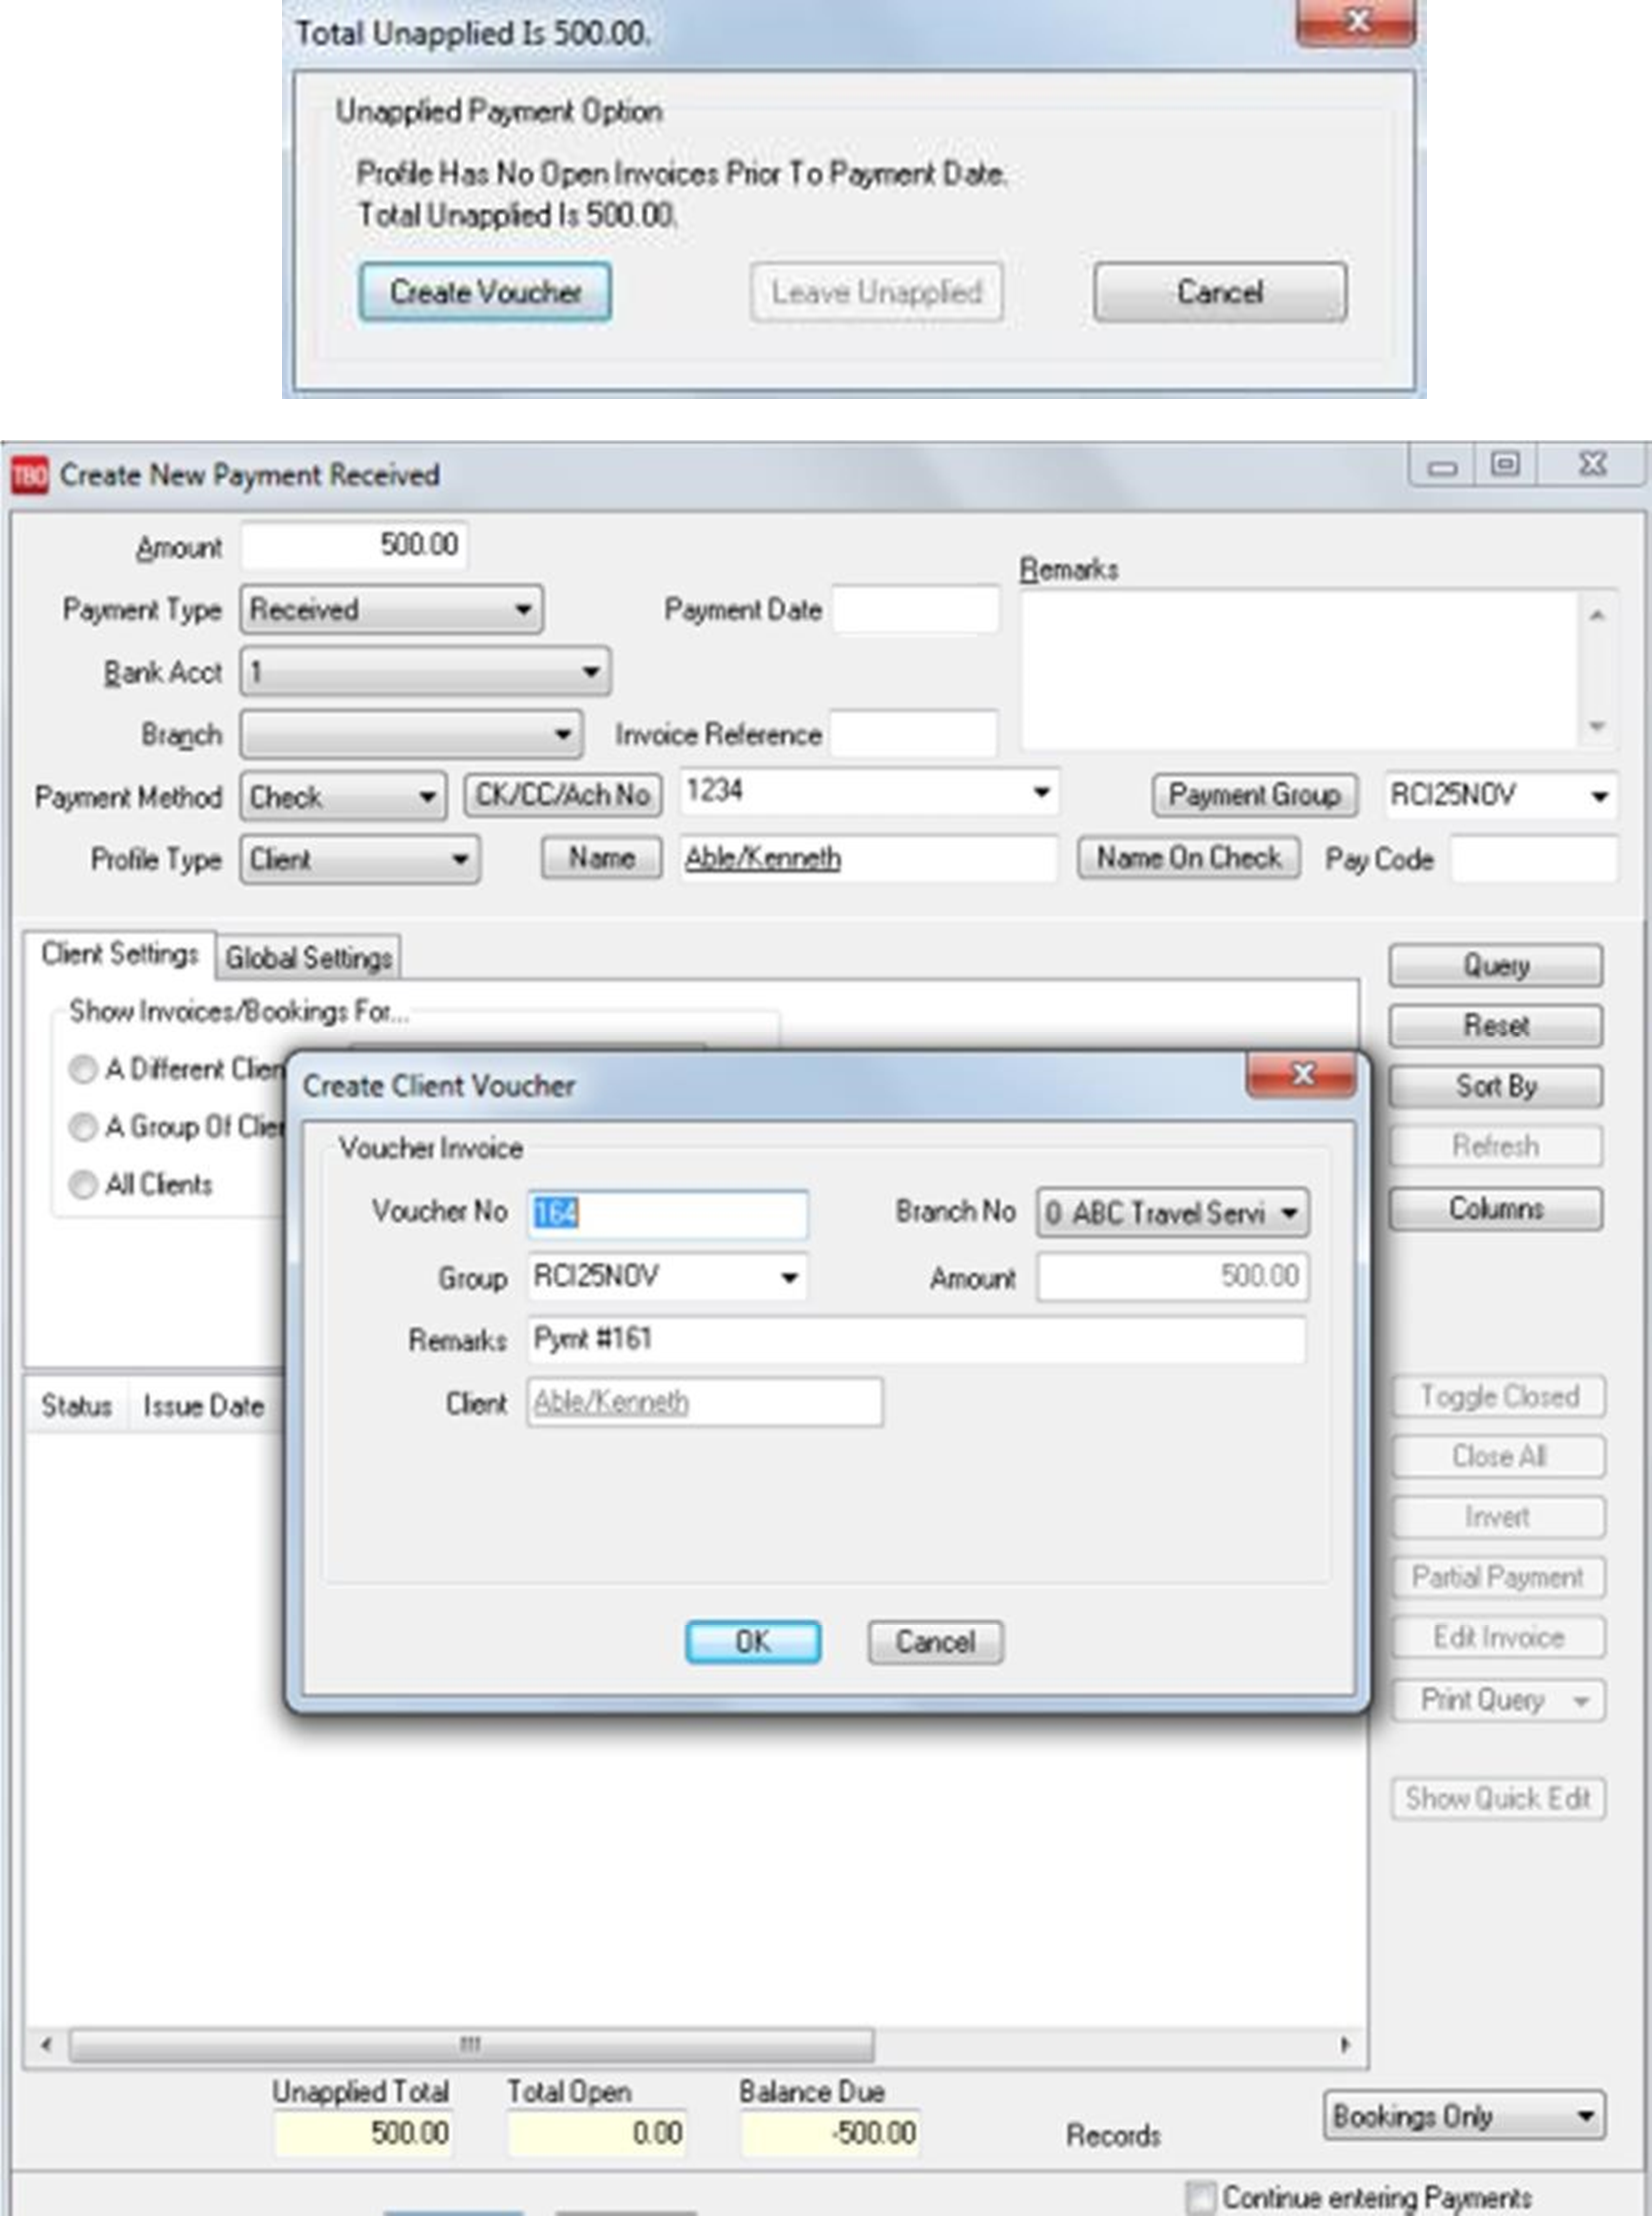
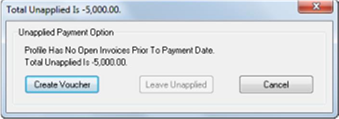
- If using accounting as departing, no invoices have been created at this point and you will be prompted to “Create Voucher” (Always Create a Voucher).
- If using accounting as payments received, apply payment to the appropriate invoice.
- If Receipts are entered in ClientBase, Back Office Personnel must reconcile the Vouchers created to the Payments Received and Deposited.
Vendor Payments:
- Go to Payments|Made and enter all payments that need to be sent to vendors.
- Create a Vendor Voucher when prompted.
- Create a Voucher for each payment. Be sure to include the RCIVOYNOV25 in the group field.
- Use the Client Profile named RCI VOYAGER GROUP – NOV 25.
Group Receipts/Expenses Report in Trams Back Office
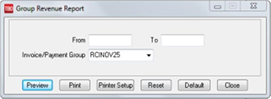
Run a Group Profit Analysis to be certain that you have accounted for all Vendor payments by going to Reports > Payment > Group. Enter the date range that covers your whole group, select the group from the drop-down and select Preview.

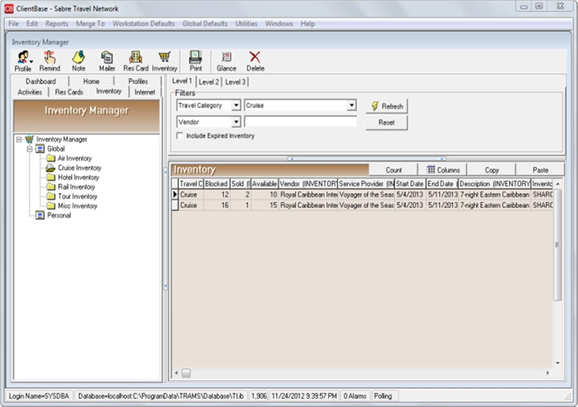
Managing Inventory Utilization in ClientBase
Easily track what’s Blocked, what’s Sold and what’s Available to manage your inventory utilization. Click Inventory Manager Tab, and Refresh to display all inventory records to view utilization.
Group Reporting in Trams Back Office
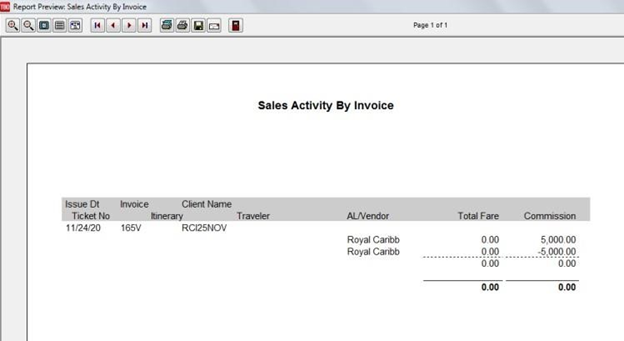
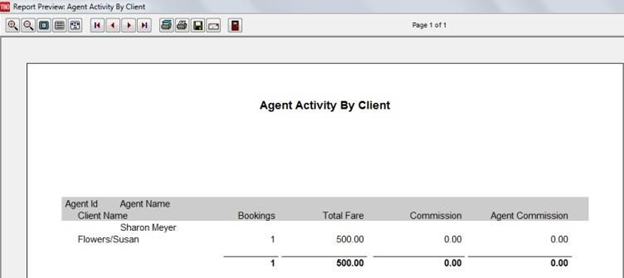
To run the Invoice Activity and Agent Activity go to Reports|Report Generator|Print Report on the main menu of TRAMS Back Office.
- Click on the Report Button and select the Invoice Activity Report: S_IN_AD. RPT
- Click on the Report Button and select the Agent Activity Report: AG_CL_AS.RPT
- Select “Invoice Group” on the Advanced Tab and select the group from the drop-down list

Example of the Sales Activity by Invoice Report: S_IN_AD.RPT
Example of the Agent Activity By Client Report: AG_CL_AS.RPT
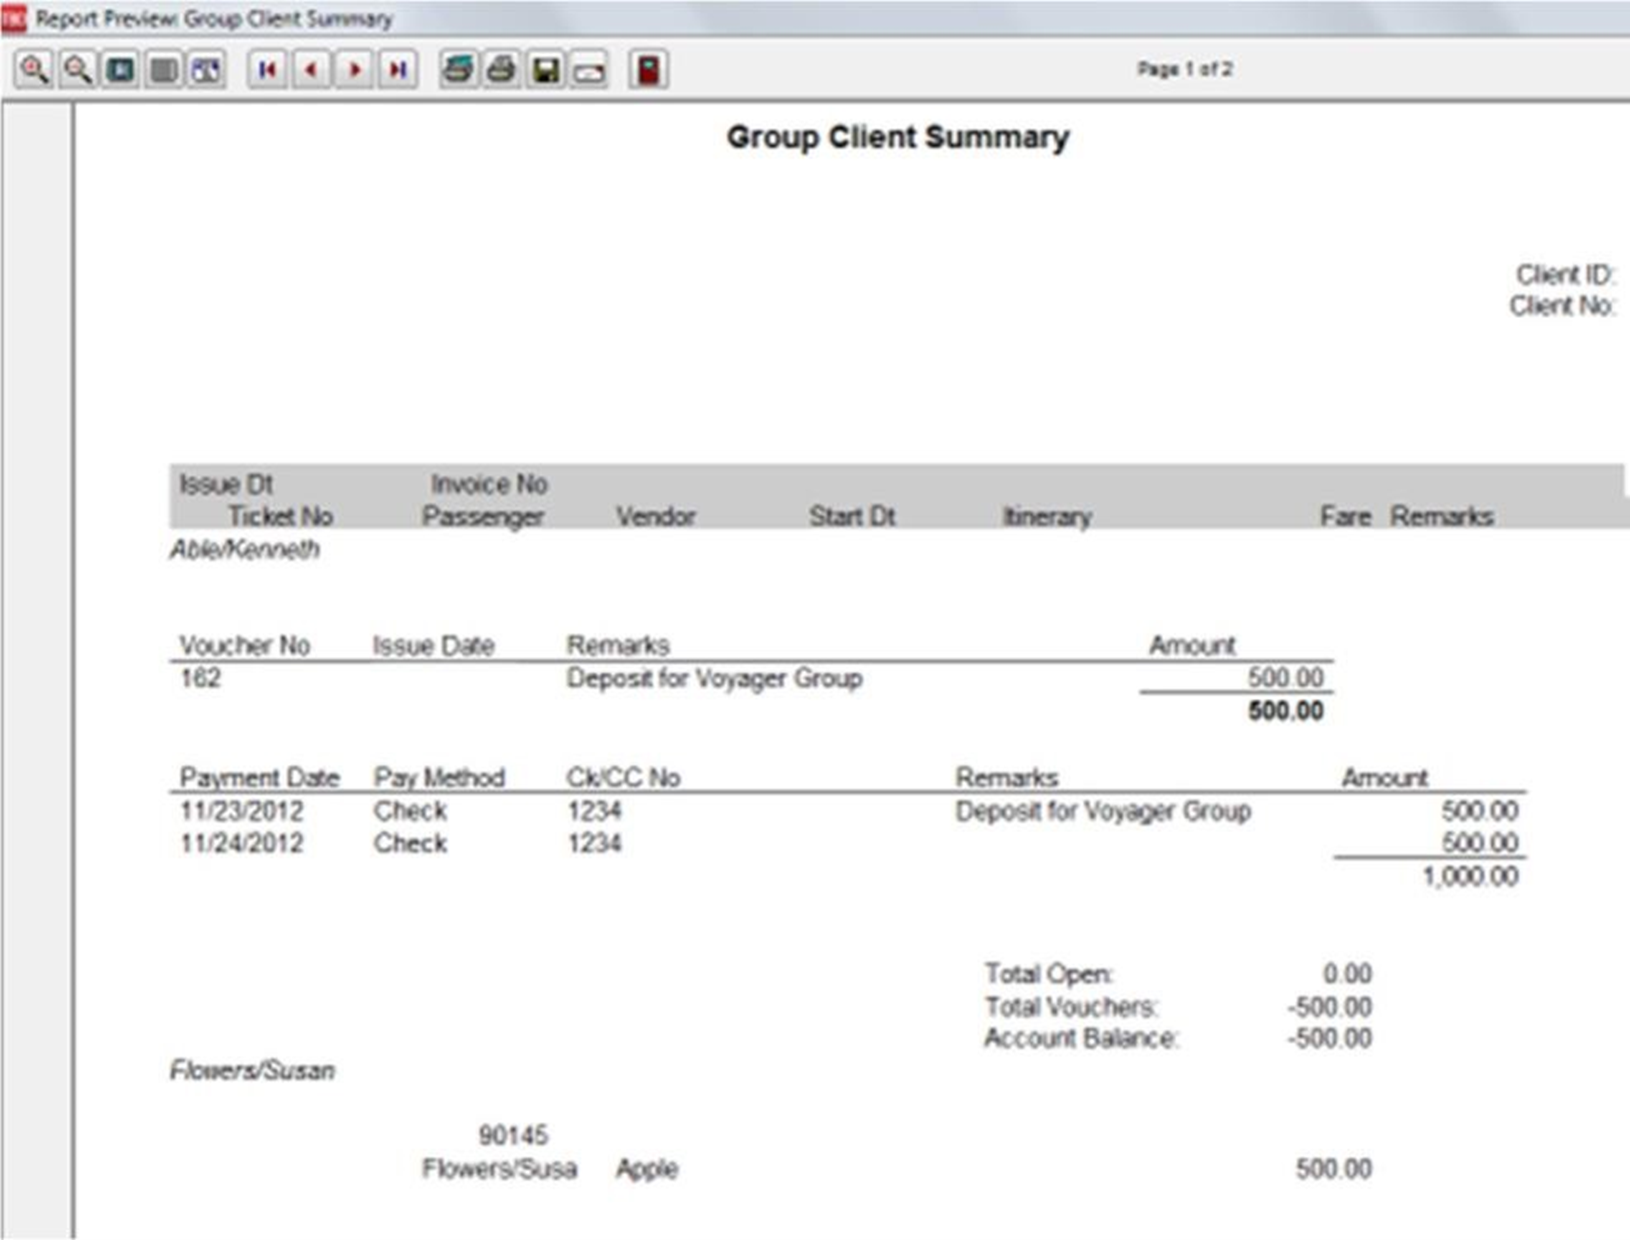
Client Group Statement
- To run a Client Group Statement, go to Reports|Client|Statement
- Click down arrow on Report Type and select Summary
- Click the down arrow in the Format field and select “Group” from the drop-down menu
- Click the down arrow in the Invoice Group Field and select a group name. (RCIVOYNOV25)

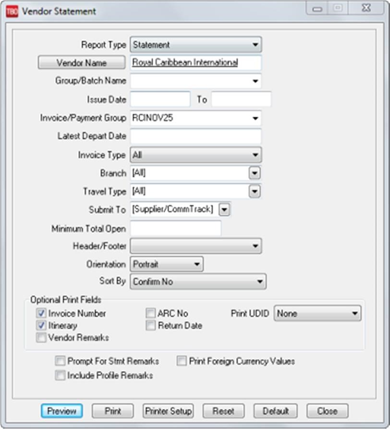
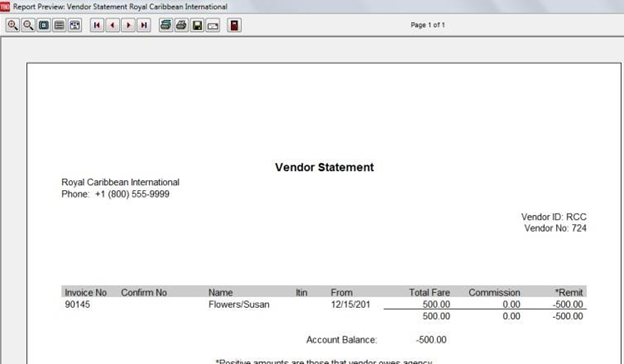
Vendor Group Statement
- To run a Client Group Statement, go to Reports|Vendor|Statement
- Click down arrow on Report Type and select Summary
- Select Vendor Name
- Click the down arrow in the Invoice Group Field and select a group name. (RCIVOYNOV25)
Group Receipts and Expenses Crystal Report
- Download Trams Crystal Reports at https://www.trestechnologies.com/trams-and-clientbase/trams-crystal-reports/
- Review our library of downloadable reports under TBO Agency Customer Reports|Payment Reports, Group Receipts and Expense Reports.
- Report is broken into two sections, “Receipts” and “Expenses”. Report can be run in “Summary” or in “Detail”.
- Receipts: Report displays the value of all payments received or made to and from clients, directly as Cash, Check, EFT or CC Merchant Payments, or where their CC has been charged indirectly through a Supplier.
- Expenses: All payments made or received to and from vendors will be displayed. These will include checks and EFT payments sent and received to and from Suppliers, Check payments sent to cover “expenses” of the group and CC payments processed though a Supplier.
- Both methods of accounting for Group sales and Revenue are handled with this report.

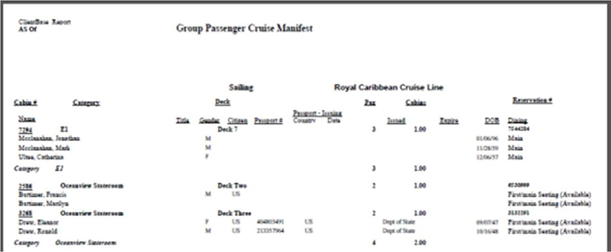
Group Passenger Manifest
Download Trams Crystal Reports at https://www.trestechnologies.com/trams-and-clientbase/trams-crystal-reports/. This report is found under ClientBase Group Reports|Group Passenger Cruise Manifest:
Other Group Reports in Trams Back Office
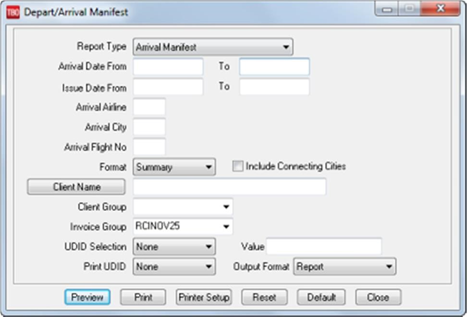
Depart and Arrive Manifest – Go to Reports/Invoices/Depart Arrival Manifest Select Invoice Group name from the drop-down menu. Rooming List – If a UDID1 (must be UDID1) was used linking Passengers sharing a room.
Closing the Group
Create all final invoices in ClientBase.
- Final invoices are created with commission in them, so that when looking at the travel history for a client, you can see the revenue value of that client to the agency.
In Trams Back Office closing Client side.
- Close all vouchers and invoices and track the income for the group
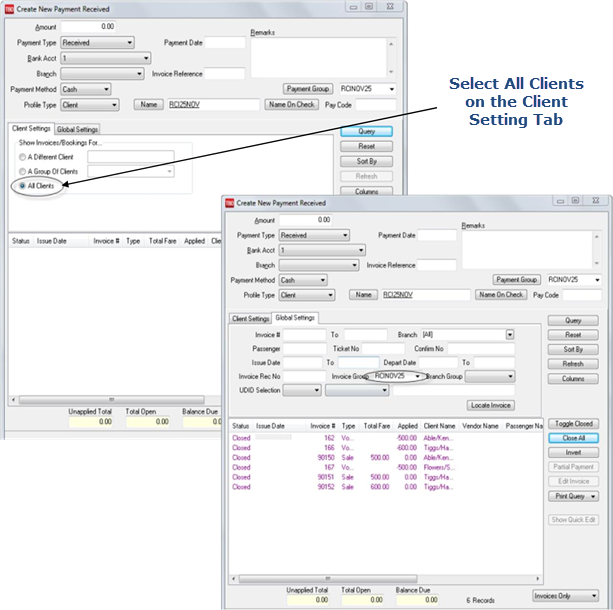
- Attach client invoices to client payments by entering a payment received of zero dollars
- Close out both the invoices and vouchers by going to Payments|Received.
- Change Pay Method to either Cash or Other.
- All Client vouchers and invoices can be closed with a single payment by using the Client Settings and Global Setting Tabs in the payment screen.
- Click Query and all invoices and vouchers for the group appear.
- Click Close All, on the right, and click OK. The client side of the group is closed.
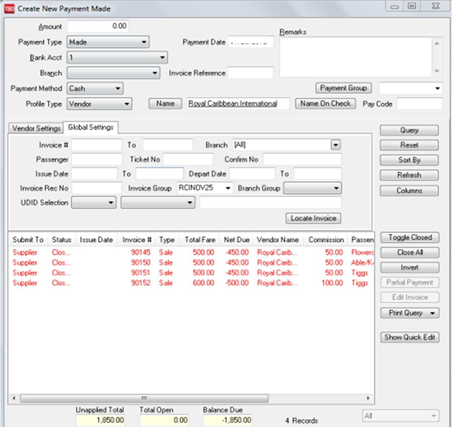
In Trams Back Office closing Vendor side.
- Close the vendor side of the group by going to Payments|Made.
- The amount is zero, and the Pay Method is either Cash or Other.
- Click Close All to close off all invoices and all Vouchers.
- You are prompted to create a voucher if there is any remaining amount.
- Select "Yes," as this is income for the group.
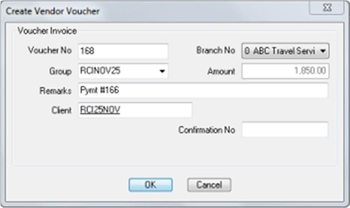
Create one final invoice to account for group income.
- Use the profile that we created for our group as the client
- The total fare is zero, and the commission amount is the amount of the vendor voucher we created above.
- Close invoice as we did in the above steps.