Move to the bottom of this article to watch a recording on setting up inventory.
Setting up Inventory Records in ClientBase
Inventory items can be created from anywhere in the program:
- Clicking the Inventory button on the tool bar or
- Going to File|New|Inventory or
- Right-mouse clicking in the results screen of the Inventory Manager and selecting Add.
One inventory record can include multiple Inventory Details. Inventory Details include Quantity, Description and pricing. For example, we have blocked space for 2 different categories of cabins on a November sailing of Royal Caribbean’s Voyager. You would have one inventory record with 2 Inventory Details, one for each cabin category with the quantity blocked and it’s pricing.
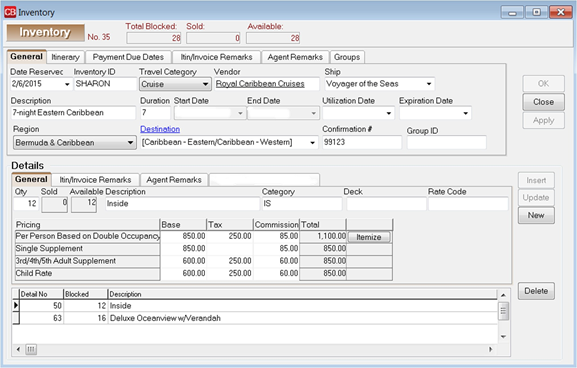
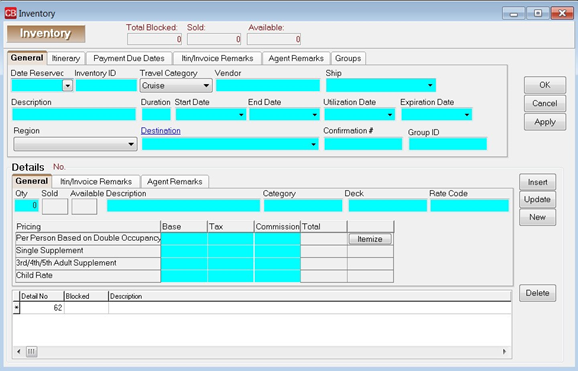
General Tab (Top) Depending on the Travel Category selected, different tabs of information appear with different fields of information within those tabs.
- Date Reserved: Manually enter or choose date from the drop-down menu. This is the date this block space is reserved.
- Inventory ID: This unique ID is user definable and can be used to query your inventory items. For example, our Cruise ID might read, CR110104 (using CR for cruise and the date).
- Travel Category: From the drop-down menu, select the appropriate Travel Category from Air, Cruise, Hotel, Miscellaneous, Rail or Tour.
- Vendor: Type in a few letters of the vendor's name and choose vendor from drop-down menu.
- Airline/Ship/Property/Rail/Service Provider: Fill in the Service Provider profile that applies. For example, our vendor is Royal Caribbean and the service provider would be Voyager.
- Description: Type in a unique description to identify this inventory item. For example, our cruise is described as Western Caribbean (Location of cruise)
- Duration: Type the number of days of the item.
- Start Date: Type the start date of the item or double-click the start date off the calendar accessible from the drop-down menu.
- End Date: Type the end date of the item or double-click end date off the calendar accessible from the drop –down menu.
- Utilization Date: Type when this item can be used, or double-click the utilization date off the calendar accessible from the drop-down menu. The utilization date can also mean the date by which the Inventory must be sold to avoid penalty. Agency can choose either interpretation.
- Expiration Date: Enter date when this item can no longer be used, or double-click the utilization date off the calendar accessible from the drop-down menu. This is important because by entering an expiration date, agents are prevented from pulling inventory into Res Cards after this date, and ClientBase automatically removes all expired inventory from any query results when launched from the Res Card Inventory button. You can still query expired inventory from your Inventory Manager, as the record still remains in the database. (If an inventory record has the Expiration Date set to today, the inventory continues to appear in query results and is not considered expired until the day after the expiration date.)
- Region: If you are tracking where clients are traveling, from the drop-down menu, select an area.
- Destination: Enter the region/destination of the trip from a detailed list in the drop-down menu.
- Confirmation #: Enter a confirmation number.
- Group ID: Track details of group cruise contracts. If a user adds a Group Name and a Group ID to the same Inventory record, the Group ID and Group Name are now associated. When an Inventory Group is viewed from the Group List, any associated Group IDs are listed under Linked Inventory Group IDs. (This field only displays if there are Group IDs linked.)
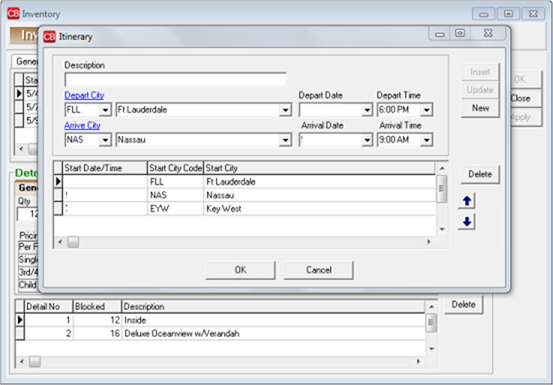
Itinerary Tab (Top)
To enter detailed itinerary information to print on Itineraries|Invoices generated from Res cards click the Itinerary Tab:
- Click Itinerary to complete all desired fields.
- Click Insert to add information
- To add an additional item, click
- To edit an item, select it, change the data, and click Update.
- To remove an item, select it, and click Delete.
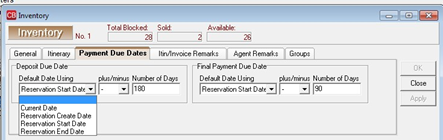
Payment Due Dates Tab (Top)
- Deposit Due Date: From the drop-down menu next to Default Date Using, select Current Date, Reservation Create Date, Reservation Start Date, or Reservation End Date. Next, from the drop-down menu select the plus or minus sign and choose the number of days from 1 to 2000 to use in combination with the Default Date Using
- Final Deposit Due Date: From the drop-down menu next to Default Date Using, select Current Date, Reservation Create Date, Reservation Start Date, or Reservation End Date. Next, from the drop-down menu select the plus or minus sign and choose the number of days from 1 to 2000 to use in combination with the Default Date Using field.
Note: These dates will be used when creating Reminders.
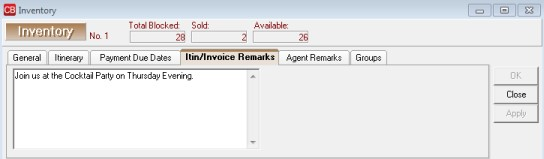
Itin/Invoice Remarks Tab (Top)
Enter free-flowing Itinerary/Invoice Remarks that appear on the generated Itinerary and Invoice in the Res card.
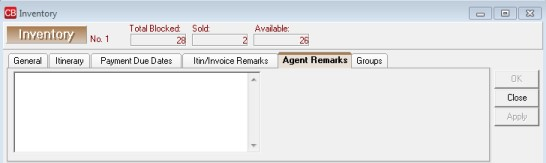
Agent Remarks Tab (Top)
Enter free-flowing remarks that do not appear on the generated itinerary and invoice.
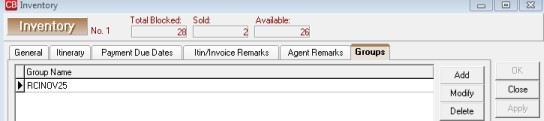
Groups Tab (Top)
Add a Group name to the inventory record.
Details (Bottom)
General Tab
- Qty: Type in the number of available items. For example, we have 20 inside cabins and 10 outside cabins.
- Sold/Available: This area keeps track of what has been sold and what is still available
- Description: Type in any identifying description such as with our cruise – outside cabins or inside cabins.
- Class of Service/Category-Deck/Room Type/Tour Name: Depending on the Travel Category selected in section above, fill in the appropriate data. With our cruise we are entering Category 8 Empress Deck.
- Rate Code: Track details of a group cruise contract.
- Pricing/Base/Tax/Commission: For each item, fill in the Base Price, Tax, and Commission on Per Person Based on Double Occupancy, Single Supplement, 3rd/4th/5th Adult Supplement, or Child
- Click Insert to add information to data entry screen below. To add an additional item, click New. To edit an item, select it, change the data, and click Update. To remove an item, select it, and click Delete. The more complete your pricing information within your Inventory Detail, the more accurate the default pricing is when your agents are pulling from this inventory record
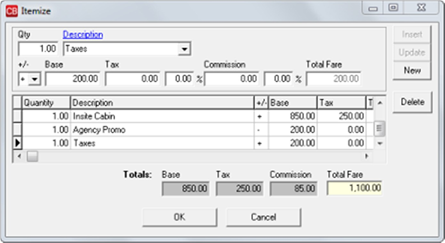
- Itemize: Click the Itemize tab to bring up a screen to itemize the total fare if you want more detail to print on the Itinerary/Invoices generated in the Res Card.
Itin/Invoice Remarks Tab (Bottom)
Enter free-flowing Itinerary/Invoice Remarks that appear on the generated Itinerary and Invoice in the Res card.
Agent Remarks Tab (Bottom)
Enter free-flowing remarks that do not appear on the generated itinerary and invoice.