Introduction
Agencies today are choosing to change the way they make their bookings. Many are dropping out of ARC/BSP and booking air tickets through a Host Agency. They may also book some or all or their cruise and tour business with a Host Agency, or continue doing those bookings as they always have. These Independent Contractors (IC) agents working through a Host Agency, may still operate a store front location, or move into a "home based" environment.
ICs must setup ClientBase with Host Codes and have a way to send invoices issued in ClientBase to the Host Agency. They also may want to import travel history from the Host Agency into ClientBase.
Travel type names should be aligned between the Host and IC databases so they link to the correct travel type during the import/export routines. The order within the Travel Type list has no consequences, just the travel type text. Example:
Host has ship-deposit
IC has cruise-deposit
Suggestion: The IC changes their travel type name to ship-deposit to align with the host. The text needs to match exactly.
Setup of Host Codes
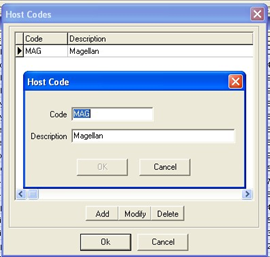
Setup a Host code in ClientBase by going to Global Defaults|Res Card Defaults|Host Codes. The IC creates Host codes for one or more Hosts. This code is one that the Host has given the IC to use. The Host needs to know the code you are entering so they can run specific reports in both Trams Back Office and Trams Crystal Reports using this code.
Issue Invoices in ClientBase to be Sent to Host
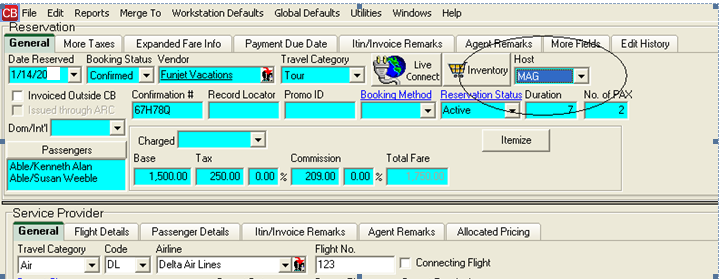
Air/Car/Hotel bookings are created using the Host GDS and the Merge To PNR feature of ClientBase. Tour/Cruise and other bookings are created manually or using ClientBase Live Connect. In ClientBase, the IC creates reservations and adds the Host Code from the drop-down menu. This Host Code is setup with the name of the Host as outlined above, i.e. MAG. The invoice is generated as normal. The Host Code is added to and saved in the invoice at the reservation level in ClientBase.
IC Has Agreed To Share Client Profile Information With The Host
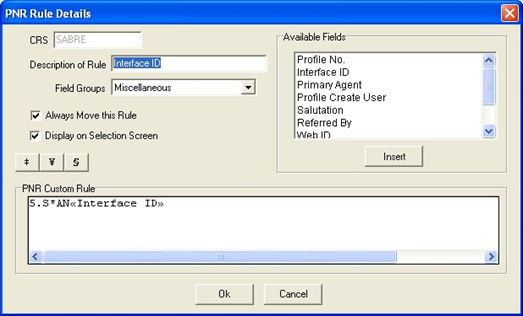
IC uses Merge To PNR as normal, transferring the Client Interface ID from the profile to the PNR created in the Host GDS. All bookings created by the IC in the Host GDS are interfaced by the Host under individual profiles in the Host database.
IC Has Agreed NOT To Share Client Profile Information with the Host
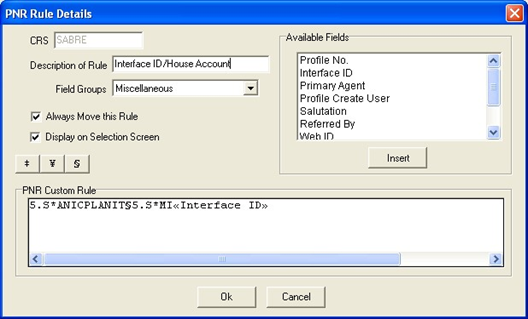
IC globally creates an additional “House Account” Interface ID under Merge To PNR Rules that always moves. This single House Account ID would then be selected from each profiles Merge To PNR screen, while deselecting the profiles primary Interface ID. All bookings created by the IC in the Host GDS are interfaced by the Host under one single House Account profile in the Host database.
Additionally, a Marketing Identifier (*MI) code can be used to track the individual client interface ID. While the host’s system will track each booking under the house account, the marketing identifier will be passed onto the IC during the IC interface process.
Transmit Invoices to Host Agency
The IC does a PNR Import of the PNR’s created in the Host GDS for its Air/Car/Hotel reservations. These reservations import into each of the ICs client profiles. These reservations will show as invoiced in the ICs ClientBase database but will not be included as part of the Export file to the HOST for any Tour/Cruise or other bookings. The Host will capture these bookings when doing his normal Interface Download and Processing. The IC needs to export only Tour/Cruise and other booking reservations created in ClientBase by setting up the Trams Export Utility.
1) The IC produces an export file using the Trams Export Utility. Open the Trams Export Utility found on the Trams website here: Sabretravelnetwork.com/Trams – it’s under Products|IC/Host Utility. Make sure to save this file to Program Files|Trams|Common Files.
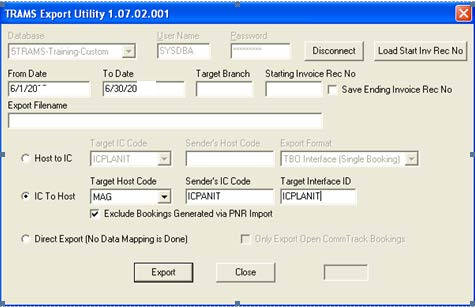
Database: Select the database from the pull-down menu (default is Trams).
User Name/Password: Enter User Name and Password for database, click Connect.
From/To Date: Enter dates you want to create export file for.
Export Filename: Enter the path to which to save your export file. The example shows the file being saved in a "temp" folder, but you can create any folder to save the file to, or save it to the "desktop." If you save it to the "temp" folder, make sure that you have a "temp" folder created on your computer or the export will error out when it can’t find the non-existent folder. If you are exporting more than one file (to two different Host Agencies, for example), be careful about naming files, as the default gets overwritten each time a new file is generated.
IC to Host: By default a Target HOST Code is defaulted. If you are working with more than one Host Agency, select the appropriate HOST code from the drop-down window. Enter the appropriate branch the HOST wants invoices to be processed to (this is important). As an IC make sure your IC Code is entered so that the Host knows that the records you send are from you as an IC. That identifies your IC records from other IC records the Host Agency may have in their database. (In this example, PLANIT is the sender's IC code.)
Note 1: If the IC has agreed to share Client Profile information with the Host, then currently the Export Utility will correctly pass all the individual profiles with Name, Address, Interface ID and the Primary Phone and E-Mail.
Note 2: If the IC has agreed NOT to share Client Profile information with the Host, then a single "House Account" profile needs to be specified in the Target Interface ID field of the Export Utility. This "single" profile ID when specified, captures all the IC bookings under one "House Account" profile in the Host database.
Send or e-mail file to the Host Agency to interface into TBO.
Import Travel History into ClientBase from Host Agency
As an IC that does NOT have TBO, but has ClientBase, you want to bring in travel history of invoices that have been created in the Host GDS, but with no segment or payment details.
Note 1 : This would most likely be used when the IC did not have access to a Host GDS or the Host is willing to keep track of the accounting details of bookings, so that the IC can focus on its selling efforts.
With access to a Host GDS, you could choose to do a PNR Import of the GDS bookings created by you as IC. If the Host is willing to keep track of the accounting details of bookings, so that the IC can focus on selling, then use the Import of Travel History option.
Note 2: New Profiles are created in ClientBase when processing the XML Travel History Import File. The XML Import currently does not import the Primary Phone or E-Mail address into the new profile.
1) Obtain an XML file created and sent to you by the Host and save somewhere on your computer.
2) Go to File|XML Import|Travel History Import
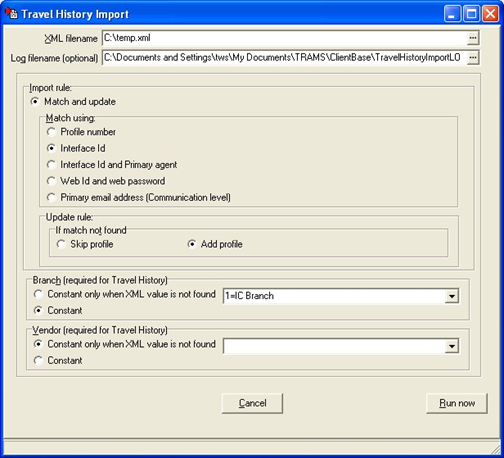
XML Filename: Enter the XML filename full path and filename of the XML file to be processed, or browse for file from the drop-down menu.
Log filename (optional): Enter the full path and filename of the log file, or choose file to append from drop-down menu. It is suggested that you create a log file.
Import rule/Match and update: Select this option to match selected profile-related information from the export file and attach data created at time of export to a profile if a match is found. If a match is not found, the profile data is added to the database as a new record and all data selected at time of export is attached to it. For Match and update, choose to match profiles using the Interface ID. Also select the Update rule by choosing Add Profile.
Branch (Required for Travel History) Pick One:
Constant only when XML value is not found: From the drop-down menu, select the default branch if value in the XML file is not found.
Vendor (Required for Travel History) It is highly unlikely that there will not be a vendor in the XML file, but pick one:
Constant only when XML value is not found: From the drop-down menu, select the default vendor if value in the XML file is not found. (Suggested dummy vendor profile or use of agency profile.)
3) You may be prompted with a listing of Travel Categories within the file that need to be mapped to the Travel Categories included within ClientBase. Click the arrow for a drop- down list of Travel Category choices to select from.
4) You are alerted when the import is completed, and you have the ability to view the import log and print out the import summary if desired:
5) Go to the Travel History tab in one of the profiles to see if travel history was imported correctly.