Associated Debtors
Individual companies or Debtors may belong to a larger company group. This relationship can be reflected in CCTE by using the Associated Debtors function, allowing for easier navigation between each file using a drop down list.
A Debtor file may only belong to one associated Debtor group at a time. Accounting transactions between Associated Debtors are not linked.
Creating an Association
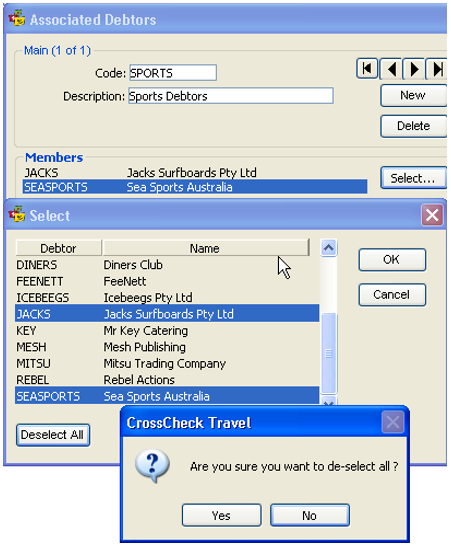
- Open a Debtor file to be included in the association, select Options, then Associated Debtors from the main CCTE menu bar to open the input window (or, right-click anywhere in the Debtor window, and select Associated Debtors).
- Click on the New button, to start a new Debtor grouping.
- Enter an appropriate Code to be used for this association.
- Enter a Description for the Debtor grouping. This field is free text.
- Click the Select button to show a list of all Debtors in the CCTE application.
- Use the mouse and scroll bars to find and highlight ALL debtors to be included in the association. It is important to select the currently open Debtor.
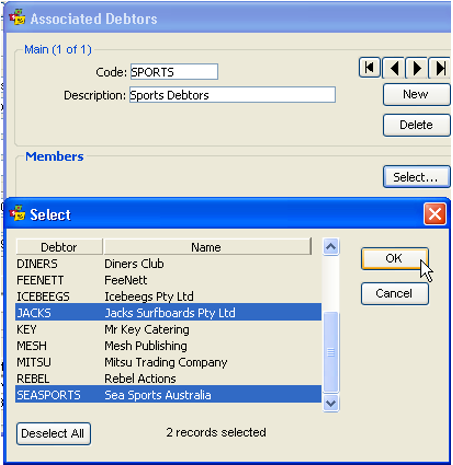
- Click on OK to finalize the selections. The selected debtors are displayed under the Members area of the associated debtors screen.
- Click on OK to complete the creation of the Associated Debtors.
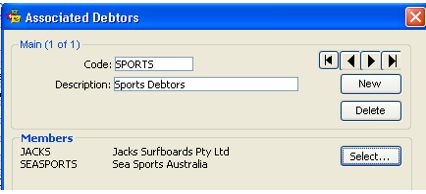
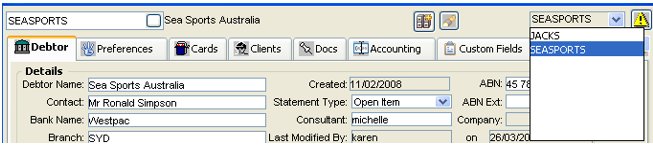
The Associated Debtor codes can be seen in the drop-down selection box located at the top of the Debtor File window. Move between Associated Debtors by clicking on the codes in this list.
Removing a Debtor from an Association
- Open any Debtor file that is part of the association and select Tools, then Associated Debtor from the CCTE menu bar to open the input window.
- Use the arrow buttons to locate the correct group.
- Click the Select button to display the list of Debtor files. Those highlighted are a part of this group.
- Click on the Deselect button, OR remove the highlight from the relevant Debtor individually.
- Click on the Deselect All button to remove all members from the group. This action displays a dialogue box asking for confirmation to delete the entire group. Click Yes or No depending on requirements.
- Click OK to be returned to the Associated Debtor input screens and click OK to save the change.
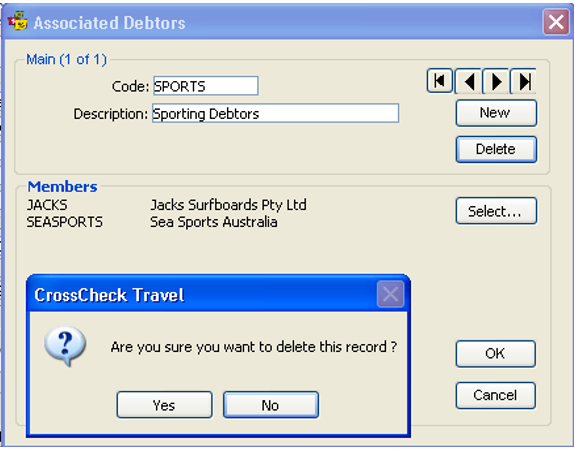
Deleting an Association
- Open any Debtor files and display the input screen by selecting Associated Debtors from the drop down menu attached to the Tools heading on the main menu bar.
- Use the arrows to locate the group code to be deleted.
- Click on the Delete button, click Yes in the dialogue box, then click OK to save the change.