
This is part 2 of 6 in our series on managing groups in Trams Back Office.
In this article we learn how to set up client profiles depending on how payments are going to be received. We also learn how to set up vendor profiles based on how payments are to be sent to the vendor.
The key question to ask when it comes to profiles is: Who’s Paying for the Group Travel? Is the agency collecting payments from one client (a Group leader) or from each member of the Group?
After determining if payment for Group travel is received from one source or from each traveler (multiple sources), select the Client profile configuration that produces the best accounting results for you.
- If each traveler pays individually, use individual client profiles just like you do for leisure travel bookings.
- If the agency plans to receive payment from one source for the entire Group, use one corporate profile like we do for corporate travel bookings.
The Group travel rule-of-thumb is: One Trams Client profile for every paying entity:
- If a Group has 50 participants and each participant is paying separately, 50 client profiles are used to record and track these payments.
- If payment for a Group of 100 participants is received from one entity, only one client profile is needed.
Steps if Receiving Payments from Many Participants
If participants are paying individually, multiple client profiles and multiple invoices/vouchers are used to record and track each customer's payments. These are all linked to the common Group name we set up in the section above entitled, Setting Up Your Group. This facilitates Group reporting by linking invoices/payments/invoices to this common Group name. (A customer’s travel history could contain both Group and non-Group expenditures.)
Step 1) If a Group participant already has a profile; do not create a second one. If payments start coming in, link the payment to the Group name as described above.
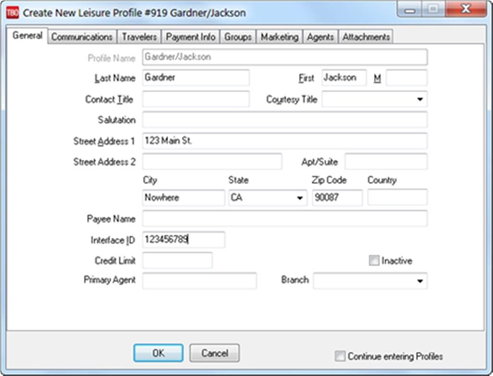
Step 2) Create a Leisure profile if none exists (by going to Profile|Client|Leisure) when payments start coming in. Link the payment to the Group name as described above. If you have a single payment from a couple or a family, create one Leisure profile for each household, and list family members under the Family Info tab. The Interface ID must be unique for this client, do NOT use the Group Interface ID. Completely fill out the profile. The more information collected, the easier the marketing to this client is in the future.
Steps if Receiving Payments from One Entity
When an organization or Group leader forms a Group and payment comes from one source, build one corporate profile in Trams Back Office. With this configuration, payments from individuals are not recorded in Trams Back Office. Instead, payments from the organization or Group leader are recorded.
Step 1) When first payments come in, query up the Group corporate profile you created in Section One above and click on the Travelers Tab.
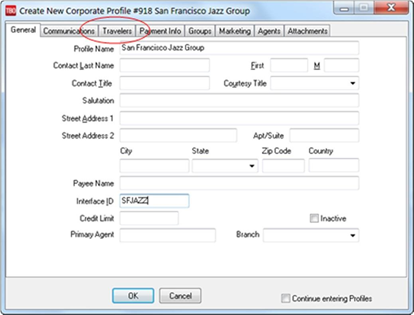
Step 2) Add each Group participant as a passenger under the Employee Info Tab. Click OK to save.
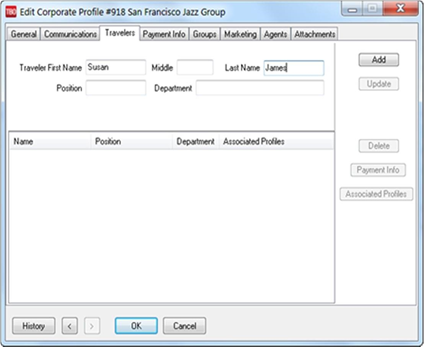
Step 3) When you have time, create Leisure profiles for each member. This allows you to market future trips to Group members. Although not required for Group accounting, it is recommended that you collect address and contact information for each member of the Group.
How to Handle Vendor Profiles
After determining how your agency receives payment from a Group, we need to decide how we are going to pay the vendors who are providing air, ground, accommodation, or meal services. If you are sending a Group to an existing vendor, use your existing vendor profile. For example, if you are sending a Group on a Carnival Cruise and Carnival is your only vendor, you can use your existing Carnival profile. If Carnival is only one of many vendors involved, then you can use the vendor profile we created in Section 1 as the master profile that tracks all Group payments, or you can use individual vendor profiles for each vendor providing a service.
Frequently Asked Questions
Q: If I send a check to a master vendor, won't the payee name on the check have to be San Francisco Jazz Festival if I have created one vendor profile name San Francisco Jazz Festival?
A: Yes, the Payee by default is the name of the profile. You can overwrite this by filling in the actual name of the vendor on the payment screen. There is a field that reads “Name on Check”. Put the name and address of the actual vendor there.
Q: If I use one vendor profile, when in fact I have five vendors, won’t I understate my sale to those vendors?
A: Using a master vendor profile is a recommendation, not a requirement. If you want to track your sales to each individual vendor, you may do so. This makes invoicing a bit more difficult and places more responsibility on your agents.
Note: Be sure to group all invoices and payments with the group code you previously set up and this will bring up all vendors on any reporting.
Let’s Review
- If each member of the Group is paying separately, create Leisure profiles for each member with a unique Interface ID.
- If you receive one payment from a couple or family, create one Leisure profile only and list family members under the Family Info tab.
- If you receive payment from one Group leader, create one corporate profile, and list the Group participants under the Employee Info tab.
- If you are sending a Group to an existing vendor and it’s your only vendor for this group, use your existing vendor profile.
- If you are using multiple vendors, use the vendor profile created in Section 1 as the master profile that tracks all Group payments, or you can use individual vendor profiles for each vendor providing a service.
Related Articles:
Groups in Trams Back Office: Part 1 – Setting Up Your Group
Groups in Trams Back Office: Part 3 - Group Invoices and Payments
Groups in Trams Back Office: Part 4 - Closing a Group