Skip To:
Opening Debtor Files
Creating a Debtor File
Opening Debtor Files
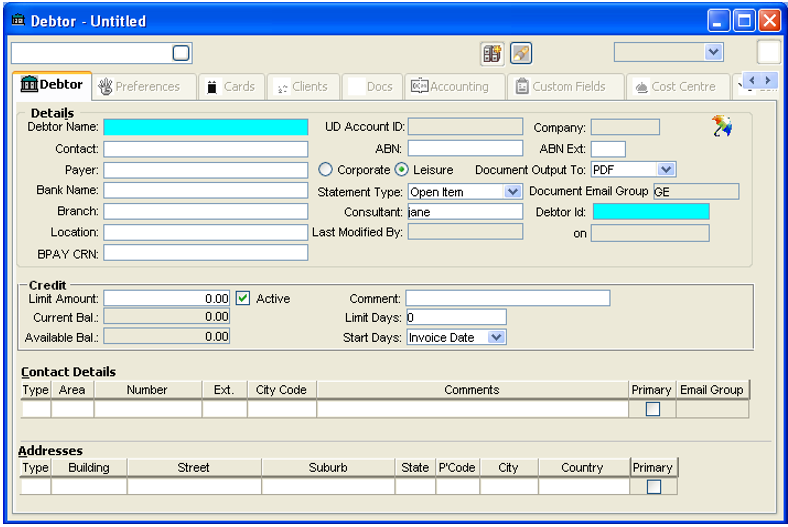
The Debtor file stores information about Debtor accounts. These are companies which owe your agency money. Debtors include corporate travel accounts as well as companies dealt with on a commercial basis.
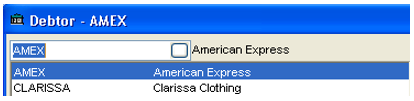
American Express and Diners are default Debtors provided with the application, and cannot be deleted.
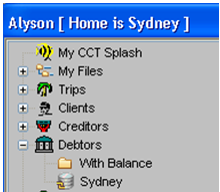
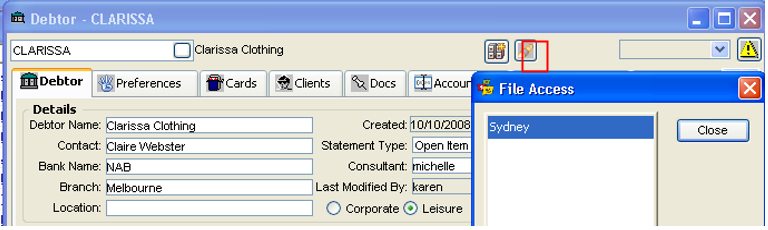
Debtor files are accessed from the MyCCT menus or from the Debtor icon on the CCTE standard toolbar. The folders in MyCCT display for all Debtor files with a balance, and all files in the database.

Once a Debtor file is open, switch to another file by selecting from the dropdown list at the top of the Debtor File window.
Or it is possible to Search from  and an additional dropdown screen will appear.
The  Set Home key shows which Branch(es) have access to a particular Debtor.
Creating a Debtor File
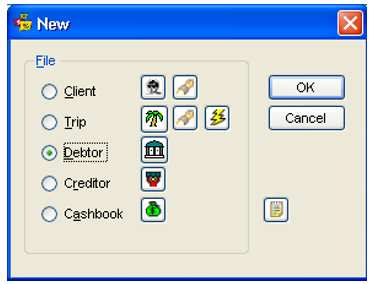
Click New on the standard toolbar and select Debtor then click OK.
A blank Debtor file will be displayed with Debtor Name and Debtor ID marked as mandatory fields.
Note: The Cost Centre tab will only be available if the Supervisor has activated this functionality. Please see CCTE Finance User Guide for further information.
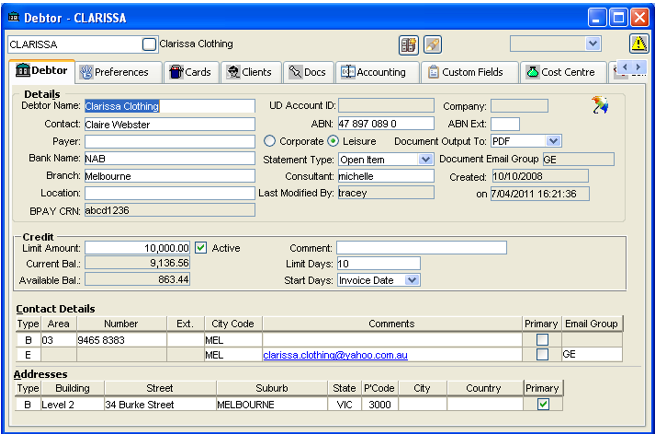
Debtor Tab
Enter the full company name in the Debtor Name field and create a Debtor ID code using a maximum of 12 characters. The Debtor ID field only appears when creating a new file, and is replaced with the Creation date once the file has been saved.
All other fields on the screen are optional. The recommended procedure is to fill in the mandatory fields, click the Save icon, then fill in any remaining fields and information on additional tabs. Upon clicking Save, a prompt confirms if the invoice address is to be entered. Click Yes to continue entering information. This address information is used for all documentation. Once the file has been saved, the Debtor Id and Branch access will be attached.
Enter:
- The prime contact for the debtor account in the Contact field
- Bank name and Branch details into the relevant fields
- ABN and ABN Ext numbers
When a Debtor is created the Branch Access Key will have the Users Home Branch saved in it. Only this Branch can access this Debtor. The default security settings allow Users in the Manager User Group to open the key and give access to other Branches, if Multi branching was applicable – see CCTE Multi Branching Guides,Answers 42423 and 42425 in Ask Travelport for further information.
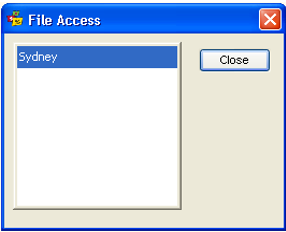
When a Debtor is created the Branch Access Key will have the Users Home Branch saved in it. Only this Branch can access this Debtor. The default security settings allow Users in the Manager User Group to open the key and give access to other Branches.
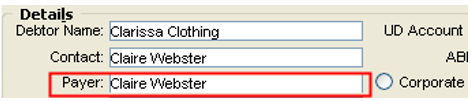
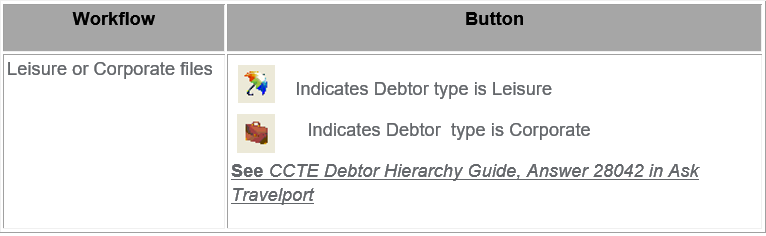
In both Corporate and Leisure Debtor types, the Payer field, if completed, will populate automatically to Debtor Receipts.
Select the Statement Type from:
Open Item
Shows all invoices that have not been fully paid, plus all receipts and invoices for the current period. An aged balance break up is also provided.

Balance Forward
Shows only a brought forward balance plus all receipts and invoices for the current period.

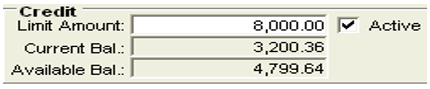
The Credit Field
The amount of credit being offered to the debtor can be set on the Limit Amount field. The Current Bal and Available Bal are generated by the system and are unable to be modified.

The Active tick box is used to activate the Debtors credit arrangements. If un-ticked, the screen displays a warning that Credit is stopped. If Active, the current and Available Balances constantly adjust as invoices are paid.
For Debtors who have not provided an ABN number, this box should be un-ticked to prevent invoice production. By default, CCTE only provides this option to Managers. However this can be adjusted if required, see CCTE Finance User Guide.
The Limit Days field is used to stipulate the number of days the Debtor has in which to make payment. This is used in conjunction with the Start Days field which indicates when the Limit Days is counted from. The options are Invoice Date or Month End. Enter any related comments in free text format in this field.
Where a BPAY CRN is allocated to a Debtor the CRN will generate to Debtor documents as per the document setup in the supervisor settings.
Note: Where a Debtor document is generated from a trip file e.g. an invoice where the Client / Debtor association exists, the document will be generated with the relevant Debtor CRN.
Enter Address and Phones details. Use Ctrl+N to create additional lines.
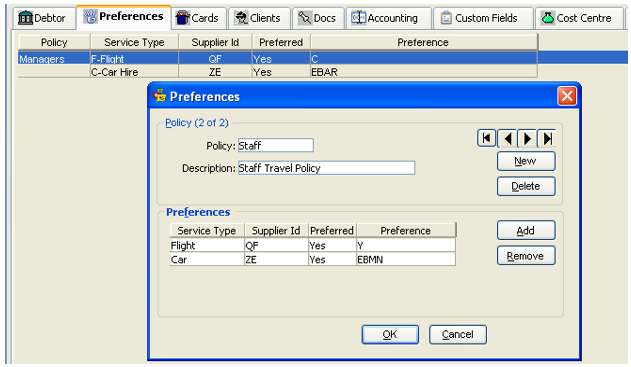
Preference Tab
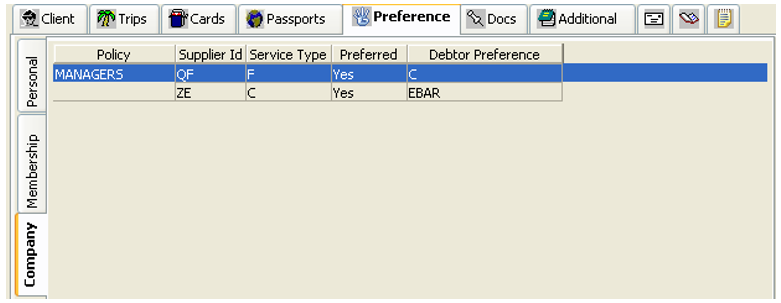
The Preferences tab is used to store the company’s preferred travel arrangements, grouped into Policies. These preferences can be transferred to any linked clients and are displayed on the Company tab of the Client file Preferences tab. Preferences must be added and saved. For an outline of the steps, see "Company Preference Tab" in Module 4: Client File.
Adding a Preference
Take the following steps to add a preference:
- Highlight the Preference tab and click the New icon on the standard toolbar to access the Preferences input window.
- Enter a short name for the policy in the Policy field and fill in a brief description.
- Preferences are set using the small table in the lower section of the screen.
- Select the appropriate Service Type from the list.
- Enter the supplier code into the Supplier ID field (F12 or double click the field for a list).
- Select Yes or No to indicate if the supplier is preferred or not.
- Enter additional details about the preference, such as cabin class, in the Preference field.
- To enter additional preferences for the policy, click the Add button. Once all preferences have been added, click the OK button, or to start a new policy click the New button.
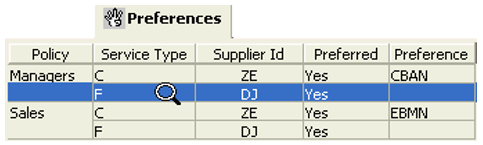
Editing Preferences
Preferences can be changed by re-opening the input window. Double click on the Policy to be changed, from the list under the Preferences tab.
Deleting Preferences or Policies
To delete an entire Policy, ensure the correct Policy is displayed by using the Arrow buttons then click the Delete button. A prompt will ask to confirm the action. Click Yes to delete the entire Policy Record.
Individual preferences belonging to a Policy can be deleted. Locate the required policy. Using the mouse, highlight the Preference line to be removed and click the Remove button.
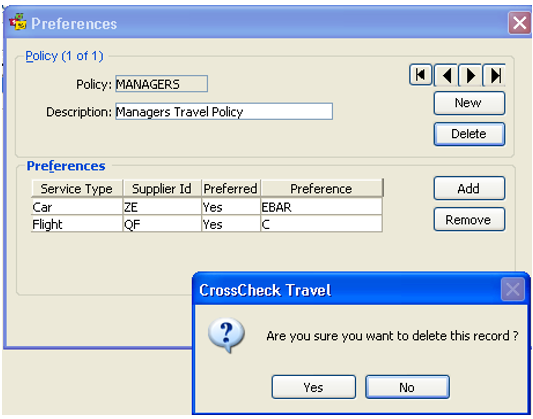
A prompt will ask you to confirm the action. Click Yes to delete this preference.
Linking Debtor Preferences to the Client File
The company preferences recorded in the Debtor file can be linked to an individual client file.
- Open the Client file and click on the Preferences tab and then on the Company tab.

- Press Ctrl+N to display the Preference selection screen.
- Locate the Preference required using the arrow buttons if necessary.
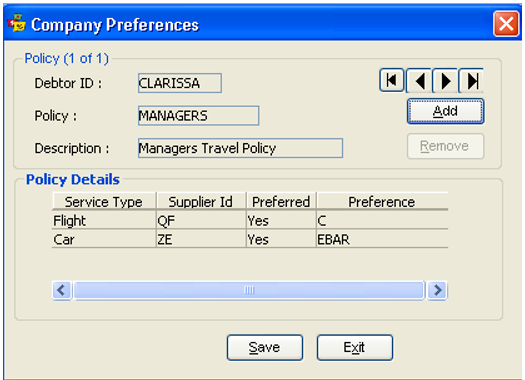
- Click on the Add button.
- If required use the arrow buttons to display any other policy to be added and carry out the same procedure.
- Click on the Save and Exit buttons. The company preference will then appear on the client file.
How to Remove a Preference Policy
- In the Client file open the Preference screen and highlight the Company tab.
- Double click on the Preference to be removed to re-display the Preference selection screen.
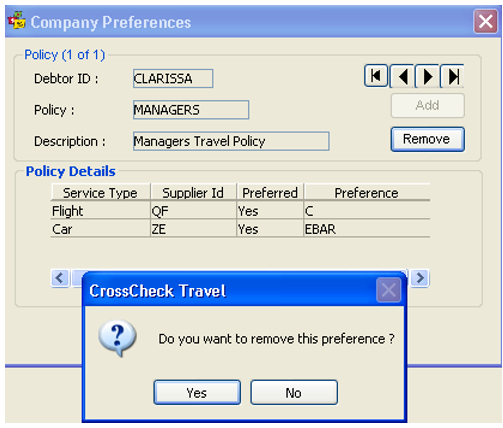
- Click on the Remove button.
- A confirmation message will be displayed, select Yes.
- Click on the Save and Exit buttons.
Cards Tab
The Cards tab is used to store all company credit card details. These details are automatically transferred to any Linked Client files (if the Active field is set to Yes).
Entering Card Details
Take the following steps:
- Enter the Card Type and Card Number.
- The Expiry Date must be entered in the MM/YY format.
- Use the Comment free text area to make any additional notes about the card.
- Select Yes in the Active field if this card is to be made available to linked Client files.
- To enter more Credit Cards, click the New icon on the standard toolbar or press Ctrl+N.
- To save your entries click on the Save icon or press CTRL+S.
Clients Tab
A list of all client files linked to this Debtor is displayed on this tab. The linking of client files to debtor files can be performed from either file.

Once the two files have been linked:
- Debtor contact details are displayed in the Client file and can be accessed for invoicing.
- Debtors credit card details can be accessed through the Client file, depending on the Active field on the Card tab, and used for payment of services.
Documents Tab

CCTE will save the document at the location when it is saved or emailed as WORD or PDF. It will also record the history of the documents which were saved, printed or emailed. The history will display in the DOCS tab page on DEBTOR profiles for its documents. The saved document can be viewed by clicking on the hyperlink.
Note: External documents are not able to be saved within a Debtor\Documents tab, this feature is only available for Trip and Client files. For more details, see Module 4, Client/Docs Tab.