Skip To:
The Preference tab is used to store preferred travel options for a Client. There are three different sections which are accessed by the tabs on the left hand side of the window. The third tab, Company, only appears after a Client is linked to a Debtor.
Personal Preferences
This section is used to store the client’s personal preferences. These are added according to their Service Type - Flight, Car or Hotel.
To enter Personal Preferences:
- Make a selection for the Service Type field by clicking the drop-down arrow
- Enter the Supplier ID or access the Search box by double clicking or pressing F12 in the Supplier ID field.
- Select either Yes or No from the Preferred field drop-down menu.
- Selecting No indicates the Client prefers to not use the supplier selected.

The Preference field requires specific codes depending on the Service Type selected. Double click or press F12 on the Preference field, select from the search box the click OK.
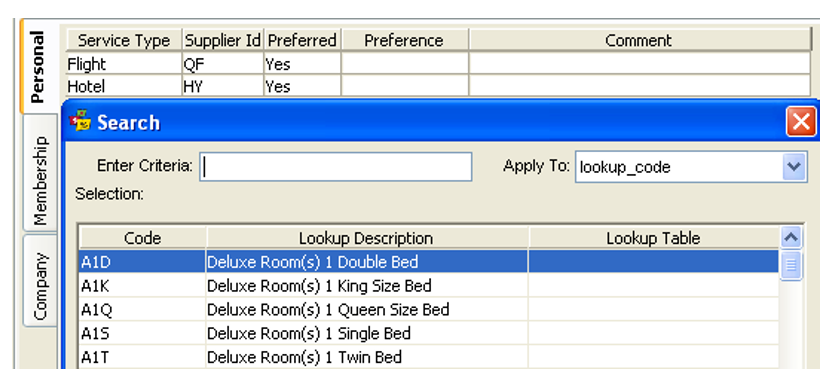
The Comment field is used to enter additional, free text comments. To enter additional Personal Preferences, click the New icon on the standard toolbar or press Ctrl+N to create new lines. It is possible to make multiple entries for each Service Type as demonstrated.

Membership Preferences
The second sub tab of the Preference tab is the Membership tab. This area is utilised to store all information in relation to Frequent Flyer memberships, otherwise known as Frequent Traveller Cards (FQTV). Frequent Rental (Car) or Frequent Guest (Hotel) memberships are classed as Club Membership.
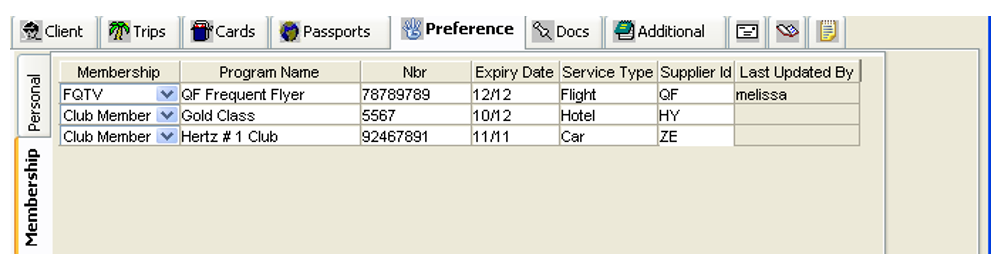
- Click on the drop-down menu under the Membership heading and select the type
- Enter a Program Name, e.g. Silver Kris, Gold Member
- Type the Membership Number in the Nbr field. If the number is too long, it can be entered under the Additional tab.
- The Expiry Date is entered as MM/YY (i.e. 01/09)
- Select the Service Type from the drop-down list
- Enter the Supplier ID or make a selection from the Search box (F12 or double click the field)
New lines can be added by clicking the New icon or pressing Ctrl+N
Note: During the upload of client information to Smartpoint, only the Frequent Flyer details (FQTV) are transmitted. To include other membership information, it must be entered under the Other Upload area on the Additional tab.
Company Preferences
Company Preferences are available once the Client is linked to a Debtor.
To enter Company Preferences:
- Select the Company tab and press Ctrl+N (or click the New button on the standard toolbar) to open the Company Preferences window and select the policy to be added.
- Use the arrow buttons to scroll through the policies created in the Debtor until the appropriate one is displayed.
- Click Add to transpose the details to the Client file.
- Once all policies have been added, click Save then Exit to return to the Preferences tab.
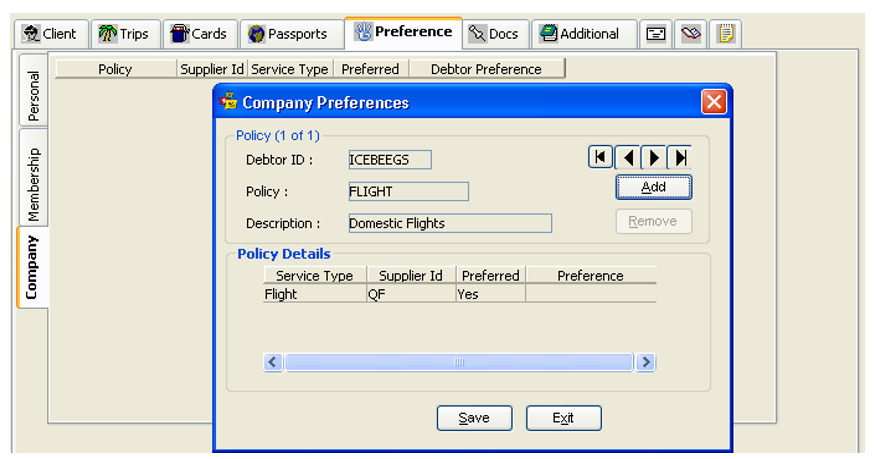
For details on the creation of Company Policies and Preferences, see "Preference Tab" in Module 7: Debtor File.
Removing Company Preferences
To remove a company preference:
- Press Ctrl+N to open the Company Preferences window
- Use the arrows to display the policy to be removed and click the Remove button
- Answer Yes to the confirmation prompt
- Click Save then Exit once all policies have been removed