Skip To:
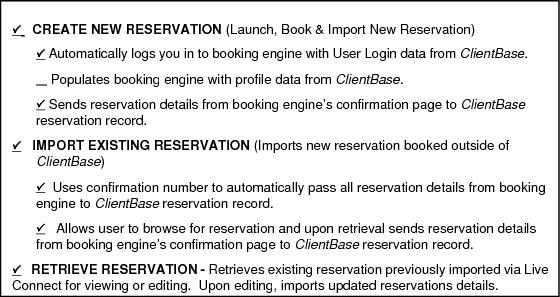
Live Connect Features Supported by Casa Travel
Casa Travel supports the following Live Connect Features if checked:
Casa Travel for ClientBase Windows
If you are not currently registered to book Casa Travel on-line, go to
http://www.casatravel.com/profile.php to enroll. Upon completion of the registration you will receive a User ID and Password and can take the following steps to setup ClientBase.
- Set Up Casa Travel Live Connect (Windows)
- Create New Reservation in Live Connect (Windows)
- Import Existing Reservation Made Outside of ClientBase (Windows)
- Retrieve an Existing Reservation for Editing or Cancelling (Windows)
Set Up Casa Travel Live Connect (Windows)
Upon receiving User ID and Password, take the following steps to setup ClientBase for Live Connect.
Step 1) Make sure Casa Travel is set up as a Live Connect Provider by going to Utilities|Live Connect Providers, and clicking Add. (Or check the URL for accuracy.)
- Provider Name: Type Casa Travel.
- URL: Type http://www.casatravel.com/login.php
- Travel Category: Select Air from the drop-down.
- Import XML from: Select HTML Source.
Step 2) Set up for Live Connect agent logins can be done individually or globally for the agency. Users can set up their own logins by going to Utilities|My Login|Live Connect and clicking Add. To set up globally, go to Global Defaults|Res Card Defaults|Live Connect to enter the User Name, and Password that everyone in agency will use. When Live Connect is launched, the system first looks to see if there is login information at the User Login level, and if not, then looks at the global login.
- Live Connect Provider: Select Casa Travel from the drop-down list.
- User Name and Password: Enter the necessary fields based upon the login information provided to you when you contacted Casa Travel.
- The Agency Number and Code is not applicable.
Step 3) Retrieve the Casa Travel vendor profile from the Profile Manager (or create one if not in your database). From the General Info tab, click the Live Connect Providers button. Click Add, and select Casa Travel booking engine from the drop-down list. The Vendor Code is 24512795. In the Travel Category profile field, select Air from the drop-down menu.
Create New Reservation in Live Connect (Windows)
Step 1) When ready to book on-line, create a client Res Card and fill in the Agent, Status, Reservation Cycle, and Trip Name fields and select the travelers.
Step 2) Use the Add Reservation button to start a new reservation. Fill in the Vendor and Travel Category fields and then click Live Connect.

Step 3) Select the Casa Travel from the drop-down menu by Connect To (if not already defaulted), and then click Create New Reservations.
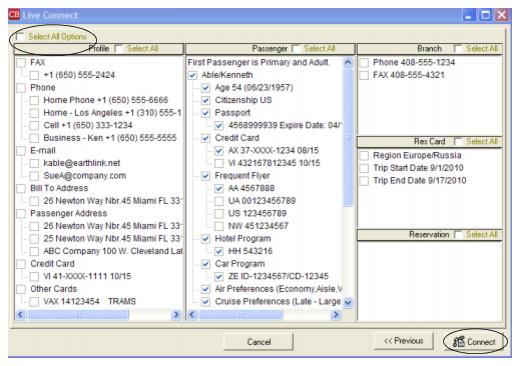
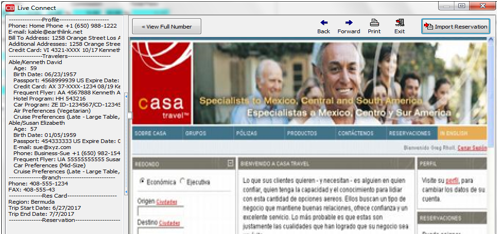
Step 4) Select any customer information to use to book the Casa Travel reservation. (This information is not sent to Casa Travel, but can be copied and pasted into reservation fields from top of launch screen.) Click Connect.
Step 5) Although still in ClientBase, you are now on-line at the Casa Travel booking site. Complete the reservations using instructions supplied by Casa Travel upon registration. When the reservation is confirmed, it automatically imports into the ClientBase reservation. All reservation data booked on-line is now located in the reservation fields in ClientBase.

Import Existing Reservation Made Outside of ClientBase (Windows)
Create a new reservation and click Import Existing Reservation. Enter the confirmation number or leave blank. If you have entered a confirmation number, the system automatically retrieves and imports the reservation. If no confirmation number is entered, when in the website, instead of creating a new reservation, go to the retrieve reservation area. Once the reservation details are showing, click Import and the details of the reservation are imported into the ClientBase Reservation record.
Retrieve an Existing Reservation for Editing or Cancelling (Windows)
To edit or cancel an existing reservation using Live Connect, follow these steps:
Step 1) Launch Live Connect from inside the reservation to edit or cancel in ClientBase.
Step 2) A dialog box appears. Click Retrieve Reservation.
Step 3) Live Connect launches the booking engine site. Edit or cancel the reservation using instructions supplied by the booking engine, and click Import Reservation. All reservation data edited or cancelled online is now located in the reservation fields in ClientBase.
Casa Travel for ClientBase Online
If you are not currently registered to book Casa Travel on-line, go to www.Casa Travel.com/profile.php to enroll. Upon completion of the registration you will receive a User ID and Password and can take the following steps to setup ClientBase.
- Set Up Casa Travel Live Connect (Online)
- Create New Casa Reservation in Live Connect (Online)
- Import Existing Casa Reservation Made Outside of ClientBase (Online)
- Retrieve Existing Casa Reservation for Editing or Cancelling (Online)
Set Up Casa Travel Live Connect (Online)
Upon receiving User ID and Password, take the following steps to setup ClientBase for Live Connect.
Step 1) Once you have obtained accurate login information, you need to add this Live Connect Provider into ClientBase by going to Tools|Settings|Live Connect Providers and clicking Add.
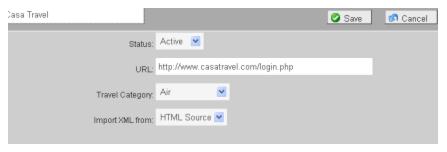
- Provider Name: Type Casa Travel.
- URL: Type http://www.casatravel.com/login.php
- Travel Category: Select Air from the drop-down.
- Import XML from: Select HTML Source.
Step 2) Each user can put in his own login information under Tools|My Login|Live Connect or enter one set of login information for a Live Connect provider for all agents by going to Tools|Settings|Live Connect Login. Click Add and enter the following information:
- Live Connect Provider: Select Casa Travel from the drop-down list
- User Name and Password: Enter the necessary fields based upon the login information provided to you when you contacted Casa Travel.
- The Agency Number and Code is not applicable
Step 3) Retrieve the Casa Travel vendor profile from the Profile Manager (or create one if not in your database). From the General Info link, click the Live Connect Providers button. Click Add, and select Casa Travel booking engine from the drop-down list. The Vendor Code is 24512795. In the Travel Category profile field, select Air from the drop-down menu.
Create New Casa Reservation in Live Connect (Online)
***Important Note: You must download the Live Connect extension for Chrome before using Live Connect with ClientBase Online. Chrome is the supported browser. Please click here for instructions on downloading the extension.
Step 1) Retrieve the desired client profile, create a new Res Card and after entering basic Res Card info, launch Live Connect by clicking Live Connect on the menu bar. (You can also launch Live Connect from the Profile action gear.)
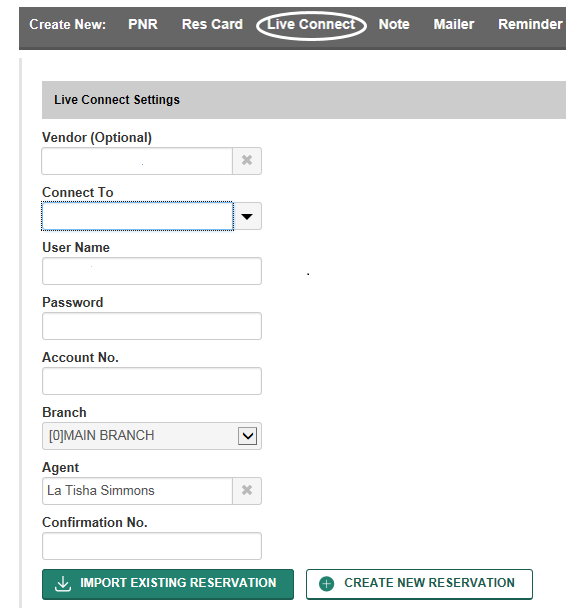
Step 2) Complete the Live Connect settings by identifying the vendor, the Live Connect Provider and appropriate Login information.
Step 3) Click the Create New Reservation button.
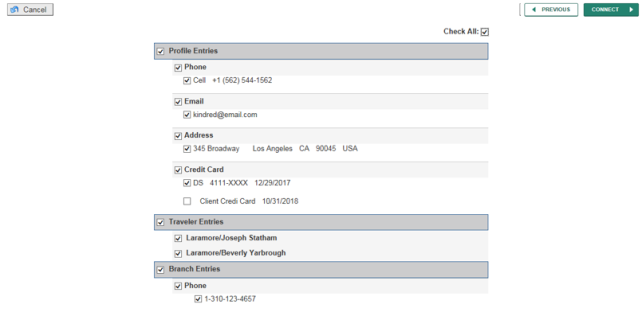
Step 4) Select any Profile, Passenger, Branch and Res Card information you want to use to book the reservation. This data is NOT passed to booking site, but you are able to view it at the top of your booking screen and can highlight it, copy, and paste it into the booking fields to save you time during the booking process. Click Connect to launch the on-line booking engine.
Step 5) Although still in ClientBase, you are now on-line at the Casa Travel booking site. Complete the reservations using instructions supplied by Casa Travel upon registration. When the reservation is confirmed, it automatically imports into the ClientBase reservation. All reservation data booked on-line is now located in the reservation fields in ClientBase.
Import Existing Casa Reservation Made Outside of ClientBase (Online)
Create a new reservation and click Import Existing Reservation. Enter the confirmation number or leave blank. If you have entered a confirmation number, the system automatically retrieves and imports the reservation. If no confirmation number is entered, when in the website, instead of creating a new reservation, go to the retrieve reservation area. Once the reservation details are showing, click Import and the details of the reservation are imported into the ClientBase Reservation record.
Retrieve Existing Casa Reservation for Editing or Cancelling (Online)
To edit or cancel an existing reservation using Live Connect, follow these steps:
Step 1) Launch Live Connect from inside the reservation to edit or cancel in ClientBase.
Step 2) A dialog box appears. Click Retrieve Reservation.
Step 3) Live Connect launches the booking engine site. Edit or cancel the reservation using instructions supplied by the booking engine, and click Import Reservation. All reservation data edited or cancelled online is now located in the reservation fields in ClientBase.