Tech Update 12/4/25: Issue: Upon connecting to the site, the reservation will be found with no error, but then when clicking on the import button, the result is 'Reservation details are not available for import."
Because of an issue with the XML on some reservation, the import for those specific reservations will not work. If you see this behavior, you will need to enter the reservation details into the Res Card manually. We have contacted the provider. We will remove this tech note once the issue has been resolved.
Tech Update: Warning Message: The message below in blue is generated by the Classic Vacations site and is only a warning. As long as you see the Reservation Number and Account number at the bottom left, please ignore the section in blue, and continue to complete the import. If there is an error on the bottom left instead, it is unrelated to this warning message, and the problem will be clear.
Skip To:
Classic Vacations Features
Classic Vacations support the following Live Connect Features if checked:

Classic Vacations for ClientBase Windows
Classic Vacations has a website where agents can book transactions with their own logins obtained through Classic Vacations. However, you must be registered to use Classic Vacations with Live Connect in ClientBase. To register, complete the enrollment form below and once completed, fax it to 408.882.8452.
Classic Vacations only provides a User ID and Password to Owner/Manager for use with ClientBase and this differs from the login used on the Classic Vacations website. There are no exceptions to this, as this is a precautionary measure to protect Agency Owners and Managers. Classic for Agents reserves the right to verify all information provided is accurate.
Classic for Agents Enrollment Form
After your request has been received, you will receive a confirmation of receipt. Please allow 2 - 3 weeks to process and receive an e-mail notification with your User ID and password.
- Set Up Classic Vacations (Windows)
- Import Previously Made Classic Vacations Reservation Details (Windows)
Set Up Classic Vacations (Windows)
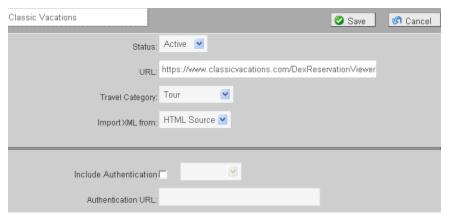
Step 1) Create a Live Connect Provider for Classic Vacations if none exists by going to Utilities|Live Connect Providers, and clicking Add. (It’s a good idea to check if the URL is correct.)
- Provider Name: Enter Classic Vacations
- URL: Enter https://www.classicvacations.com/DexReservationViewer
- Travel Category: Enter Tour from the drop-down menu.
- Import XML from: Enter HTML Source.
Step 2) Each agent should make sure to go into Utilities|MyLogin|Live Connect and delete out any Classic login that exists there as there are no longer individual logins.
Thereafter, the database administrator goes to Global Defaults|Res Card Defaults|Live Connect to enter the User Name, Password and Account Number which everyone in agency will use. Agency Code is left blank. This must be set up to use Classic.
Step 3) Create a vendor profile in ClientBase if one does not exist. From the profile manager, retrieve the Classic Vacations vendor profile (or create if it is not in database). From the General Info tab, click Live Connect Providers. From here, click Add, and select Classic Vacations from the drop-down list. The vendor code is CLA. Click OK to save.
Import Previously Made Classic Vacations Reservation Details (Windows)
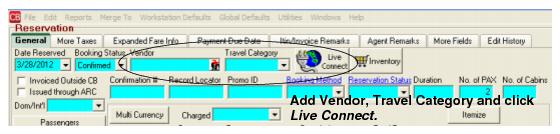
Step 1) Create a Res Card in ClientBase, enter the Res Card Cycle and Trip Name, and add a reservation. Select Classic Vacations as the vendor and enter the Travel Category and then click Live Connect.
Step 2) Select Classic Vacations from the drop-down menu by Connect To (if not defaulted), and then click Import existing reservation.
Step 3) Enter the confirmation number for the reservation you want to import into ClientBase. Click OK. **If your login credentials and reservation number are not present in ClientBase before connecting, the import will not work.
Step 4) Although still in ClientBase, you are now on-line at the Classic Vacations booking site. Once the reservation is displayed on your screen, click Import Reservation at the top of the ClientBase screen. All reservation data booked on-line is now located in the ClientBase reservation screen.
Classic Vacations for ClientBase Online
Classic Vacations has a website where agents can book transactions with their own logins obtained through Classic Vacations. However, you must be registered to use Classic Vacations with Live Connect in ClientBase. To register, complete the enrollment form below and once completed, fax it to 408.882.8452.
Classic Vacations only provides a User ID and Password to Owner/Manager for use with ClientBase and this differs from the login used on the Classic Vacations website. There are no exceptions to this, as this is a precautionary measure to protect Agency Owners and Managers. Classic for Agents reserves the right to verify all information provided is accurate.
Classic for Agents Enrollment Form
After your request has been received, you will receive a confirmation of receipt. Please allow 2 - 3 weeks to process and receive an email notification with your User ID and password.
- Set Up Classic Vacations (Online)
- Import Previously Made Classic Vacations Reservation Details (Online)
Set Up Classic Vacations (Online)
***Important Note: You must download the Live Connect extension for Chrome before using Live Connect with ClientBase Online. Chrome is the supported browser. Please click here for instructions on downloading the extension.
Step 1) Once you have obtained accurate login information, you need to add this Live Connect Provider if it does not already exist into ClientBase by going to Tools|Settings|Live Connect Providers and clicking Add.
Fill in the following fields:
- Name of the Provider: In blank field provided, type the name of the Provider.
- Status: Leave the default of Active. If you ever want to make it Inactive, go back in this area to turn off.
- URL: Enter https://www.classicvacations.com/DexReservationViewer
- Travel Category: Select Tour.
- Import XML from: Select HTML Source.
- Include Authentication: Leave blank.
- Click Save.
Step 2) Each agent should make sure to go into MyLogin|Live Connect and delete out any Classic login that exists there as there are no longer individual logins.
Thereafter, the database administrator goes to Tools|Settings|Live Connect Providers to enter the User Name, Password and Account Number which everyone in agency will use. Agency Code is left blank.
Step 3) Create a vendor profile in ClientBase if one does not exist. From the profile manager, retrieve the provider’s vendor profile (or create if it is not in database). In the General Info area, click Live Connect Providers. From here, click Add, and select provider from the drop-down list. The vendor code is CLA. Save. Make sure to make the Travel Type Tour.
Import Previously Made Classic Vacations Reservation Details (Online)
Step 1) Retrieve the desired client profile, create a new Res Card and after entering basic Res Card info, launch Live Connect by clicking Live Connect on the menu bar. (You can also launch Live Connect from the Profile action gear.)
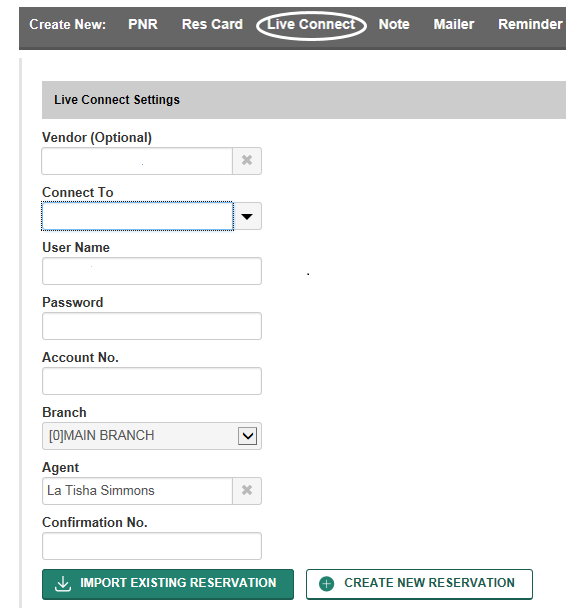
Step 2) Complete the Live Connect settings by identifying the vendor, the Live Connect Provider and appropriate Login information if not auto-populated.
Step 3) Enter the confirmation number for the reservation you want to import and click Import Existing Reservation. **If your login credentials and reservation number are not present in ClientBase before connecting, the import will not work.
Step 4) Depending on the Live Connect Provider, the system either locates the reservation using the confirmation number and automatically import all reservation details, or takes you to the Live Connect Provider's site for you to use its Retrieve Reservation feature to locate the reservation. Upon displaying the existing reservation, click on the Live Connect Extension, and then select Import Reservation. All reservation data booked on-line is now located in the reservation fields in ClientBase.
Note: If you do not have the Live Connect extension installed, click here for directions on installation.