Tech Update 9/18/25: You must access CBO using Chrome with the Chrome extension for the Live connect process to work with this provider. The Live connect Chrome extension version in the Edge browser does not recognize the reservations.
We have the fix finished, and once the update to the extension is sent to Microsoft Edge, then the Live Connect process will work in Edge. Until then, you must use Chrome for the import. If this Tech Update is still posted, then this issue is still ongoing.
Skip To:
Live Connect Features Supported by Delta Vacations
Delta Vacations supports the following Live Connect Features:
Delta Vacations for ClientBase Windows
If not currently registered to book Delta Vacations on-line, go to www.worldagentdirect.com to register and obtain a Delta Vacations user name and password.
- Set Up Delta Vacations (Windows)
- Create New Delta Vacations Reservation (Windows)
- Import Existing Reservation Made Outside of ClientBase (Windows)
Set Up Delta Vacations (Windows)
Upon receiving a user name and password, take the following steps to setup ClientBase for Live Connect.
Please note that you should already have an entry for World Agent Direct, which was their name for many years. Rather than following the steps below, you can modify and rename that entry to Delta Vacations. It will already have the correct URL.
Step 1) Edit the Live Connect Provider for Delta Vacations or create one if none exists by going to Utilities|Live Connect Providers. (It’s a good idea to check if the URL is correct.)
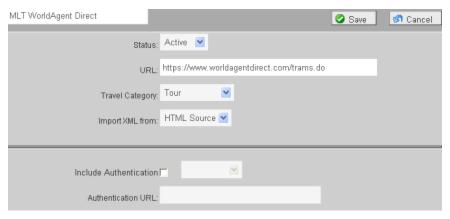
- Provider Name: Enter Delta Vacations.
- URL: Enter https://www.worldagentdirect.com/trams
- Travel Category: Enter Tour from the drop-down menu.
- Import XML from: Enter HTML Source.
Step 2) Create a vendor profile in ClientBase for Delta Vacations (if none exists), or look up and open your Delta Vacations profile. Click on the Live Connect Providers button and then Add. Choose Delta Vacations (or World Agent Direct if you have not changed it) and enter NWV for the Vendor Code.
Create New Delta Vacations Reservation (Windows)
Step 1) Click the Reservation Tab and Add in the Res Card. Fill in the Travel Category and Vendor fields and then click Live Connect.
Step 2) Select Delta Vacations from the drop-down menu by Vendor and Live Connect, then click Create New Reservations.
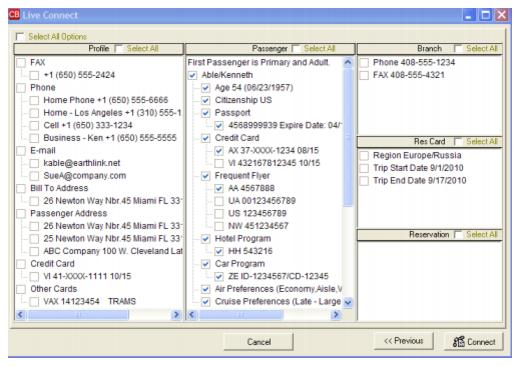
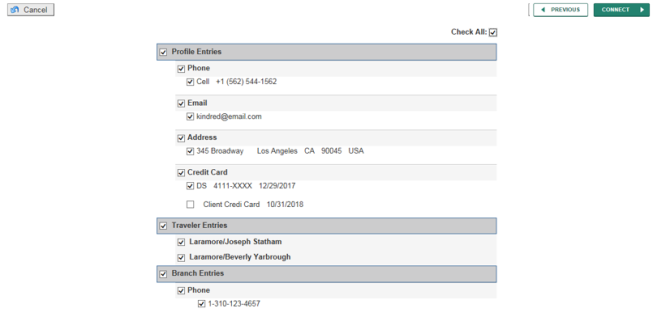
Step 3) Select any customer information to use for the reservation. This data is automatically passed to Delta Vacations and saves time during the booking process, as less fields need to be completed manually. Click Connect.
Step 4) Although still in ClientBase, you are now on-line at the booking site. Log in to the provider's website.
Step 5) Complete the reservations and when the reservation is confirmed, click Import Reservation. All reservation data booked on-line is now located in the reservation fields in ClientBase.
Import Existing Reservation Made Outside of ClientBase (Windows)
First, create a new reservation and click Import Existing Reservation. Log in to the provider's site. After logging in, find the area to retrieve the reservation. Once the reservation details are showing, click Import and the details of the reservation are imported into ClientBase reservation record.
Delta Vacations for ClientBase Online
If not currently registered to book Delta Vacations online, go to www.worldagentdirect.com to register and obtain a Delta Vacations user name and password.
- Set Up Delta Vacations (Online)
- Create New Delta Vacations Reservation (Online)
- Import Existing Delta Vacations Res Made Outside of CB (Online)
Set Up Delta Vacations (Online)
Upon receiving a user name and password, take the following steps to setup ClientBase for Live Connect.
Please note that you may already have an entry for World Agent Direct, which was their name for many years. Rather than following the steps below, you can modify and rename that entry to Delta Vacations. It will already have the correct URL.
Step 1) Once you have obtained accurate login information, you need to add this Live Connect Provider into ClientBase by going to Tools|Settings|Live Connect Providers and clicking Add.
Fill in the following fields:
- Name of the Provider: Enter Delta Vacations.
- URL: Type https://www.worldagentdirect.com/trams
- Travel Category: Select Tour.
- Import XML from: Select HTML Source.
- Include Authentication: Leave blank.
- Click Save.
Step 2) Create a vendor profile for Delta Vacations (if none exists), or look up and open your Delta Vacations profile. From the General Info link, click Live Connect Providers. From here, click Add, then select the Delta Vacations booking engine from the drop-down list (or World Agent Direct if you have not changed it) and enter NWV for the Vendor Code.
Create New Delta Vacations Reservation (Online)
***Important Note: You must download the Live Connect extension for Chrome before using Live Connect with ClientBase Online. Chrome is the supported browser. Please click here for instructions on downloading the extension.
Step 1) Retrieve the desired client profile, create a new Res Card and after entering basic Res Card info, launch Live Connect by clicking Live Connect on the menu bar. (You can also launch Live Connect from the Profile action gear.)
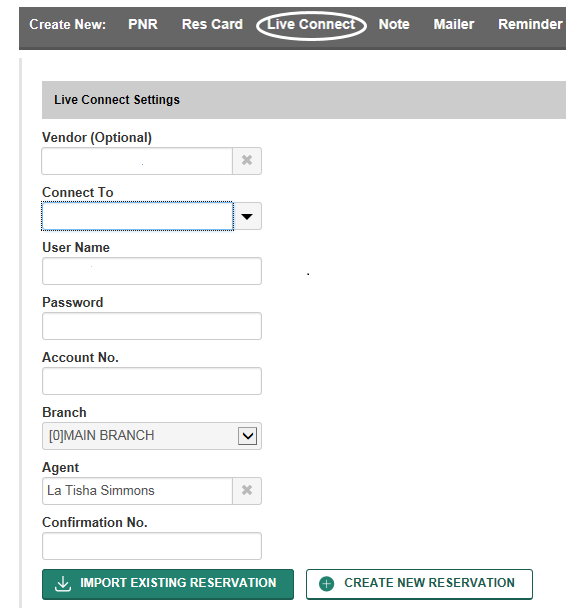
Step 2) Complete the Live Connect settings by identifying the vendor, the Live Connect Provider and appropriate Login information.
Step 3) Click the Create New Reservation button.
Step 4) Select any Profile, Passenger, Branch and Res Card information you want to use to book the reservation. Click Connect to launch the on-line booking engine.
Step 5) When the Live Connect box comes up, click on the circled link below to open a new tab for the Delta Vacations website.
Step 6) You are now on-line at the Delta Vacations booking site. Log into the provider's site. Complete the reservations using instructions supplied by Delta Vacations upon registration. When the reservation is confirmed, click on the Chrome extension to bring up the Import Reservation button. It will then automatically import into the ClientBase reservation. All reservation data booked on-line is now located in the reservation fields in ClientBase.
Import Existing Delta Vacations Res Made Outside of CB (Online)
Step 1) Create a new Res Card or open an existing one and launch Live Connect by clicking the Live Connect icon.
Step 2) Complete the Live Connect settings by identifying the vendor, the Live Connect Provider.
Step 3) When the Live Connect box comes up click on the circled link to open a new tab for the Delta Vacations site. Log in to the provider's site.
Step 4) After logging in, find the area to retrieve the reservation. Once the reservations details are showing, click on the Chrome extension to bring up the Import Reservation button. It will then automatically import into the ClientBase reservation. All reservation data booked on-line is now located in the reservation fields in ClientBase.