Tech Update 10/8/25: ID Travel Group has changed their site and at this time we do not have a new URL. Until we have more information, you will need to enter any reservation details manually.
Skip To:
-
Live Connect Features Supported by ID Travel Group
-
ClientBase Windows
-
ClientBase Windows Recording
-
ClientBase Online
-
ClientBase Online Recording
Live Connect Features Supported by ID Travel Group
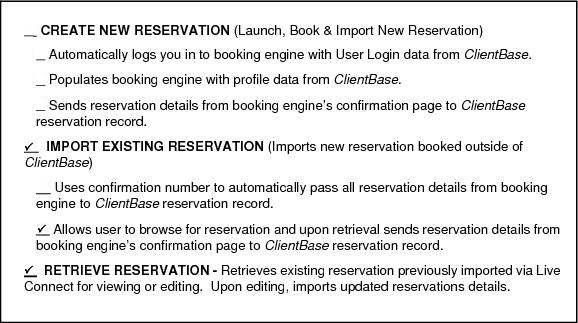
ID Travel Group supports the following Live Connect features if checked:
ID Travel Group for ClientBase Windows
To partner with ID Travel Group, please contact them at 914-833-3300. Once approved they will contact you with login credentials.
- Set Up ID Travel Group (Windows)
- Importing an Existing Reservation (Windows)
- Retrieve an Existing Reservation for Editing or Canceling (Windows)
Set Up ID Travel Group (Windows)
Upon receiving login information, take the following steps to setup ClientBase for Live Connect.
Step 1) Create a Live Connect Provider for ID Travel Group if none exists by going to Utilities|Live Connect Providers, and clicking Add. (It’s a good idea to check if the URL is correct.)
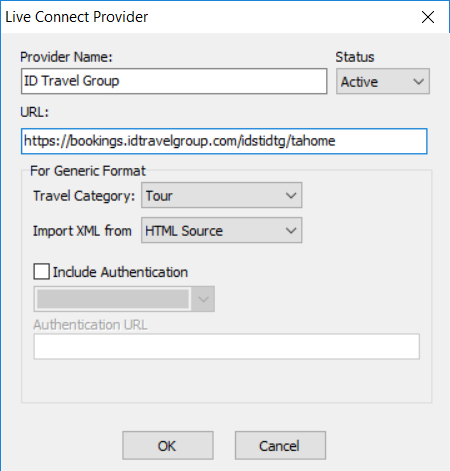
- Provider Name: Enter ID Travel Group.
- URL: Enter https://bookings.idtravelgroup.com/idstidtg/tahome
- Travel Category: Select Tour from the drop-down menu.
- Import XML from: Enter HTML Source.
Step 2) From the Profile Manager, retrieve the ID Travel Group profile (or create if not in database). From the General Info tab, click Live Connect Providers. Click Add, then select ID Travel Group from the drop-down list. The vendor code is IDSTIDTG. Click OK.
You should not set up your login credentials in ClientBase since, for security reasons, no information is passed to the provider site. You will be asked to log in at the site upon connection.
Importing an Existing Reservation (Windows)
Step 1) Create a new Res Card Reservation. Enter the vendor name and click Live Connect. Confirm that the correct Provider is selected and click Import an Existing Reservation. Enter a confirmation number or leave blank and click Okay.
Or
Step 1) Open or create a new Res Card. Click Live Connect in the lower right corner of the Res Card screen. Select the Provider and click on Import and Existing Reservation. Enter a confirmation number or leave blank and click Okay.
**You should not set up your login credentials in ClientBase since, for security reasons, no information is passed to the provider site. You will be asked to log in at the site upon connection.
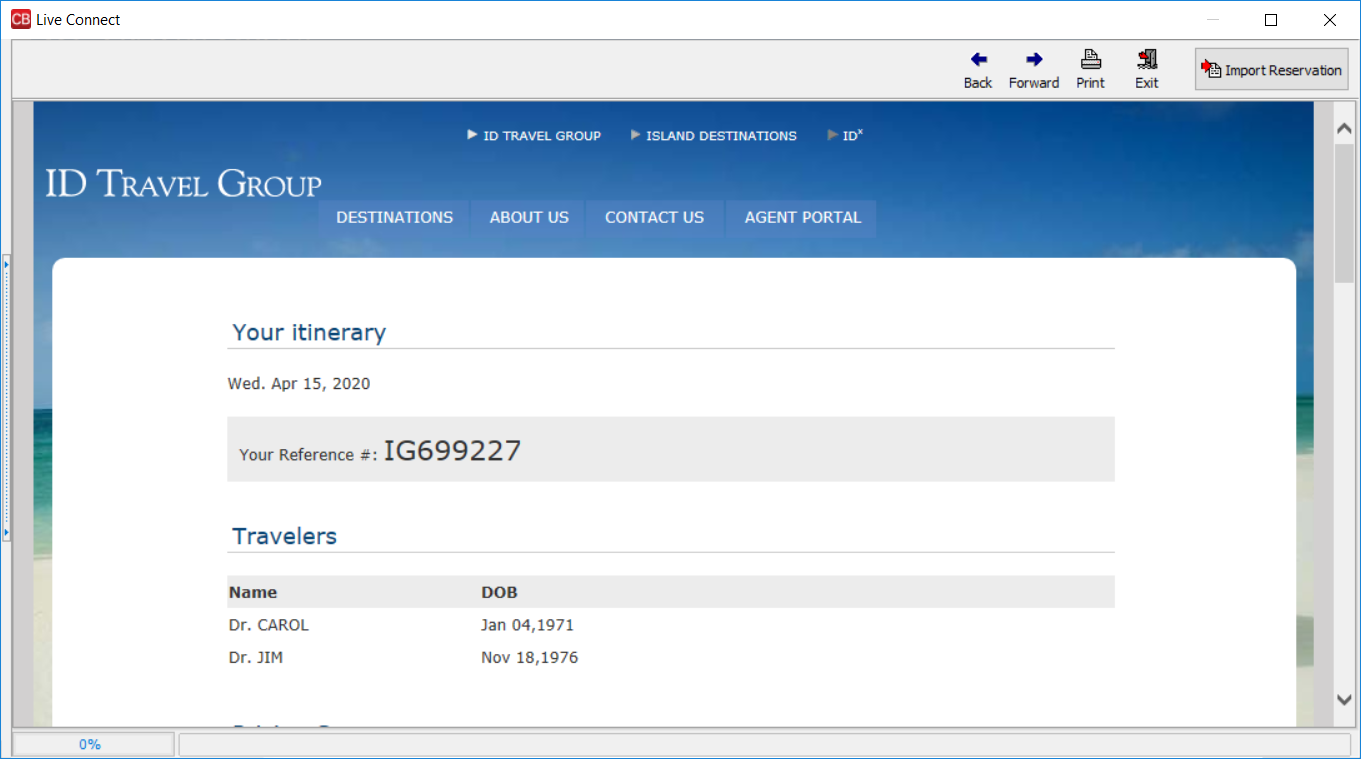
Step 2) Depending on how the provider implemented this feature, you may be taken directly to the booking confirmation, or you may need to retrieve the reservation on the site.
Step 3) When the booking details are displayed, click Import Reservation.
All reservation data booked on-line is now located in the reservation fields in ClientBase.

Retrieve an Existing Reservation for Editing or Canceling (Windows)
Step 1) Open your current Reservation and click on Live Connect. Click Retrieve Reservation.
Step 2) Depending on how the provider implemented this feature, you may be taken directly to the booking confirmation, or you may need to retrieve the reservation on the site.
Step 2) Edit or cancel the reservation using instructions supplied by the booking engine.
Step 3) When the reservation is confirmed and booking details displayed, click Import Reservation.
All reservation data edited or cancelled online is now located in the reservation fields in ClientBase.
ID Travel Group for ClientBase Online
To partner with ID Travel Group, please contact them at 914-833-3300. Once approved they will contact you with login credentials.
- Set Up ID Travel Group (Online)
- Importing an Existing Reservation (Online)
- Retrieve an Existing Reservation for Editing or Canceling (Online)
Set Up ID Travel Group (Online)
Step 1) Once you have obtained accurate login information, you need to add this Live Connect Provider into ClientBase by going to Tools|Settings|Live Connect Providers and clicking Add.
Fill in the following fields:
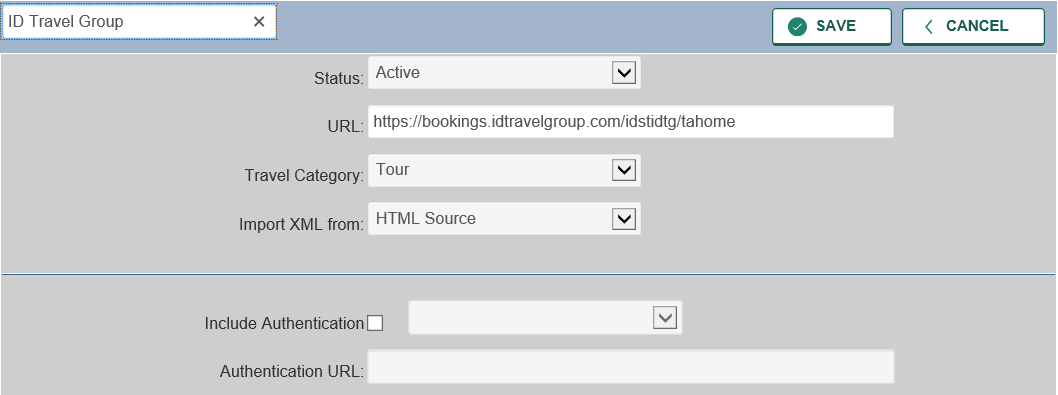
- Name of the Provider: In blank field provided, type ID Travel Group.
- Status: Leave the default of Active. If you ever want to make it Inactive, go back in this area to turn off.
- URL: Type https://bookings.idtravelgroup.com/idstidtg/tahome
- Travel Category: Select Tour
- Import XML from: Select HTML Source.
- Include Authentication: Leave blank.
- Click Save.
You should not set up your login credentials in ClientBase since, for security reasons, no information is passed to the provider site. You will be asked to log in at the site upon connection.
Step 2) Retrieve the ID Travel Group vendor profile from the Profile Manager (or create one if not in your database). From the General Info link, click Add next to the Live Connect Providers label. Select ID Travel Group from the drop-down list. The Vendor Code is IDSTIDTG
Importing an Existing Reservation (Online)
***Important Note: You must download the Live Connect extension for Chrome before using Live Connect with ClientBase Online. Chrome is the supported browser. Please click here for instructions on downloading the extension.
Step 1) Create a new Res Card or open an existing one and launch Live Connect by clicking the Live Connect icon.
Step 2) Complete the Live Connect settings by identifying the vendor, and the the Live Connect Provider.
You should not set up your login credentials in ClientBase since, for security reasons, no information is passed to the provider site. You will be asked to log in at the site upon connection.
Step 3) Enter the confirmation number for the reservation you want to import and click Import Existing Reservation.
Step 4) Depending on the Live Connect Provider, the system either locates the reservation using the confirmation number and automatically import all reservation details, or takes you to the Live Connect Provider's site for you to use its Retrieve Reservation feature to locate the reservation. Upon displaying the existing reservation, click Import Reservation and the reservation details are imported into the ClientBase Res Card.
Retrieve an Existing Reservation for Editing or Canceling (Online)
To edit or cancel an existing reservation using Live Connect, follow these steps:
Step 1) Launch Live Connect from inside the Live Connect reservation to edit or cancel. Click Live Connect.
Step 2) Confirm all Live Connect settings including confirmation number, and click Retrieve Reservation.
Step 3) Live Connect launches the booking engine site. Edit or cancel the reservation using instructions supplied by the booking engine, and click Import Reservation. All reservation data edited or cancelled online is now located in the reservation fields in ClientBase.
ID Travel Group for ClientBase Windows Recording