
Sabre Vacations Canada includes Air Canada Vacations, Air Transat Holidays, Alba Tours, Canjet, Fun Sun Vacations, Nolitours, Signature Vacations, Sunquest Vacations, Sunwing, The Holiday Network, Titan Tours, Tours Mont-Royal, Tours Mason/Vacances Sunquest, Transat Holidays, Varaplaya and West Jet Vacations.
Tech Update:
Some new reservations will not import due to a vendor code missing in the XML. If you receive a General Failure / application error during the import process, you will need to enter the reservation details into the Res Card manually. When this is fixed, we will remove this tech note.
Skip To:
-
Live Connect Features Supported by Sabre Vacations Canada
-
Sabre Vacations Canada Tour Operator List
-
ClientBase Windows
-
ClientBase Windows Recording
-
ClientBase Online
-
ClientBase Online Recording
Live Connect Features Supported by Sabre Vacations Canada
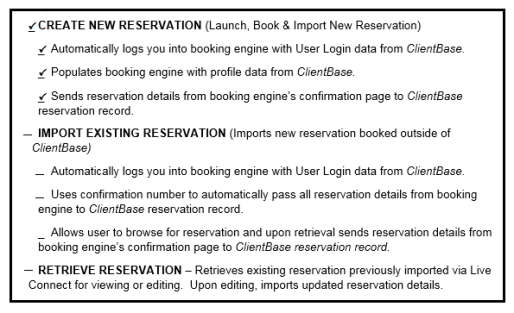
Sabre Vacations Canada supports the following Live Connect features if checked:
Sabre Vacations Canada Tour Operator List
|
CODE |
VENDOR NAME |
LIVE CONNECT PROVIDER |
|
ACV |
Air Canada Vacations |
Sabre Vacations Canada |
|
VAT |
Air Transat Holidays |
Sabre Vacations Canada |
|
ALB |
Alba Tours |
Sabre Vacations Canada |
|
CJV |
Canjet |
Sabre Vacations Canada |
|
FUN |
Fun Sun Vacations |
Sabre Vacations Canada |
|
NOL |
Nolitours |
Sabre Vacations Canada |
|
SGN |
Signature Vacations |
Sabre Vacations Canada |
|
SQV |
Sunquest Vacations |
Sabre Vacations Canada |
|
SWG |
Sunwing |
Sabre Vacations Canada |
|
THN |
The Holiday Network |
Sabre Vacations Canada |
|
TTT |
Titan Tours |
Sabre Vacations Canada |
|
TMR |
Tours Mont-Royal |
Sabre Vacations Canada |
|
TMA |
Tours Mason/Vacances Sunquest |
Sabre Vacations Canada |
|
VAT |
Transat Holidays |
Sabre Vacations Canada |
|
VAR |
Varaplaya |
Sabre Vacations Canada |
|
WJV |
West Jet Vacations |
Sabre Vacations Canada |
Sabre Vacations Canada for ClientBase Windows
Anyone can use Sabre Vacations Canada for Live Connect, but you MUST be registered.
- Register with Sabre Vacations Canada (Windows)
- Set Up in Sabre Vacations Canada (Windows)
- Create New Sabre Vacations Canada Reservation (Windows)
Register with Sabre Vacations Canada (Windows)
Step 1)
-
All Trams ClientBase customers have been assigned a unique Sabre PCC.
- If you do not know your Sabre PCC, e-mail Support@TresTechnologies.com to obtain it. If you know your Sabre PCC, go to Step 2.
Step 2)
- Verify that your agency has an active account with all Tour Operators your agency wants to book through Sabre Vacations.
- Available Tour Operators for Sabre Vacations Canada are shown below in section entitled, Sabre Vacations - Canada Tour Operator List.
Step 3)
- You must register with Sabre Vacations Canada and obtain an Administrator login and password.
- To register, e-mail sabrevac.ca@sabre.com with the subject line – Sabre Vacations Canada Registration.
- Include the following information:
- Sabre PCC
- Agency Name
- Agency Owner
- Agency Address
- IATA/TIDS Number
- Agency Phone number used to register accounts with the tour operators
- Agency administrator’s e-mail address
- List of all Tour Operators you are registered to book
Once you have obtained your Sabre Vacations Canada Login and password, go to Step 4.
Step 4) this step must be completed even if you are currently booking with Sabre Vacations Canada.
-
Contact each Tour Operator directly to request booking access through Sabre Vacations.
Click here for a Tour Operators contact list.
Once access is approved by the Tour Operator, the agency must contact Sabrevac.Ca@sabre.comwho will in turn contact Soft Voyage to validate access.
- Once access is verified by Soft Voyage, Sabre Vacations will enable access to the Tour Operators inside Sabre Vacations for use with ClientBase Live Connect.
-
All email interactions with Sabre Vacations and Tour Operators must include the subject line – Sabre Vacations Canada Live Connect Activation. Include the following:
- Agency Name
- Sabre PCC
- Agency Phone Number
Please note: Live Connect will not function without completing the above steps. Once you launch a Sabre Vacations Live Connect reservation, you should see a list of contacted Tour Operators under the Tour Operators tab and then the drop-down by All Tour Operators. If your Tour Operator is not listed, please contact the Tour Operator and then request access through Sabre Vacations as outlined in Step 4 above.
Set Up in Sabre Vacations Canada (Windows)
Step 1) Setting up Sabre Vacations Canada as a Live Connect Provider
- Verify if a Live Connect Provider for Sabre Vacations Canada exists by going to Utilities|Live Connect Providers. If none exist click Add.
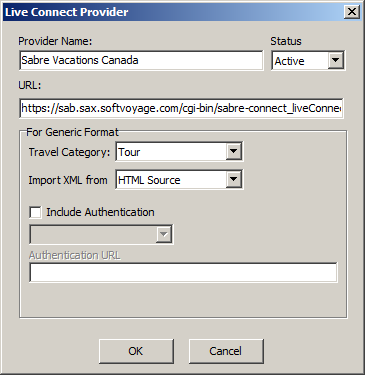
- Provider Name: Enter Sabre Vacations Canada.
- URL: Enter https://sab.sax.softvoyage.com/cgi-bin/sabre-connect_liveConnect.cgi
- Travel Category: Select Tour from the drop-down.
- Import XML from: Select HTML Source.
- Include Authentication – Make sure this is unchecked
- Click OK to save.
Step 2) User Logins an be done in two ways - globally (if all agents are going to share the same user name, password, and agency code), or individually if each agent has their own login setup for Sabre Vacations-Canada. By using one agency login, agents will not receive credit for their own bookings with suppliers.
- Setting Up User Logins Globally – One login for agency
-
Set Up Global Agent Login Information: To enter one login for all agents to share, go to the Global Defaults menu and select Live Connect Login. Click Add and enter the following information:
- Username
- Password
- Account Number Leave Blank
- Agency Code (Sabre PCC)
-
Set Up Global Agent Login Information: To enter one login for all agents to share, go to the Global Defaults menu and select Live Connect Login. Click Add and enter the following information:
- Setting Up Individual Agent User Logins
-
Set up Individual Agent Login in Sabre Vacations- Canada:
- Log into Sabre Vacations Canada with the administrator login provided by Sabre Vacations.
- Click Tour Operators tab
- Click Control Center under the Tours Operators
- Click Agent Access
- Use this screen to create a New user, Edit an existing user or Delete a user.
-
Set up Individual Agent Login in Sabre Vacations- Canada:
-
-
Set Up Individual Agent Login Information in ClientBase
- Users can set up their own logins by going to Utilities|My Login|Live Connectand clicking Add. Each agent login/password must be setup in Sabre Vacations Canada.
- Live Connect Provider: Select Sabre Vacations - Canada from the drop-down list.
- User Name, Password: Enter the necessary fields based upon your login information
- Account Number: Leave blank.
- Agency Code:Enter your Pseudo City Code.
- Users can set up their own logins by going to Utilities|My Login|Live Connectand clicking Add. Each agent login/password must be setup in Sabre Vacations Canada.
-
Step 3) Vendor Setup
- When registering, Sabre Vacations Canada provided you with a list of participating vendors and vendor codes. See Sabre Vacations Canada Tour Operator List.
-
Create a vendor profile in ClientBase for each vendor or verify if one already exists. Specify Sabre Vacations Canada as the booking engine and enter the unique vendor identifier.
- In the vendor profile click Live Connect Providers
- Click Add
- Select Sabre Vacations Canada from the drop-down menu
- Enter the Sabre Vacations Canada vendor code. For example the vendor code for Transat is VAT.
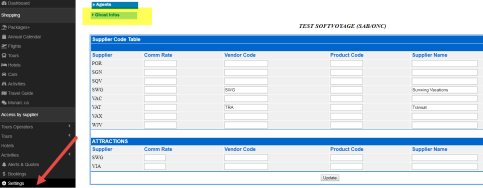
Normally, providers have their Vendor Codes hard coded on their site. However, Sabre Vacations Canada has a settings screen that is used to assign the correct Vendor Names and Codes. If you import and do not receive the correct Vendor Name or code, please go to the settings screen as seen in the screenshot below to enter this information, using the table we’ve provided above as your guide.”
Create New Sabre Vacations Canada Reservation (Windows)
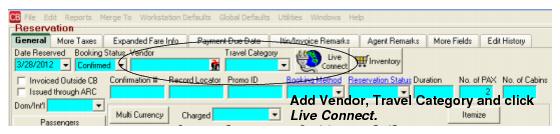
Step 1) When ready to book on-line, create a client Res Card and fill in the Agent, Status, Reservation Cycle, and Trip Name fields and select the travelers. Click Add Reservation to start a new reservation. Fill in the Vendor and Travel Category fields and then click Live Connect.
Step 2) Select the Sabre Vacations Canada from the drop-down menu by Connect To and then click Create New Reservations.
Step 3) Select customer data to book the reservation (Traveler, Credit Card, Phone and Billing Address) and click Connect.
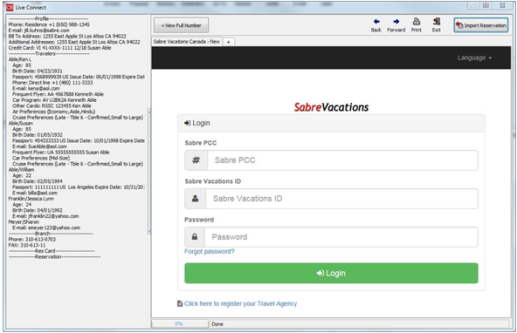
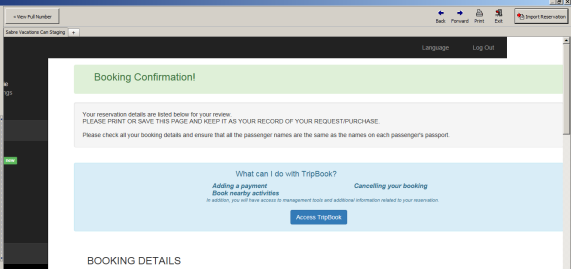
Step 4) Although still in ClientBase, you are now on-line at the Sabre Vacations Canada booking site. Complete your reservation as you normally would using Sabre Vacations Canada’s booking features. If you are not familiar with how to use Sabre Vacations Canada booking tools, please contact your Sabre Software Help Desk, or access on-line documentation and virtual training via the eServices website. When the reservation is confirmed, click Import Reservation. All reservation data booked on-line is now located in the ClientBase reservation record.
Sabre Vacations Canada for ClientBase Online
Anyone can use Sabre Vacations Canada for Live Connect, but you MUST be registered.
- Register with Sabre Vacations Canada (Online)
- Set Up in Sabre Vacations Canada (Online)
- Create New Sabre Vacations-Canada Reservation (Online)
- Live Connect with Sabre Vacations Canada in ClientBase Online Recording
Register with Sabre Vacations Canada (Online)
Step 1) Set Up
- All Trams ClientBase customers have been assigned a unique Sabre PCC.
- If you do not know your Sabre PCC, e-mail Support@TresTechnologies.com to obtain it. If you know your Sabre PCC, go to Step 2.
Step 2)
- Verify that your agency has an active account with all Tour Operators your agency wants to book through Sabre Vacations.
- Available Tour Operators for Sabre Vacations Canada are shown below in section entitled, Sabre Vacations - Canada Tour Operator List.
Step 3)
- You must register with Sabre Vacations Canada and obtain an Administrator login and password.
- To register, e-mail sabrevac.ca@sabre.com with the subject line – Sabre Vacations Canada Registration.
- Include the following information:
- Sabre PCC
- Agency Name
- Agency Owner
- Agency Address
- IATA/TIDS Number
- Agency Phone number used to register accounts with the tour operators
- Agency administrator’s e-mail address
- List of all Tour Operators you are registered to book
Once you have obtained your Sabre Vacations Canada Login and password, go to Step 4.
Step 4) This step must be completed even if you are currently booking with Sabre Vacations Canada.
- Contact each Tour Operator directly to request booking access through Sabre Vacations.
Click here for a Tour Operators contact list.
Once access is approved by the Tour Operator, the agency must contact Sabrevac.Ca@sabre.com who will in turn contact Soft Voyage to validate access.
- Once access is verified by Soft Voyage, Sabre Vacations will enable access to the Tour Operators inside Sabre Vacations for use with ClientBase Live Connect.
- All email interactions with Sabre Vacations and Tour Operators must include the subject line – Sabre Vacations Canada Live Connect Activation. Include the following:
- Agency Name
- Sabre PCC
- Agency Phone Number
Please note, Live Connect will not function without completing the above steps. Once you launch a Sabre Vacations Live Connect reservation, you should see a list of contacted Tour Operators under the Tour Operators tab and then the drop-down by All Tour Operators. If your Tour Operator is not listed, please contact the Tour Operator and then request access through Sabre Vacations as outlined in Step 4 above.
Set Up in Sabre Vacations Canada (Online)
Step 1) Setting up Sabre Vacations Canada as a Live Connect Provider
- Verify if a Live Connect Provider for Sabre Vacations – Canada exists by going to Tools/Settings/Live Connect Providers, click modify to verify the settings below. If none exist click Add.
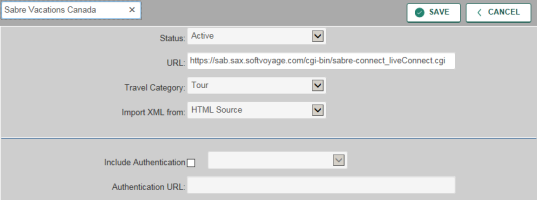
- Provider Name: Enter Sabre Vacations Canada.
- URL: Enter https://sab.sax.softvoyage.com/cgi-bin/sabre-connect_liveConnect.cgi
- Travel Category: Select Tour from the drop-down.
- Import XML from: Select HTML Source.
- Include Authentication – Make sure this is unchecked
- Click Save.
Step 2) Set up for Live Connect agent logins can be done two ways - globally (if all agents are going to share the same user name, password, and agency code), or individually if each agent has their own login setup for Sabre Vacations-Canada. By using one agency login, agents will not receive credit for their own bookings with suppliers.
Setting Up User Logins Globally ~ One login for entire agency
-
Set Up Global Agent Login Information: To enter one login for all agents to share, go to the Tools/Settings/Agency Live Connect Logins. Click Add and enter the following information:
- From the dropdown, select Sabre Vacations Canada
- Enter User information
- Enter Password
- Account Number Leave Blank
- Enter Agency Code (Sabre PCC)
Setting Up Individual Agent User Logins
-
Set up Individual Agent Login in Sabre Vacations- Canada
- Log into Sabre Vacations Canada with the administrator login provided by Sabre Vacations.
- Click Tour Operators tab
- Click Control Center under the Tours Operators
- Click Agent Access
- Use this screen to create a New user, Edit an existing user or Delete a user.
-
Set Up Individual Agent Login Information in ClientBase Online
- Users can set up their own logins by going to Tools|My Login|Live Connect and clicking Add. Each agent login/password must be setup in Sabre Vacations Canada.
- Live Connect Provider: Select Sabre Vacations - Canada from the drop-down list.
- User Name, Password: Enter the necessary fields based upon your login information
- Account Number: Leave blank.
- Agency Code: Enter your Pseudo City Code
- Users can set up their own logins by going to Tools|My Login|Live Connect and clicking Add. Each agent login/password must be setup in Sabre Vacations Canada.
Step 3) Vendor Setup
- When registering, Sabre Vacations - Canada provided you with a list of participating vendors and vendor codes. (See list below)
- Create a vendor profile in ClientBase Online for each vendor or verify if one already exists. Specify Sabre Vacations - Canada as the booking engine and enter the unique vendor identifier.
- In the vendor profile click Live Connect Providers
- Click Add
- Select Sabre Vacations - Canada from the drop-down menu
- Enter the Sabre Vacations - Canada vendor code. For example the vendor code for Transat is VAT.
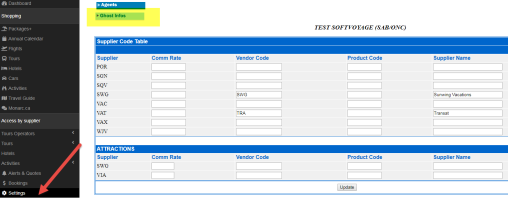
Normally, providers have their Vendor Codes hard coded on their site. However, Sabre Vacations Canada has a settings screen that is used to assign the correct Vendor Names and Codes. If you import and do not receive the correct Vendor Name or code, please go to the settings screen as seen in the screenshot below to enter this information, using the table we’ve provided above as your guide.”
Create New Sabre Vacations-Canada Reservation (Online)
***Important Note: You must download the Live Connect extension for Chrome before using Live Connect with ClientBase Online. Chrome is the supported browser. Please click here for instructions on downloading the extension.
Step 1) Retrieve the desired client profile, create a new Res Card and after entering basic Res Card info, launch Live Connect by clicking Live Connect on the menu bar. (You can also launch Live Connect from the Profile action gear.)
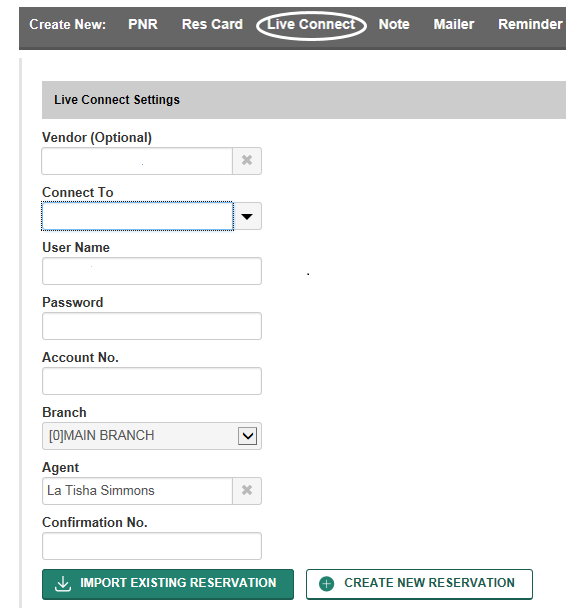
Step 2) Complete the Live Connect settings by identifying the vendor, the Live Connect Provider and appropriate Login information.
Step 3) Click the Create New Reservation button.
Step 4) Select any Profile, Passenger, Branch and Res Card information you want to use to book the reservation and click Connect to launch the on-line booking engine.
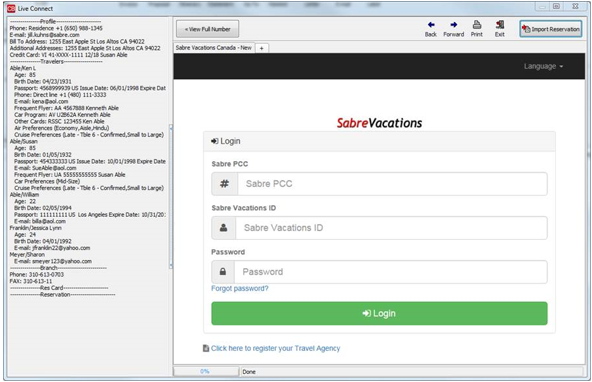
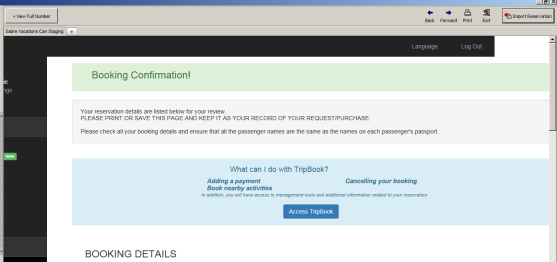
Step 5) Step 5) Although still in ClientBase, you are now on-line at the Sabre Vacations Canada booking site. Complete your reservation as you normally would using Sabre Vacations Canada’s booking features. If you are not familiar with how to use Sabre Vacations Canada booking tools, please contact your Sabre Software Help Desk, or access on-line documentation and virtual training via the eServices website. When the reservation is confirmed, click Import Reservation. All reservation data booked on-line is now located in the ClientBase reservation record.
Sabre Vacations Canada for ClientBase Windows Recording
Sabre Vacations Canada for ClientBase Online Recording