RezSaver includes Azamara, Carnival, Celebrity, Costa, Crystal, Cunard, Disney, MSC, Norwegian, Princess and Royal Caribbean International cruise lines.
Skip To:
-
RezSaver Features
-
RezSaver Participating Vendors and Vendor Codes
-
ClientBase Windows
-
ClientBase Online
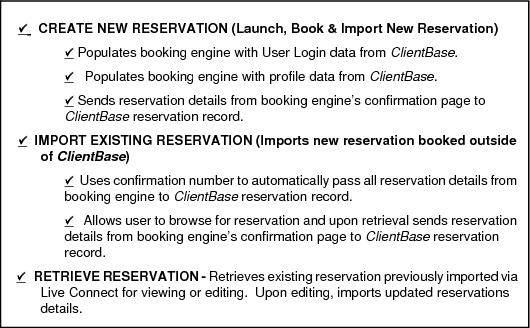
RezSaver Features
RezSaver supports following Live Connect features if checked:
RezSaver Participating Vendors and Vendor Codes
|
CODE |
VENDOR NAME |
LIVE CONNECT PROVIDER |
|
AZ |
Azamara |
RezSaver |
|
CV |
Carnival Cruise Lines |
RezSaver |
|
CB |
Celebrity Cruises |
RezSaver |
|
CO |
Costa Cruise Lines |
RezSaver |
|
CS |
Crystal Cruises |
RezSaver |
|
CU |
Cunard Cruises |
RezSaver |
|
DS |
Disney Cruise Line |
RezSaver |
|
MS |
MSC Cruises |
RezSaver |
|
NC |
Norwegian Cruise Line |
RezSaver |
|
PC |
Princess Cruises |
RezSaver |
|
RC |
Royal Caribbean International |
RezSaver |
RezSaver for ClientBase Windows
Agents are all eligible to use our software through an existing portal which they have access to using their AxtraWeb username and password.
- Set Up RezSaver Live Connect (Windows)
- Create New RezSaver Reservation (Windows)
- Import Existing Sabre Vacations Reservation Made Outside of ClientBase (Windows)
- Retrieve an Existing Reservation for Editing or Cancelling (Windows)
Set Up RezSaver Live Connect (Windows)
Take the following steps to setup ClientBase for Live Connect.
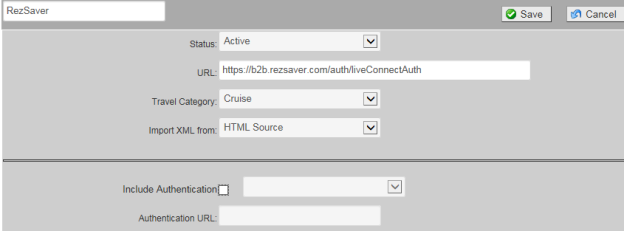
Step 1) Create a Live Connect Provider for RezSaver if none exists by going to Utilities|Live Connect Providers, and clicking Add. (It’s a good idea to check if the URL is correct.)
- Provider Name: Enter RezSaver.
- URL: Enter https://b2b.rezsaver.com/auth/liveConnectAuth
- Travel Category: Enter Cruise from the drop-down menu.
- Import XML from: Enter HTML Source.
Step 2) Set up for Live Connect agent logins can be done individually or globally for the agency. Users can set up their own logins by going to Utilities|My Login|Live Connect and clicking Add. To set up globally, go to Global Defaults|Res Card Defaults|Live Connect to enter the User Name, and Password that everyone in agency will use. When Live Connect is launched, the system first looks to see if there is login information at the User Login level, and if not, then looks at the global login.
- Live Connect Provider: Select RezSaver from the drop-down list.
- User Name, Password and Account Number: Use your AxtraWeb user name/password. The account number is not applicable.
- Agency Code is left blank.
Step 3) From the RezSaver Participating Vendors and Vendor Codes list, create a profile if none exists in ClientBase for each vendor you are using. Click Live Connect Providers and Add in the vendor profile. Select RezSaver from the drop-down menu and enter the RezSaver vendor code as the unique vendor identifier.
Create New RezSaver Reservation (Windows)
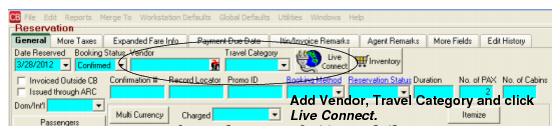
Step 1) Create a Res Card in ClientBase, enter the Res Card Cycle and Trip Name, and add a reservation. Select RezSaver as the vendor, fill in the Travel Category, and then click Live Connect.
Step 2) Select RezSaver from the drop-down menu by Connect To (if not defaulted), and then click Create New Reservations.
Step 3) Although still in ClientBase, you are now on-line at the booking site.
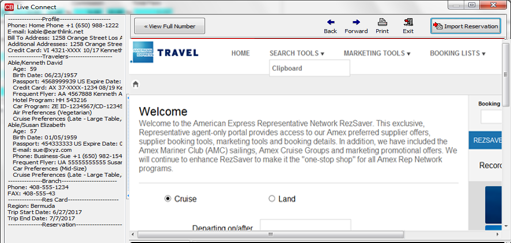
Create the reservation with the traveler information passed from ClientBase by clicking New Reservation and use the instructions supplied by RezSaver. When the reservation is confirmed, click Import Reservation at the top of the ClientBase screen. All reservation data booked on-line is now located in the reservation.
Import Existing Sabre Vacations Reservation Made Outside of ClientBase (Windows)
Step 1) Create a new Res Card or open an existing one and launch Live Connect by clicking the Live Connect icon.
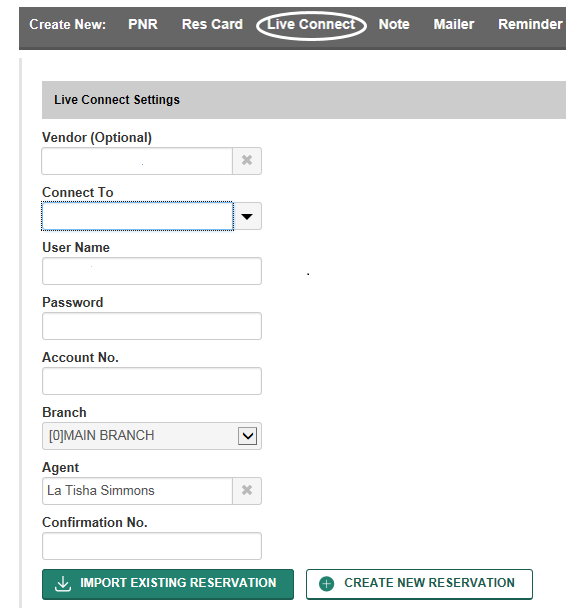
Step 2) Complete the Live Connect settings by identifying the vendor, the Live Connect Provider and appropriate Login information if not auto-populated.
Step 3) Enter the confirmation number for the reservation you want to import and click Import Existing Reservation.
Step 4) Depending on the Live Connect Provider, the system either locates the reservation using the confirmation number and automatically import all reservation details, or takes you to the Live Connect Provider's site for you to use its Retrieve Reservation feature to locate the reservation. Upon displaying the existing reservation, click Import Reservation and the reservation details are imported into the ClientBase Res Card.
Retrieve an Existing Reservation for Editing or Cancelling (Windows)
To edit or cancel an existing reservation using Live Connect, follow these steps:
Step 1) Launch Live Connect from inside the reservation to edit or cancel in ClientBase.
Step 2) A dialog box appears. Click Retrieve Reservation.
Step 3) Live Connect launches the booking engine site. Edit or cancel the reservation using instructions supplied by the booking engine, and click Import Reservation. All reservation data edited or cancelled online is now located in the reservation fields in ClientBase.
Need help? Contact info@vectotechnology.com or call 888-995-7385.
RezSaver for ClientBase Online
Agents are all eligible to use our software through an existing portal which they have access to using their AxtraWeb username and password.
- Set Up RezSaver Live Connect (Online)
- Create New RezSaver Reservation (Online)
- Import Existing Reservation Made Outside of ClientBase (Online)
- Retrieve an Existing Reservation for Editing or Cancelling (Online)
Set Up RezSaver Live Connect (Online)
Take the following steps to setup ClientBase for Live Connect.
Step 1) Create a Live Connect Provider for RezSaver if none exists by going to Tools|Settings|Live Connect Providers and clicking Add.
- Provider Name: Enter RezSaver.
- URL: Enter https://b2b.rezsaver.com/auth/liveConnectAuth
- Travel Category: Enter Cruise from the drop-down menu.
- Import XML from: Enter HTML Source.
Step 2) Set up for Live Connect agent logins can be done in two ways - globally (if all agents share the same user name, password or account number), or individually. When Live Connect is launched, the system first looks to see if there is login information at the User Login level, and if not, then looks for the login information at the Global Defaults level.
Set Up Global Agent Login Information: To enter one set of login information for a Live Connect provider for all agents to share, go Tools|Settings|Live Connect Login. Click Add and enter the following information:
- Live Connect Provider: Select RezSaver from the drop-down list.
- User Name, Password and Account Number: Use your AxtraWeb user name/password.
- The Agency Code is left blank.
Set Up Individual Agent Login Information: Users can set up their own logins by going to Tools|My Login|Live Connect and clicking Add.
- Live Connect Provider: Select RezSaver from the drop-down list.
- User Name, Password and Account Number: Use your AxtraWeb user name/password.
- The account number is not applicable.
Step 3) From the RezSaver Participating Vendors and Vendor Codes list, create a profile if none exists in ClientBase for each vendor you are using. Click Live Connect Providers and Add in the vendor profile. Select RezSaver from the drop-down menu and enter the RezSaver vendor code as the unique vendor identifier.
Create New RezSaver Reservation (Online)
***Important Note: You must download the Live Connect extension for Chrome before using Live Connect with ClientBase Online. Chrome is the supported browser. Please click here for instructions on downloading the extension.
Step 1) Create a Res Card in ClientBase, enter the Res Card Cycle and Trip Name, and add a reservation. Select RezSaver as the vendor, fill in the Travel Category, and then click Live Connect.
Step 2) Select RezSaver from the drop-down menu by Connect To (if not defaulted), and then click Create New Reservations.
Step 3) Although still in ClientBase, you are now on-line at the booking site

Create the reservation with the traveler information passed from ClientBase by clicking New Reservation and use the instructions supplied by RezSaver. When the reservation is confirmed, click Import Reservation at the top of the ClientBase screen. All reservation data booked on-line is now located in the reservation.
Import Existing Reservation Made Outside of ClientBase (Online)
Step 1) Create a new Res Card or open an existing one and launch Live Connect by clicking the Live Connect icon.
Step 2) Complete the Live Connect settings by identifying the vendor, the Live Connect Provider and appropriate Login information if not auto-populated.
Step 3) Enter the confirmation number for the reservation you want to import and click Import Existing Reservation.
Step 4) Depending on the Live Connect Provider, the system either locates the reservation using the confirmation number and automatically import all reservation details, or takes you to the Live Connect Provider's site for you to use its Retrieve Reservation feature to locate the reservation. Upon displaying the existing reservation, click Import Reservation and the reservation details are imported into the ClientBase Res Card.
Retrieve an Existing Reservation for Editing or Cancelling (Online)
To edit or cancel an existing reservation using Live Connect, follow these steps:
Step 1) Launch Live Connect from inside the reservation to edit or cancel in ClientBase.
Step 2) A dialog box appears. Click Retrieve Reservation.
Step 3) Live Connect launches the booking engine site. Edit or cancel the reservation using instructions supplied by the booking engine, and click Import Reservation. All reservation data edited or cancelled online is now located in the reservation fields in ClientBase.
Need help? Contact info@vectotechnology.com or call 888-995-7385.