
Skip To:
Signature HotelConnection Features
Signature HotelConnection support the following Live Connect Features if checked:
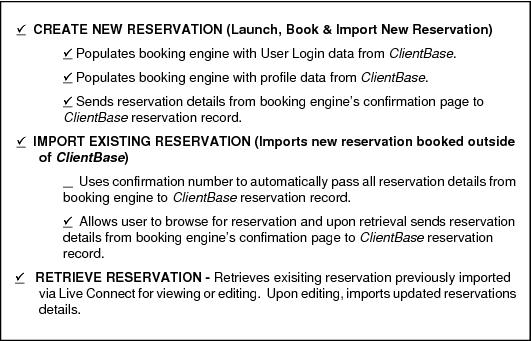
Signature HotelConnection for ClientBase Windows
This feature is only available to agencies who belong to Signature Travel Network as the Signature HotelConnection booking engine is exclusive to this group. Signature members can log into the Signature Intranet, www.signaturetravelnetwork.com, and find setup instructions under Support Training & Meetings, in the Communications section. Just scroll down to "Signature Hotels & Resorts" and access the setup document. For more information on Signature HotelConnection or Signature Travel Network, please contact Signature Travel Network directly at info@signaturetravelnetwork.com.
- Set Up Signature HotelConnection (Windows)
- Create New Signature HotelConnection Reservation (Windows)
- Create New Signature HotelConnection Reservation (Windows)
- Retrieve an Existing Reservation for Editing or Cancelling (Windows)
Set Up Signature HotelConnection (Windows)
Step 1) Create a new or check that a Live Connect Provider for Signature HotelConnection exists by going to Utilities|Live Connect Providers, and clicking Add. (Make sure the URL is correct if Provider is present.)
- Provider Name: Enter Signature HotelConnection.
- URL: Enter https://www.signaturetravelnetwork.com/SigNet/index.cfm/LiveConnect/hotels
- Travel Category: Select Hotel from the drop-down.
- Import XML from: Select HTML Source.
Step 2) Each Agent can set up a login by going Utilities > My Login and clicking on the Live Connect tab. Click Add and enter the following information:
- Live Connect Provider: Select Signature HotelConnection from the drop-down list.
- User Name, Password, Agency Code: Enter your SigNet User Name, your Password, and Agency Code*.
- *The agency code is the Agency Key for your branch. To find in SigNet go to Tools & Reports > My Branch Profile > look in the column on the right for your Agency Key.
- Account Number is left blank.
Step 3) Create a vendor profile for Signature Hotels if you do not want to use individual hotel profiles when launching Live Connect. (See below for detailed instructions on this.) From the Profile Manager, create a new profile called Signature Hotels. From the General Info tab, click Live Connect Providers. From here, click Add, and select Signature HotelConnection from the drop-down list. The vendor code is left blank. Click OK to save.
Create New Signature HotelConnection Reservation (Windows)
Step 1) Use the ClientBase Res Card to launch Signature HotelConnection.
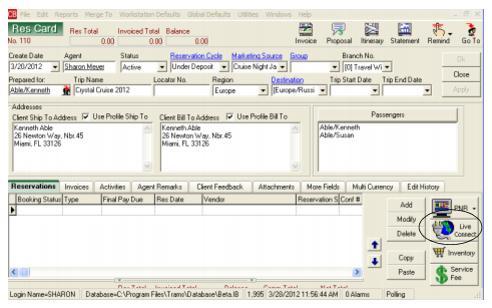
Once the setup steps have been completed, retrieve the desired client profile and start or retrieve a Res Card. If you do not know the hotel vendor you will be using, click the Live Connect button in the lower right hand corner of the main Res Card screen to launch Signature HotelConnection right from the Res Card level.
Upon completion of the hotel reservation, the system will have you search for the hotel profile you have booked. If you do not find it in your system after you have queried, you must create a hotel profile by clicking File|New|Vendor Profile. (Make sure you click the Live Connect button in the Vendor Profile before you save it to link Signature HotelConnection to it by clicking Add. Next time you need to use this profile, it’ll be in the system.)
If you want to use the Signature Hotels profile you created for all hotel bookings you book through HotelConnection, so you don’t have to search for existing hotel profiles or create new ones when importing the reservations, use the Add Reservation button to start a new Reservation.
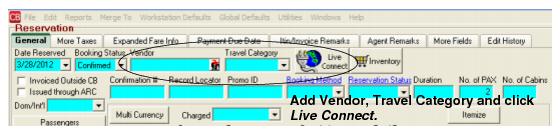
From within the ClientBase Reservation record, select Signature Hotels as the Vendor and click the Live Connect button to launch Signature HotelConnection. When imported back into the system, the hotel you booked will populate the Service Provider area of the reservation.
Step 2) Verify the default Login information and select "Create New Reservation".
A window appears with your default HotelConnection login information. The Connect To should read Signature HotelConnection. If it does not, click the drop down arrow and select it from the list. Any of the login information defaulting in this window can be changed if desired. Use the Create New Reservations button to book a new reservation.
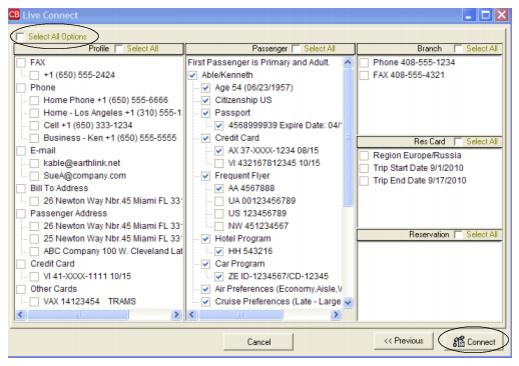
Step 3) Select the desired client information to pass to HotelConnection. Prior to connecting you to the Signature HotelConnection site, a client selection screen appears, allowing you to select the desired client data you would like to automatically pass to Signature HotelConnection. Passing this data helps you save time during the booking process, as fewer fields need to be completed by hand.
Step 4) Use Hotel Finder to find the "perfect hotel". When prompted for traveler information select each traveler using the HotelConnection "Search for a Client" feature. Or, if the client is not in the Signature database, use "Click Here to Add New Client" for each traveler traveling.
Step 5) Use HotelConnection to finish confirming your Reservation and upon receiving a confirmation number click "Import" to import the reservation details into your ClientBase database for managing further. Remember if you have launched Live Connect at the Res Card level so you can use separate Hotel Vendors, the system will have you search for the hotel profile you have booked. If you do not find it in your system after you have queried, you must create a hotel profile by clicking File|New|Vendor Profile. (Make sure you click the Live Connect button in the Vendor Profile before you save it to link Signature HotelConnection to it by clicking Add. Next time you need to use this profile, it’ll be in the system.)
If you used the Signature Hotels Profile at the reservation level to launch Live Connect, the hotel booking will come into ClientBase with the hotel name in the Service Provider area of the reservation.
This reservation information is now available for you to invoice, to create Reminders to track the administrative tasks involved in managing the trip and to report on for future marketing purposes.
Import Existing Reservation Made Outside of ClientBase (Windows)
First, create a new reservation in ClientBase and after clicking Add a New Reservation and entering vendor information, click Live Connect and Import an Existing Reservation. Do not enter a confirmation number, but when in Signature HotelConnection booking site, locate the retrieve reservation area. Once the reservation details are showing, click Import and the details of the reservation are imported into ClientBase reservation record.
Retrieve an Existing Reservation for Editing or Cancelling (Windows)
To edit or cancel an existing reservation using Live Connect, follow these steps:
Step 1) Launch Live Connect from inside the reservation to edit or cancel in ClientBase.
Step 2) A dialog box appears. Click Retrieve Reservation.
Step 3) Live Connect launches the booking engine site. Edit or cancel the reservation using instructions supplied by the booking engine, and click Import Reservation. All reservation data edited or cancelled online is now located in the reservation fields in ClientBase.
Signature HotelConnection for ClientBase Online
This feature is only available to agencies who belong to Signature Travel Network as the Signature HotelConnection 2.0 booking engine is exclusive to this group. Signature members can log into the Signature Intranet, www.signaturetravelnetwork.com, and find setup instructions under Training, in the Hotels and Resorts section. Just scroll down to Reference Guides and “The NEW Hotel Connection 2.0 Advisor Hotel Booking Engine Launch Begins” to access the setup document. For more information on Signature HotelConnection 2.0 or Signature Travel Network, please contact Signature Travel Network directly at techsupport@signaturetravelnetwork.com.
- Set Up Signature HotelConnection (Online)
- Create New Signature HotelConnection Reservation (Online)
- Import Existing Reservation Made Directly in SigNet (Online)
- Retrieve an Existing Reservation for Editing or Cancelling (Online)
Set Up Signature HotelConnection (Online)
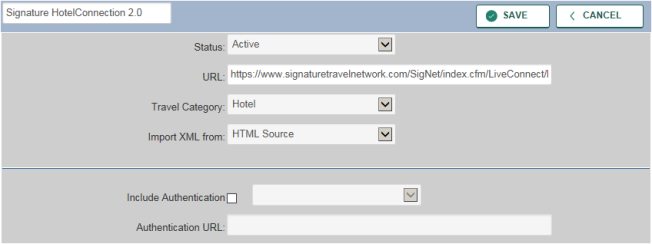
Step 1) Create a new or check that a Live Connect Provider for Signature HotelConnection 2.0 exists by going to Utilities|Live Connect Providers, and clicking Add. (Make sure the URL is correct if Provider is present.)
- Provider Name: Enter Signature HotelConnection.
- URL: Enter https://www.signaturetravelnetwork.com/SigNet/index.cfm/LiveConnect/hotels
- Travel Category: Select Hotel from the drop-down.
- Import XML from: Select HTML Source.
Step 2) Each Agent can set up a login by going to Tools > My Login > Live Connect. Click Add and enter the following information:
- Live Connect Provider: Select Signature HotelConnection from the drop-down list.
- User Name, Password, Agency Code: Enter your SigNet User Name, your Password, and Agency Code*.
- *The agency code is the Agency Key for your branch. To find in SigNet go to Tools & Reports > My Branch Profile > look in the column on the right for your Agency Key.
- Account Number is left blank.
Step 3) When importing, Signature HotelConnection 2.0 will be passing over the Hotel Property name as the Vendor Name. You will be able to search for, and create if necessary, the Vendor Profile upon import.
Create New Signature HotelConnection Reservation (Online)
***Important Note: You must download the Live Connect extension for Chrome before using Live Connect with ClientBase Online. Chrome is the supported browser. Please click here for instructions on downloading the extension.
Step 1) Use the ClientBase Res Card to launch Signature HotelConnection 2.0.
Once the setup steps have been completed, retrieve the desired client profile and start or retrieve a Res Card and launch Live Connect by clicking Live Connect on the menu bar. (You can also launch Live Connect from the Profile action gear.)
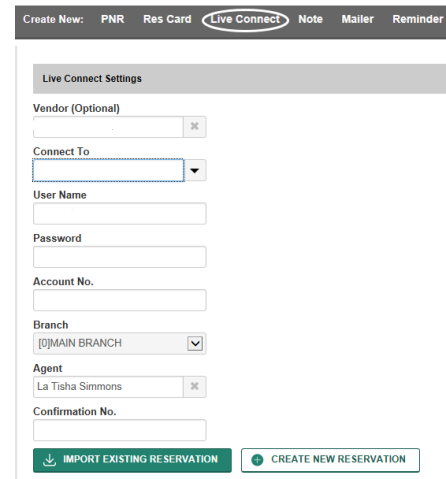
Step 2) Verify the default Login information and select "Create New Reservation".
Leave the Vendor box blank, and select Signature HotelConnection 2.0 from the Connect To drop down. Confirm that the stored login information appears and is correct. If not, you can follow the setup instructions to store a login or simply enter it now. Use the Create New Reservations button to book a new reservation. **If your login credentials and reservation number are not present in ClientBase before connecting, the import will not work.
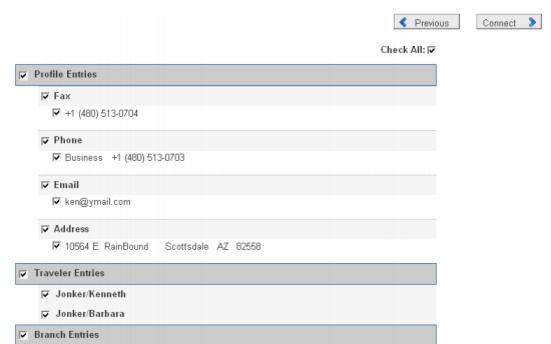
Step 3) Select the desired client information to pass to HotelConnection 2.0. Prior to connecting you to the Signature HotelConnection 2.0 site, a client selection screen appears, allowing you to select the desired client data you would like to automatically pass to Signature HotelConnection 2.0. Passing this data helps you save time during the booking process, as fewer fields need to be completed by hand.
Step 4) Use Hotel Finder to find the "perfect hotel." Use HotelConnection 2.0 to finish confirming your Reservation and upon receiving a confirmation number click Import Reservation to import the details into your ClientBase database for managing further. When importing, the system will have you search for the Hotel Vendor profile. If one does not exist, click Create Vendor to add a new Vendor profile for the property.
This reservation information is now available for you to invoice, to create Reminders to track the administrative tasks involved in managing the trip and to report on for future marketing purposes.
Import Existing Reservation Made Directly in SigNet (Online)
Begin a new Live Connect following the same steps as above for Creating a New Reservation in steps 1 and 2, except click Import an Existing Reservation. Do not enter a confirmation number, but when in the Signature HotelConnection 2.0 booking site, locate the retrieve reservation area. Once the reservation details are showing, click Import Reservationand the details of the reservation are imported into theClientBase reservation record.
Retrieve an Existing Reservation for Editing or Cancelling (Online)
To edit or cancel an existing reservation using Live Connect, follow these steps:
Step 1) Launch Live Connect from inside the existing reservation to edit or cancel in ClientBase.
Step 2) A dialog box appears. Click Retrieve Reservation, then Connect.
Step 3) Click on Search and then click on the GDS Look up Number box in the lower right hand corner of the results. Once the booking is displayed, click on Import Reservation.