
Skip To:
Travel Insured Features
Travel Insured supports the following Live Connect features if checked:
Travel Insured for ClientBase Windows
To use Live Connect to purchase insurance with Travel Insured, you must be registered to sell Travel Insured insurance. If not currently licensed to sell Travel Insured, or have not been setup to book on-line, contact Travel Insured directly by e-mailing info@travelinsured.com.
- Set Up Travel Insured (Windows)
- Create New Travel Insured Reservation (Windows)
- Import Existing Reservation Made Outside of ClientBase (Windows)
Set Up Travel Insured (Windows)
Upon receiving login information from Travel Insured, take the following steps to setup ClientBase for Live Connect.
Step 1: Setup Travel Insured Live Connect Provider
Create a new or check that a Live Connect Provider for Travel Insured exists by going to Utilities > Live Connect Providers and clicking Add. (Make sure the URL is correct if Provider is present.)
- Provider Name: In the blank field provided, type Travel Insured.
- Status: Leave the default of Active. If you ever want to make it Inactive, go back to this area to do so.
- URL: Type https://www.travelinsured.com/tramslogin.aspx
- Travel Category: Insurance.
- Import XML from: HTML Source.
- Include Authentication: Unchecked.
Step 2: Setup for Live Connect Logins
Agent logins should be done individually. Users can set up their own logins by going to Utilities > My Login > Live Connect and clicking Add.
- Live Connect Provider: Select Travel Insured from the drop-down list.
- User Login: Enter the Login ID supplied upon registration.
- User Password: Enter the password supplied upon registration.
- Account Number: Leave blank.
- Agency Code: Leave blank. Click OK to save.
Step 3: Add Live Connect Provider to Travel Insured Vendor Profile
From the profile manager, retrieve the Travel Insured vendor profile (or create if it is not in database). From the General Info tab, click Live Connect Providers. From here, click Add, then select Travel Insured from the drop-down list. The vendor code is TI. Click OK.
Create New Travel Insured Reservation (Windows)
Step 1) Create a Res Card and click the Reservation tab. Click Add on the right. Select Travel Insured as the vendor and click Live Connect.
Step 2) Select Travel Insured from the drop-down menu by Connect To, If you have saved your credentials in the setup instructions, they will fill in, otherwise fill them in now. Then click Create New Reservations.
Step 3) Select any customer information to use to book the Travel Insured reservation. This data is automatically passed to Travel Insured and saves time during the booking process, as less fields need to be completed manually. Click Next as below.
Step 4) The system prompts with the reservation records included in this Res Card. Highlight each reservation to insure. To highlight and select multiple reservations, use the CTRL key in combination with clicking, and the system completes the summary trip information. This step is designed to save time during the insurance booking process. Any missing or incomplete data can be updated on the Travel Insured website confirming the insurance booking. Then click Connect as below.
Step 5) Although in ClientBase, you are now on-line at the booking site. Complete the reservations and when the reservation is confirmed, click Import Reservation at the top right as shown below.
If needed, query the vendor name, selecting Travel Insured.
All reservation data is now located in the reservation fields in ClientBase.
Import Existing Reservation Made Outside of ClientBase (Windows)
Open the Res Card and click Live Connect on the right.
Choose Travel Insured from the dropdown. If you have saved your credentials in your User settings, they will fill in, otherwise fill them in now. Leave the confirmation number blank and click on OK to connect. You will connect to the Travel Insured site as below. Now enter a state.
and at the next screen click on Policy Search:
Next enter in the plan number you would like to import, then select Search (you may have to scroll down a bit).
Then when the plan comes up, click Select.
The next screen will look like the purchase page. Once this displays, click on Import Reservation in the upper right corner.
If needed, query the vendor name, selecting Travel Insured.
All reservation data is now located in the reservation fields in ClientBase.
Travel Insured for ClientBase Online
To use Live Connect to purchase insurance with Travel Insured, you must be registered to sell Travel Insured insurance. If not currently licensed to sell Travel Insured, or have not been setup to book on-line, contact Travel Insured directly by e-mailing info@travelinsured.com.
- Set Up Travel Insured (Online)
- Create New Travel Insured Reservation (Online)
- Import Existing Reservation Made Outside of ClientBase (Online)
Step 1) Once you have obtained accurate login information, add this Live Connect Provider into ClientBase by going to Tools > Settings > Live Connect Providers and clicking Add. If the provider is already present, check that the URL is correct.
Fill in the following fields:
- Name of the Provider: In blank field provided, type Travel Insured.
- Status: Leave the default of Active. If you ever want to make it Inactive, go back in this area to edit.
- URL: Type https://www.travelinsured.com/tramslogin.aspx
- Travel Category: Select Insurance.
- Import XML from: Select HTML Source.
- Include Authentication: None.
Click Save.
Step 2) Each user can put in his own login information under Tools > My Login > Live Connect. Click Add and enter the following information:
- Live Connect Provider: Select Travel Insured from the drop-down list.
- User Login: Enter the Login ID supplied upon registration.
- User Password: Enter the password supplied upon registration.
- Account Number: Leave blank.
- Agency Code: Leave blank.
Click OK to save. Then click Save.
Step 3) Create a vendor profile in ClientBase for Travel Insured if one does not exist. From the profile manager, retrieve the vendor profile (or create if it is not in database). From the General Info area, click Live Connect Providers. From here, click Add, then select provider from the drop-down list. The vendor code TI. Click Save.
Create New Travel Insured Reservation (Online)
***Important Note: You must download the Live Connect extension for Chrome before using Live Connect with ClientBase Online. Chrome is the supported browser. Please click here for instructions on downloading the extension.
Step 1) Retrieve the desired client profile and create a new Res Card. If you have an existing Res Card and you wish to insure that trip, view that Res Card. Now click on the Reservation section on the left, and then click Live Connect on the menu bar.
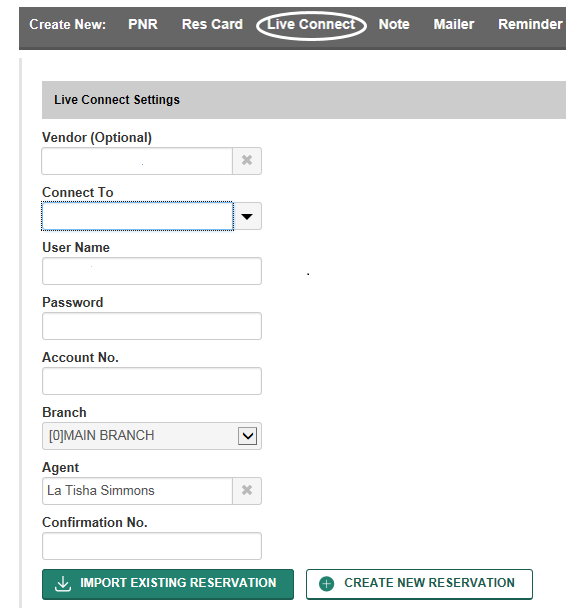
Step 2) Complete the Live Connect settings by identifying the vendor, and the Live Connect Provider. If you have set up your logins in Tools|MyLogin|Live Connect, login information will auto-populate. If not, enter the credentials at this time.
Step 3) Click the Create New Reservation button.
Step 4) Select any Profile, Passenger, Branch and Res Card information you want to use to book the reservation and click Next to launch the on-line booking engine.
Step 5) The system will prompt with the reservation records included in this Res Card. Click each reservation to insure. This step is designed to save time during the insurance booking process, as less fields need to be completed manually. Any missing or incomplete data can be updated on the website confirming the insurance booking. Click Connect.
Step 6) A new browser window will open for Travel Insured. Complete the reservation(s) using instructions supplied by Travel Insured upon registration. When the reservation is confirmed, click on the Chrome extension, and then select Import Reservation. All reservation data booked on-line is now located in the reservation fields in ClientBase.
Import Existing Reservation Made Outside of ClientBase (Online)
Open the Res Card and click on the Reservation section. Click on Live Connect at the top.
Choose Travel Insured from the dropdown. If you have saved your credentials in the setup instructions, they will fill in, otherwise fill them in now. Leave the confirmation number blank and click on OK to connect. You will connect to the Travel Insured site as below. Now enter a state.
and at the next screen click on Policy Search:
Next enter in the plan number you would like to import, then select Search (you may have to scroll down a bit).
Then when the plan comes up, click Select.
The next screen will look like the purchase page. Once this displays, click on the Chrome Extension to display the Import Reservation button in the upper right corner.
If needed, query the vendor name, selecting Travel Insured
All reservation data is now located in the reservation fields in ClientBase.