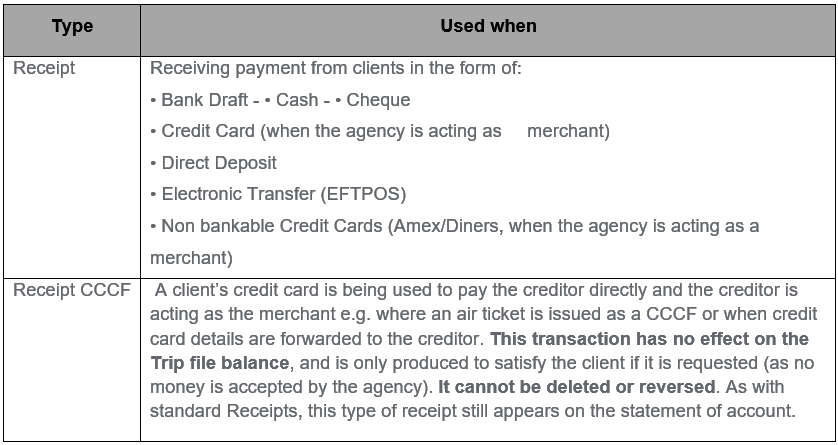
Receipts
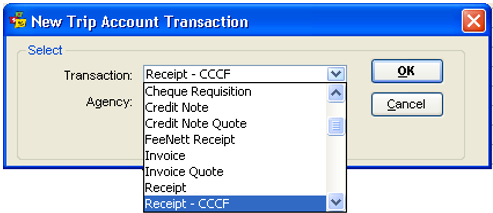
Payments received from clients are recorded on the Trip file as a receipt. Two types of receipts are available from the New Trip Account Transaction window, Receipt and Receipt CCCF.
Debtor Receipts
Payments for Debtor accounts are not entered through the trip file but are processed through the Debtor file. These transactions are normally dealt with by Supervisors or Management and are considered advanced functions. See CCTE Finance User Guide.
Creating a Receipt
Take the following steps to create a receipt:
- Open a Trip file and click on the Accounting tab.
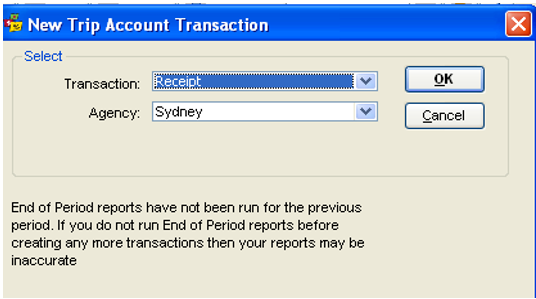
- Click on the New icon or press CTRL+N to open the New Trip Accounting Transaction window.
- Select Receipt and click OK.
Note: Receipt will default to User’s Home Branch
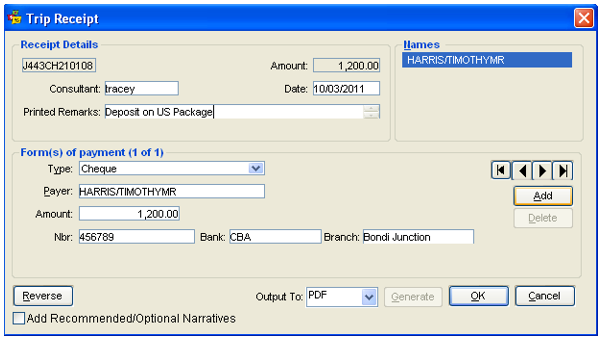
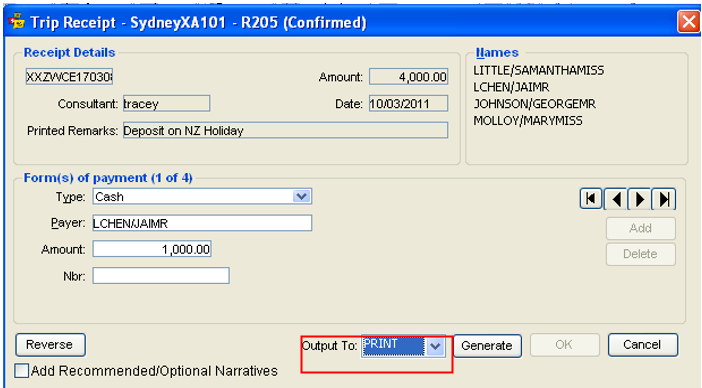
- The Trip Receipt window is broken into three parts, Receipt Details, Names and Form(s) of Payment.
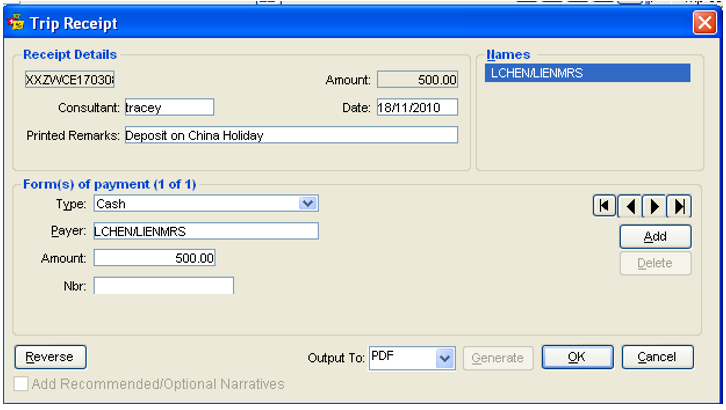
Receipt Details
- The Trip Code, Consultant, and Name fields have been transposed from the Trip file.
- The Date is a system default setting.
- The greyed out Amount field is completed by the system after the user enters the amount in the lower half of the screen.
- Printed Remarks is a free text area, which will be printed on the receipt
- ADD button is to be used for Multiple forms of Payment, see Module 6: Multiple forms of Payment
- Add Recommended/Optional Narratives – see Module 9: Narratives
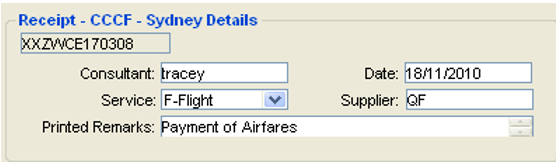
- The Receipt CCCF screen has additional Service and Supplier fields to stipulate the type of service and the supplier acting as merchant
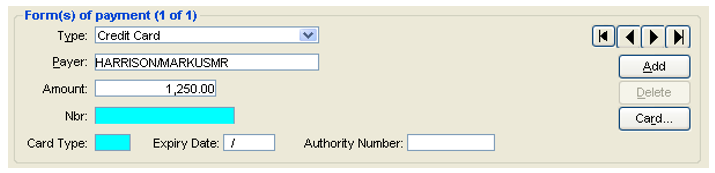
Form(s) of Payment
The Form(s) of Payment section is used to record the details of the actual payment received from the client. For Receipt CCCF, the Type field defaults to CCCF and is unable to be changed.
For a standard Receipt, select the appropriate payment Type from the dropdown List.
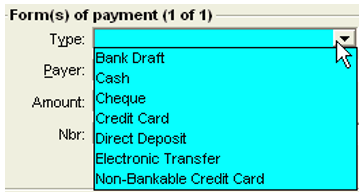

The Type of payment selected will alter the input fields that appear on this receipt screen.
The Payer and Amount fields appear on all receipts:
Payer
Type the payer’s name, or if the payer is the passenger whose name is shown in the upper half of the screen, click on this name to transpose it into the payer field. This is useful if the passenger’s name is difficult to spell.
Note: Only the passenger names selected in the receipt screen will print on the receipt. The names are not automatically taken from the Booking Name field on the Trip tab.
Enter the Amount being paid without $ signs. Complete the Nbr, Bank and Branch fields if applicable.
The Bank and Branch fields appear when one of the following Types of payment is selected:
- Bank Draft
- Cheque
- Electronic Transfer (EFTPOS)
- Direct Deposit
Adding Narratives
If a narrative is created for ФRetail Receipts‘ then that narrative will only be attached to a Receipt document – see Module 9 – Documentation, Prefix/Suffix and Narratives.

These fields are optional, but should be completed to enable bank deposits to be easily reconciled.
Output to available:
- PDF EMAIL
See Module 6: Generation of Documents
After completing all fields, click OK to save the transaction.
A confirmation prompt will be displayed. Click Yes to complete the save.
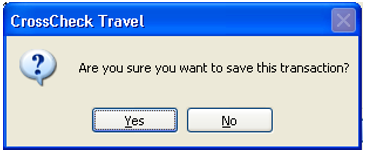
A second confirmation prompt will be displayed. Click Yes to print the receipt.

The Accounting tab will be re-displayed automatically, with a summary of the entry.
See Account tab details for explanations of this summary line. See "Accounting Tab" in Module 5: Trip File.

Double click on this line to re-open the input screen.
Receipt CCCF
CCTE records that the Creditor has received the payment directly when the CCF ticket requisition is completed and no monies have entered or exited our agency account.
Note: A Receipt CCCF cannot be deleted or reversed!
The Receipt CCCF must be selected from the New Trip Account Transaction window and completed in the same way as a normal receipt.
The Account summary screen will correctly record both the Ticket Requisition CCCF and the Receipt CCCF as a nil balance.

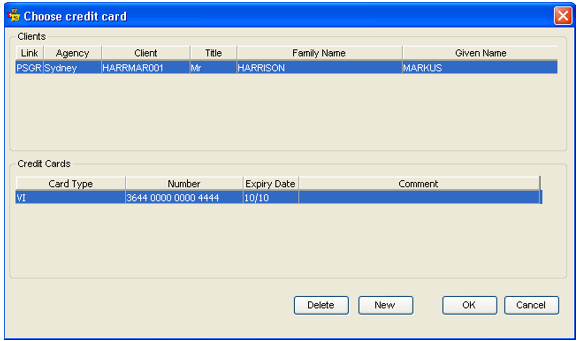
Accessing Stored Credit Card Details
Stored credit card details can be accessed from the Client file using the Card button.
A list of stored card details will be displayed. Highlight the passengers name to display the linked credit cards, then highlight the card required and click OK to transpose the details back into the relevant fields in the receipt.
Note: The list shows all cards stored, including American Express and Diners - however these two can only be used if the Non-bankable Credit Card type is selected on the Standard Receipt screen.
If there are no stored credit card details, do not click on the Card button. Type the details in the Nbr, Card Type, and Expiry Date fields.
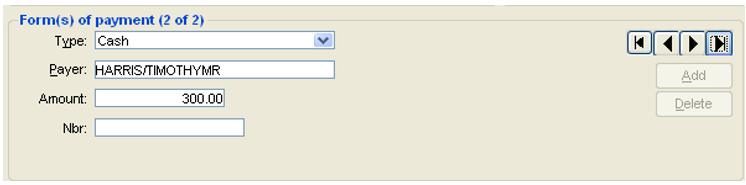
Multiple Forms of Payment
A standard Receipt can include multiple forms of payment allowing for cash, cheque and credit card amounts to be recorded on one receipt.
Exceptions: Direct Deposits and Non-bankable Credit Cards cannot be combined with other Forms of Payment.
To enter multiple forms of payment:
- Select the first Type of payment from the scroll.
- Select the name of the Payer.
- Type the Amount.
- Click on the Add button. Select the next Type of payment from the scroll.
- The Payer field is retained from the first entry.
- Type the Amount.
- Repeat this process until the total payment detail has been entered.
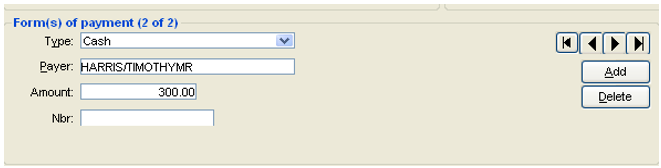
- If the passenger changes their mind about any of the forms of payment, before you press OK, remove this entry by pressing the Delete button. Then click on Yes to be returned to complete this receipt.
- Click Yes if wish to delete the second form of payment, or No if customer wishes to continue with additional form of payment.
- Click on OK.
- Click Yes if wish to save this transaction.
- Click Yes if wish to PDF this transaction.
The amounts are combined as one figure on the Trip file Accounting tab summary.
Viewing Multiple Forms of Payment
Double click on the receipt summary line to reopen it.
Use the Arrows as shown in the screen below to move through the various receipt entries.
Buttons are represented by

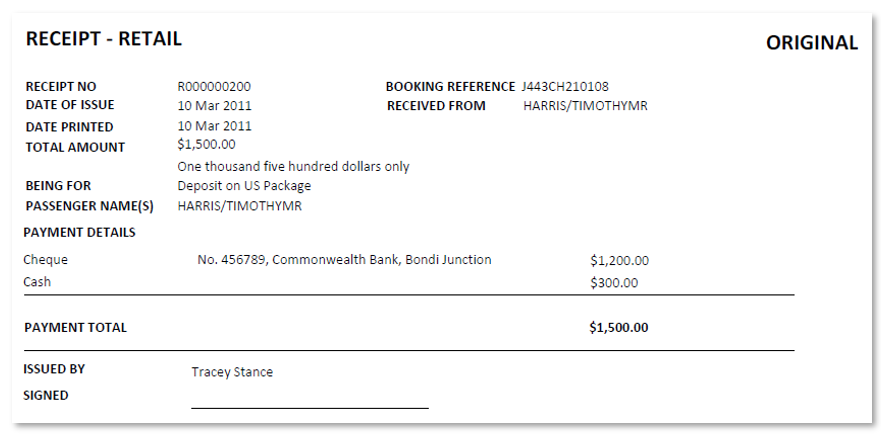
Multiple Passengers and Forms of Payment
In a multiple form of payment receipt, only the name entered in the Payer field for the first form of payment will appear on the printed document. Payer details from the other forms of payment will not appear. e.g. In the example below all four passengers have paid $1000 and each form of payment can be viewed on the screen showing each of the four different passenger names aligned to a payment. The printed receipt will read as though LChen/JaiMr, the main passenger has paid the entire amount. To view each of the individual payments it will be necessary to scroll through the buttons above Add.
Note: Should individual Receipts be required, ADD function should not be used, and individual Receipts should be created.
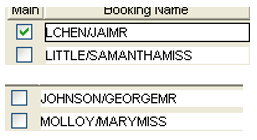
If more than one passenger and you wish all names to appear on receipt, it will be necessary to highlight those names prior to clicking OK to produce receipt.

Viewing Direct Deposit Detail
When direct deposit has been selected as the form of payment the transaction banner will show the Agency ID and transaction ID with the Bank Account ID and Deposit batch number when reopened.

Reprinting a Receipt
A receipt can be reprinted by reopening (double click) the Receipt from the Accounting tab, selecting Print from the Output To dropdown button and clicking the Generate button.
If the receipt has been previously issued, a new copy is produced with the word COPY printed on it.
Reversing a Receipt
If an error has been made in a receipt entry, or payment has been made into the wrong Trip file, the transaction can be reversed provided the status is C for confirmed. Transactions with a B status, for banked, are unable to be reversed until they are first removed from the Bank Deposit.
To Reverse a receipt, open the relevant receipt from the Accounting tab of the Trip file.
Click the Reverse button and answer Yes to the confirmation prompt.
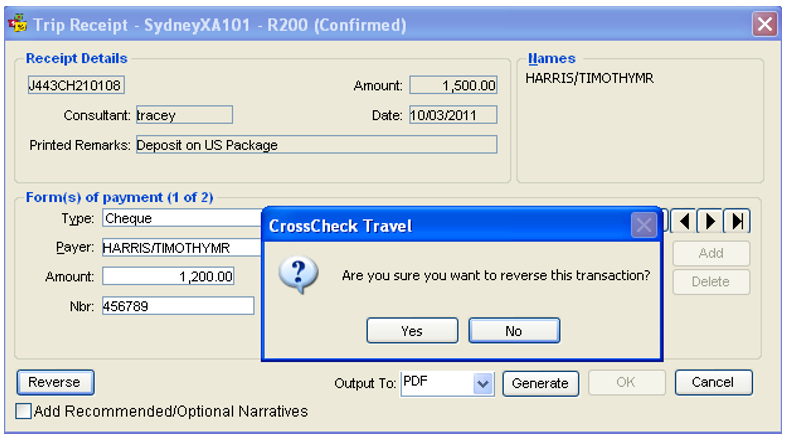
The Accounting tab summary line will change, showing a status of R for reversed and a new line with an X status, for cancelled, is automatically created to balance the reversed receipt.
Note: A Receipt CCCF cannot be reversed and must be refunded using a Refund to CCCF transaction.
See "Trip Refund CCCF" in Module 8: Trip Accounting Part 2.