Payment
There are several Payment options available in CCTE. Bulk payments and eNett payments are performed in the Creditor file by the System administrator or Manager. This is covered in the CCTE Finance User Course.
Individual payments can be processed from Ticket or Cheque Requisition screens.
There are 2 ways to access the payment window:
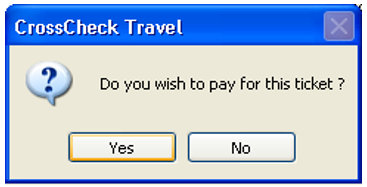
- By clicking on Yes to the question shown below, after clicking on OK and saving the transaction.
- By reopening a previously created Cheque or Ticket Requisition, by double clicking on this item in the account summary screen and clicking on the Payment button at the bottom on the displayed requisition.

Note: Many documents such as Cheque requisitions are able to be generated to PDF, PDF Email or PRINT.
A confirmation prompt will be displayed, click Yes to proceed to the Payment screen.
Both methods will retrieve the payment window, with details transposed from the Cheque or Ticket Requisition.

Completing the Payment screen
- Select the Type of payment from the scroll: Cheque or Direct Debit
- Enter a Reference number. If Direct Debit has been selected, enter the eNett, Money Director TIAS TIPS transaction number, or enter a cheque number if Cheque has been entered in the Type field
- The Description field is optional and does not print
- The current Transaction will be highlighted and the amount transposed into the Amount field
- Click on OK
- Click Yes to Save the Transaction
- Click Yes or No, to print question
- The accounting summary screen shows an updated status code P for Paid on the transaction

Reversing Payments
If an error has been made and a payment needs to be reversed, double click on Cheque or Ticket Requisition showing the Paid status in the accounts summary screen.
The Requisition CANNOT be reversed without reversing the payment first.

The title bar shows the requisition and payment screen transaction codes.
The Transaction Search facility can be used to locate the exact payment transaction. See "Transaction Search" in Module 6: Trip Accounting Part 1. Open the Payment transaction and select the Reverse button.
Note: When processing payments it is important not to process any individual payments for creditors using the Bulk Payment or eNett Payment system. These payments are processed by Administrators in one transaction for all Bulk Payment and/or eNett creditors.
Hiding Reversed/Cancelled Transactions
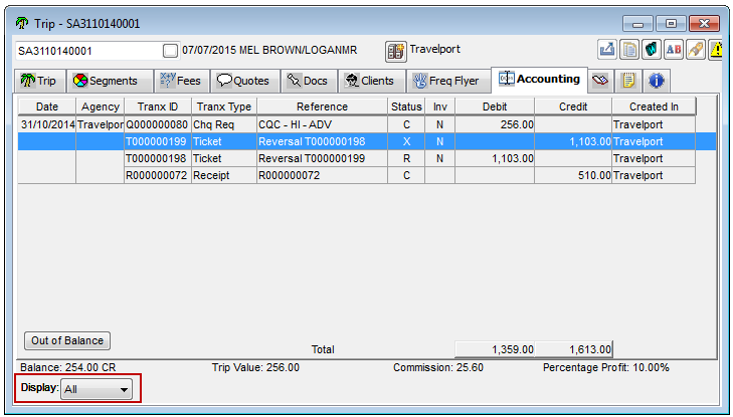
The default option for the display filter in the trip accounting tab is “All” for all the users. If the user chooses the “Active” or “Reversed” filter, the view for the accounting tab is then restricted to the selected display filter for the opened trip (regardless of the tabs the user switches to) until the user chooses to change it to another value or the trip is closed and reopened. Once the trip is closed and reopened the display filter switches default back to the “All” option.
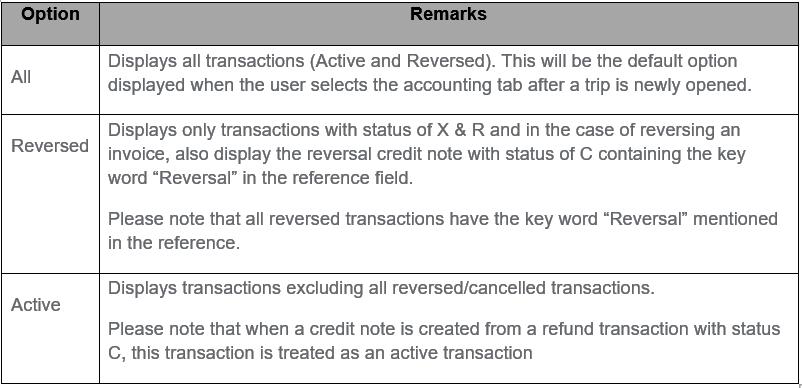
When the user selects the “All” option, the system displays all the transactions as illustrated in the screen shot below:
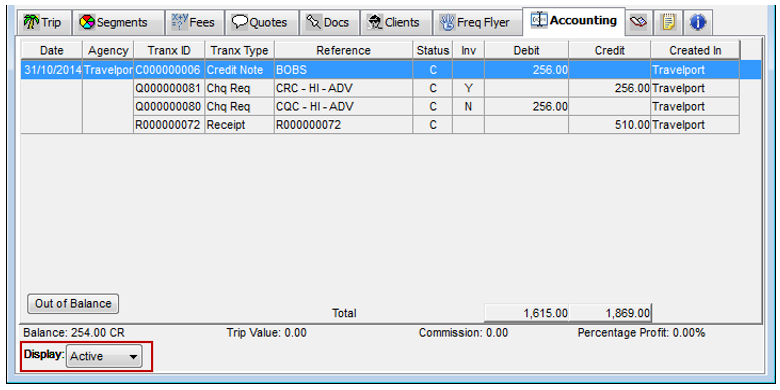
When the user selects the “Active” option, the system must display only the active transactions excluding any cancelled/reversed transactions as illustrated in the screen shot below.
Note: A credit note generated from a refund transaction is treated as an active transaction.
When the user selects the “Active” option, the accounting tab should be filtered to the “Active” view regardless of the trip tabs the user switches to as long as the trip file is open. If the user closes the trip file and opens it again, the accounting tab view should switch back to the default “All” option.
When the user selects the “Reversed” option, the system must display only the reversed/cancelled transactions as illustrated in the screen shot below. When the user selects the “Reversed” option, the accounting tab should be filtered to the “Reversed” view regardless of the trip tabs the user switches to as long as the trip file is open.
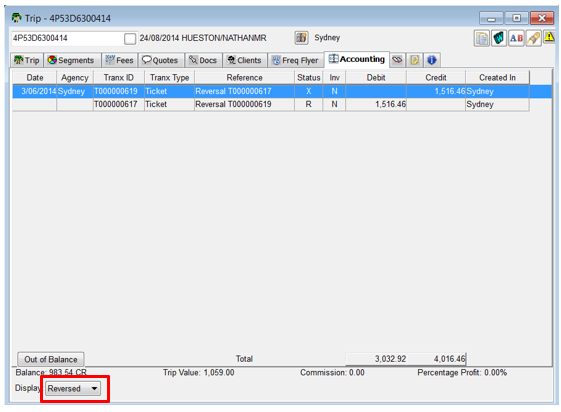
If the user closes the trip file and opens it again, the accounting tab view should switch back to the default “All” option.
Note: All transactions with a reference starting with the key word “Reversal” are reversed/cancelled transactions. These transactions have a status of X and R.
In the case of reversing an invoice, the reversal credit note generated with the key word “Reversal” in the reference field also displays as a Reversed transaction. A sample screenshot is shown below:
