Manually Creating Trip Files
With no file open, click the icon on the standard toolbar to open a selection screen.
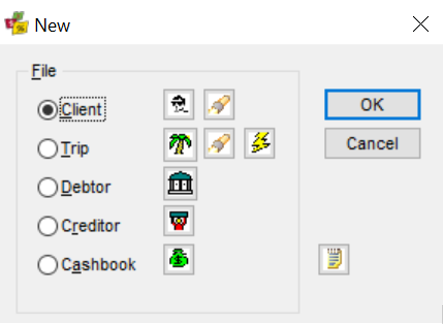
Click on the Trip radio button to start a new Trip file manually then click on OK to open a new blank Trip window.
Mandatory Fields
The blue colour indicates the mandatory fields, which must be completed before the file can be saved and a trip code created. A Booking Name or Group Name must also be entered before saving, as there is the option to complete either of these fields they are not coloured blue.
Completing the mandatory fields:

File Identity
After the Mandatory fields have been entered click on the Save icon to save the file and create a Trip file code.

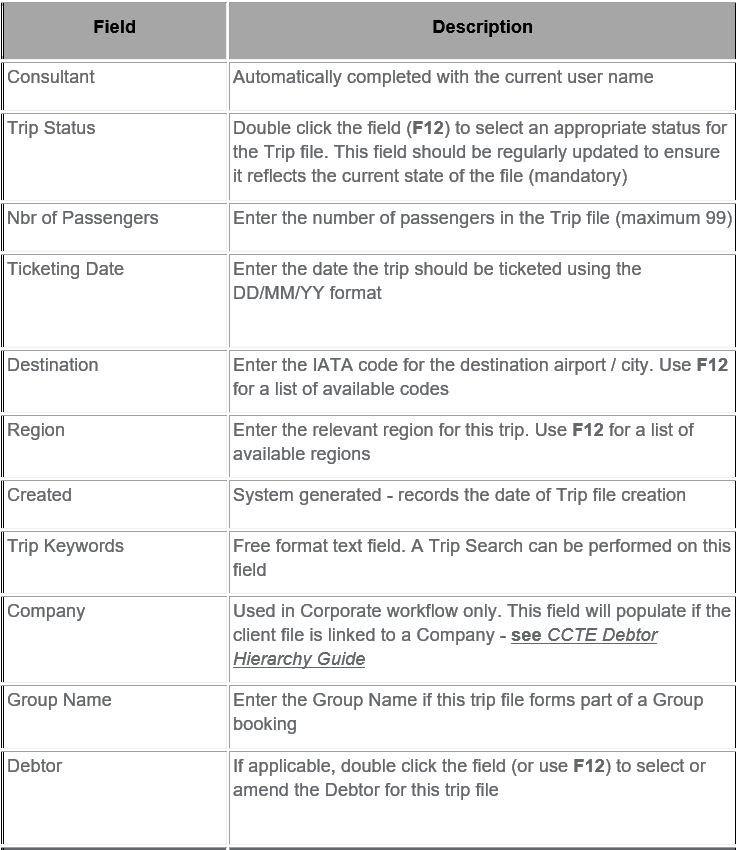
A unique Trip code is assigned by the system to each Trip file and displayed in both the drop-down list and window title bar. The structure of this Trip code will depend on whether the Trip has been manually created or downloaded from the Travelport+ host system.
Manually Created / Quick Trip Wizard Trip Code: AL2106220001

Downloaded Booking Trip Code: TTZ143100221

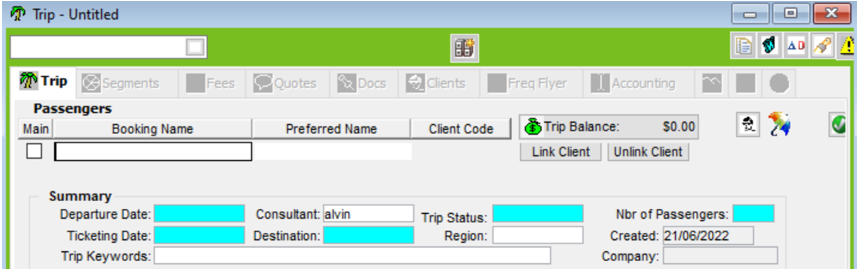
Trip Tab
The Trip file consists of the Summary bar plus a series of tabs. The initial screen or Trip tab is used as a summary screen, while the remaining tabs are used for more specific information.
Note: Company (Corporate) – Debtor and Cost Centre fields are greyed out for any merged Trip files, New Trip files will allow the Debtor and Cost Centre fields to be populated.
The following table details each field:
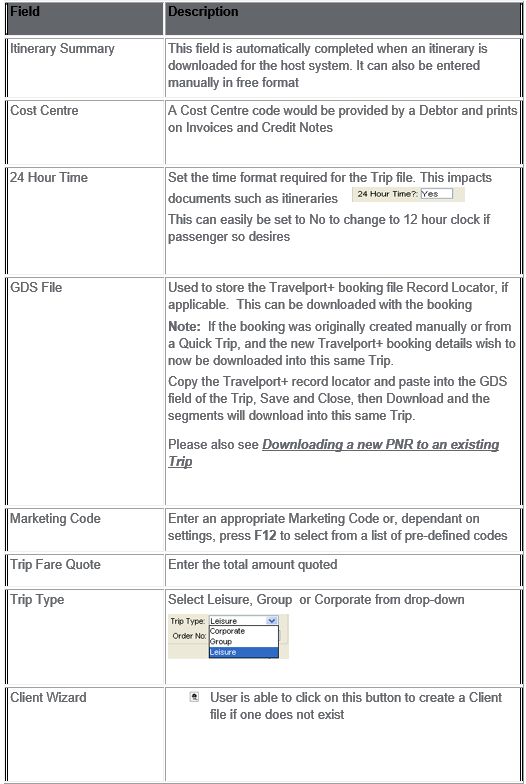
After the file has been saved, other areas on the Trip tab can be completed.
Passenger items
Main box
If there is only one passenger in the Trip file, this box will be automatically ticked on saving the file. If there is more than one passenger, place a tick next to the main passenger. More names fields can be added by clicking on the New icon or pressing Ctrl+N with your cursor in the name field.

Preferred Name
Enter the name the passenger uses (e.g. Ho Lee Fong Cheung prefers to be called Lee).
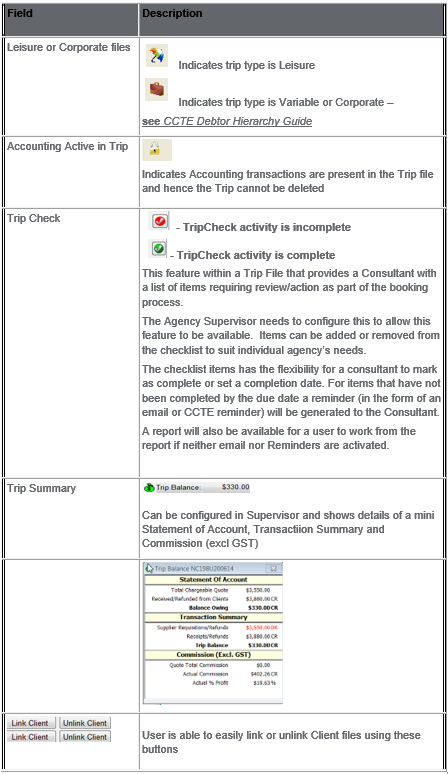
The Link Client and Unlink Client buttons are used to create passenger links from the Trip file to Client files. After these links have been created, the Client Code will be displayed. See "Trip File and Client File Linkage" in Module 5: Trip File.
Debtor
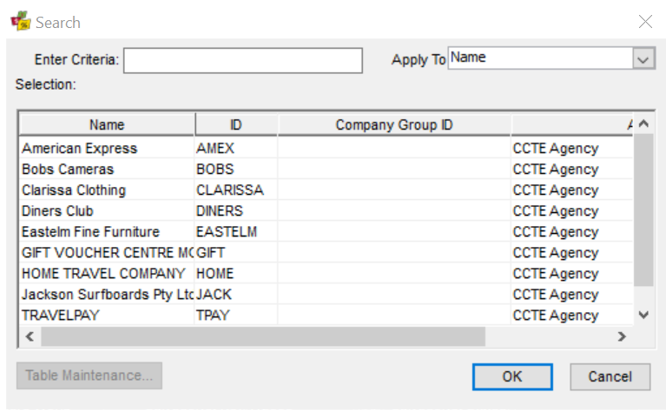
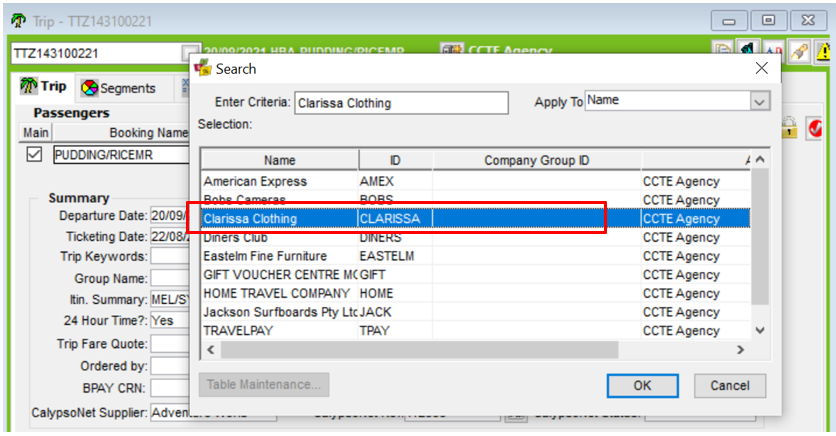
To link a Trip File to a Debtor, double click in the Debtor field:

Select the relevant Debtor File from the Search box and click OK to link to link the Trip File to the Debtor.
If a Trip File is already assigned to a Debtor and the Trip contains transactions which need to be invoiced to a different Debtor file to the one assigned, double click in the Debtor field to link the Trip File to a different Debtor file.
Debtor Linkage
In order to raise invoices in the Accounting tab of a Trip file, the Trip file must be linked to a Debtor, as the Trip File draws the Debtor and subsequent Cost Centre information from the Debtor and Cost Centre fields on the Trip tab of the Trip File.
To link a trip to a Debtor, double click in the Debtor field to open the Debtor search box.
When the Debtor search box opens, select the appropriate Debtor from the list and click OK.
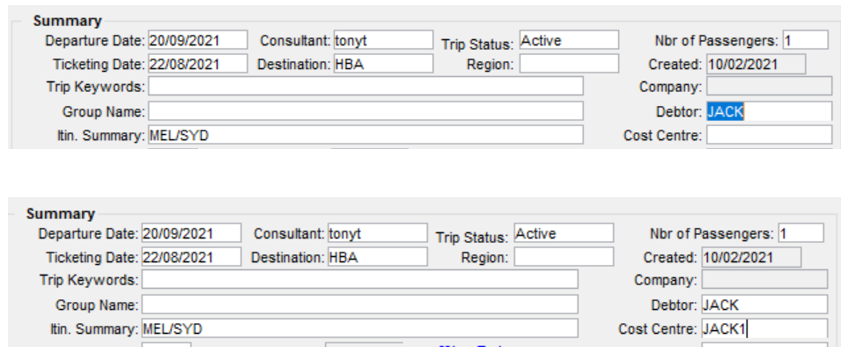
In the Trip tab, you should now see the selected Debtor (and if applicable, the Cost Centre to be charged) in the Debtor and Cost Centre fields.
For information regarding debtors, see Module 7: Debtor File. For information on invoicing debtors, see Module 8: Trip Accounting Part 2. For further information on Debtor accounting, see CCTE Finance User Guide.
Unlock Trip Debtor
At times a client may undertake a trip where you need to invoice multiple Debtors in the one Trip file.
In these cases, where you have linked a Trip file to one Debtor and need to invoice another, the user can unlock the Trip file and link it to a second Debtor in order to raise the invoice to the correct Debtor.
To unlock a Trip Debtor, return to the Trip tab and double click on the Debtor field and select the new Trip Debtor from the Debtor search box and click OK.
Once this change has been saved, proceed to the Accounting tab to raise an invoice to the valid Debtor.
For information regarding debtors, see Module 7: Debtor File. For information on invoicing debtors, see Module 8: Trip Accounting Part 2. For further information on Debtor accounting, see CCTE Finance User Guide.
Summary
The Summary area in the middle of the screen holds information on the actual trip being undertaken, and should have as much data as possible entered.
When a booking is downloaded from Travelport+ a mini Itin. Summary will be completed.

As well as 24 Hour Time, GDS File (Travelport+ record locator) and a link to www.Viewtrip.com will be created.
Note: 24 Hour Time is Yes by default, this can be changed to No if passenger desires a 12 hour time clock.
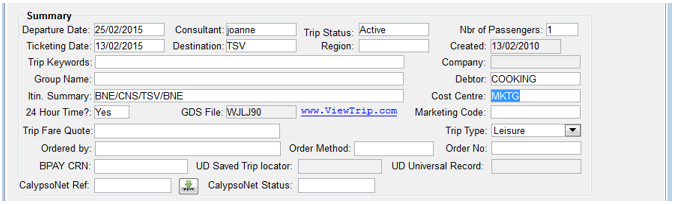
Trip files have a field for the BPAY CRN – see BPay CRN.
Trip Types can be set by default as Leisure, Group or Corporate – this field can be set by default per workstation in Tools/Options to personalise workstation settings. See Consultant Options.
It is recommended this be set by default to Leisure and only changed when creating a Group or Corporate booking.
Ordered by, Order Method, Order No and BPay CRN fields

ViewTrip link
The www.ViewTrip.com link provides easy access to the Travelport ViewTrip web site for viewing itineraries. Clicking the link opens www.viewtrip.com retrieves the itinerary for your trip file automatically.
The Viewtrip.com link only appears if a valid Travelport+ Record locator is stored in the GDS Field of the Trip tab.
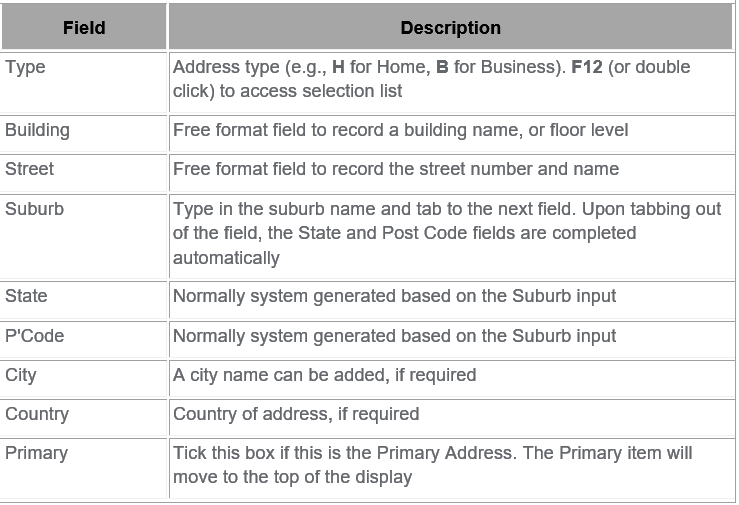
Contact Details and Address Fields
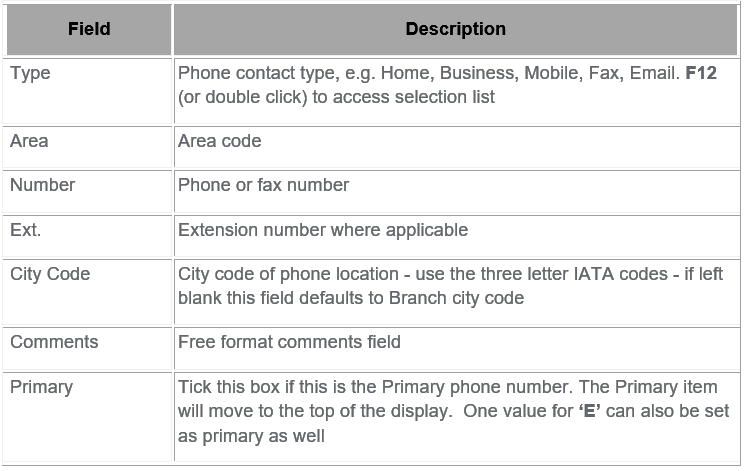
The lower part of the Trip tab is used to store the contact details. Refer to the table below to complete these fields. Additional lines can be added by clicking on the New icon while the cursor is in the appropriate field or by pressing Ctrl+N.

Contact Details
Address