Trip File and Client File Linkage
The linking of Trip and Client files allows for improved tracking of activity and sales. Multiple files can be linked to each other.
If a Client file has been uploaded to the PNR, on download, the linking will appear in the Clients tab of the Trip.
If the Client file has been linked manually or the Trip created from the Client file, the linking occurs on the Trip tab.
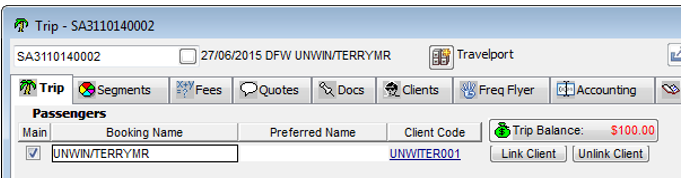
To link files manually, open the Trip file and select the Link Client button from the Trip tab, and the matching Client file will be retrieved in the preceding dialogue box.

If the client record is in a different name, enter the name, or part of the name and press the Search button to display the closest match. This is useful when a passenger has a trip file in her married name and the client file is still under her maiden name.

Select the Client name and click OK. The Client code hyperlink is displayed on the Trip tab and can be used to access the Client file.

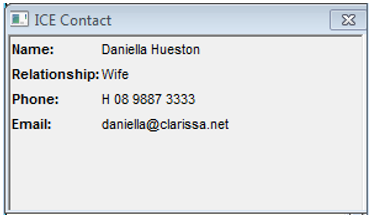
By linking the Client profile to the Trip file, the ICE (In Case of Emergency) Details will also link. To access the ICE details, click on the red cross icon found near the Contact Details on the Trip tab.

A window will appear that which contains the data.
Linking Multiple Passengers
If there are multiple passengers on the Trip file, each can be linked to its own individual client file. Repeat the linking procedure for each passenger on the trip file
Unlinking
If the incorrect Client file has been linked to the Trip file, they can be unlinked.
There are two types of links, Trip and Passenger links. Trip links are those created through the upload/download procedure. Passenger links are those created manually using the Link button.

Both link types can be reversed using the Unlink button.
Display the correct Trip file and click on the Unlink button on the Trip tab.
The hyperlink to the Client file will be removed.
Save the changes using the Save button on the standard toolbar (Ctrl+S).
Leisure Trip files
Leisure Trip files are represented by an Umbrella icon on the front of the Trip 
Variable and Corporate Trip files
For either of these options to be available, Debtor Hierarchy must be switched on in Branch to enable this feature to be available. Specialised training is also required prior to use of this functionality.
Variable and Corporate Trip files are represented by a Briefcase icon on the front of the Trip. 
Locking a Trip file
Indicates Accounting transactions are present in the Trip file and hence the Trip cannot be deleted. 
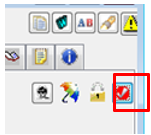
TripCheck ![]()
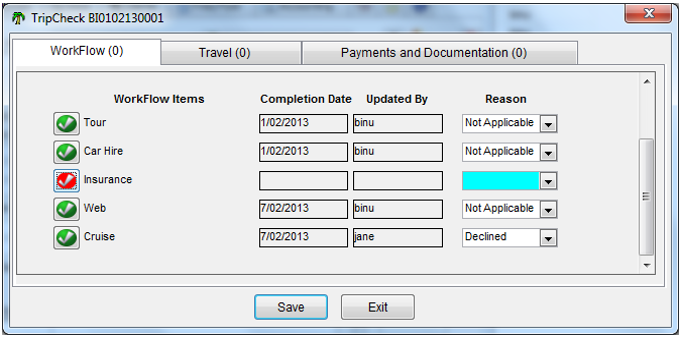
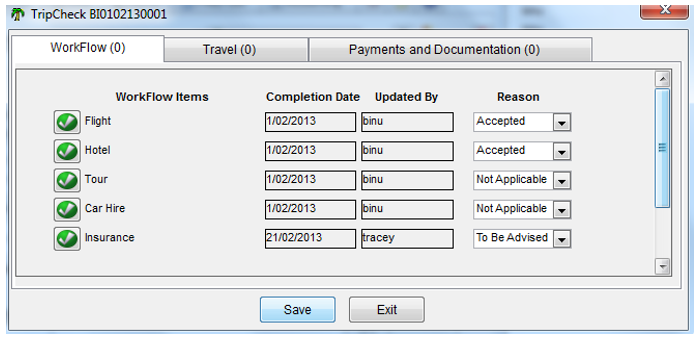
Clicking on the tick icon open will open the TripCheck Screen. The heading of the TripCheck tab shows the number of items that are currently due and require updating.
WorkFlow tab
The completion date for the sales activity is the earliest date of the Trip segment if one or more of the same Trip segments already exists in the booking and has not been actioned yet. This date is not viewable by the consultant elsewhere in CCTE.
The reason code attached to a particular work flow item or segment can be actioned by clicking on the green tick icon. 
When a booking is downloaded from Host, CCTE validates that a segment qualifies as a completed work flow item, and displays this item with a green tick icon, and will automatically update the segment in the work flow tab with the Reason “Accepted”, and the icon on the front of the Trip will change to red.

Where other service types have been made mandatory by Supervisor, it will be necessary for these fields to be completed with a valid reason.
CCTE will update the completed date and updated by consultant field at all times and cannot be edited by the user.
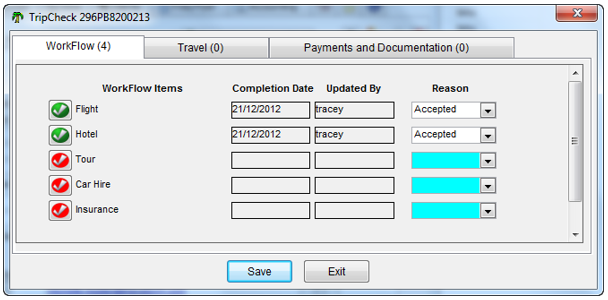
The remaining work flow items will be displayed with a red tick icon. The consultant can choose to action a red ticked work flow item by selecting an appropriate reason code. This action will update the work flow item with a green tick icon and with the current completion date and name of the consultant who has updated the reason code.
Clicking on a green ticked work flow item will enable the reason code to be edited by the user and display a red icon on the work flow item. Once the user selects an appropriate reason code, the system will once again update the work flow item to green colour and update the completion date and updated by fields.
The predefined workflow items will include Flight, Hotel, Tour, Car Hire and Insurance. If a new service type is added after the initial TripCheck WorkFlow setup, it will be available for selection in the subsequent TripCheck WorkFlow setups.
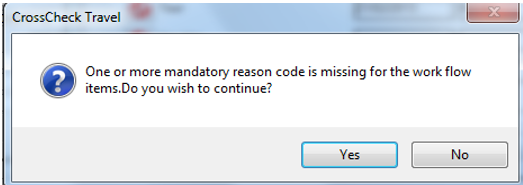
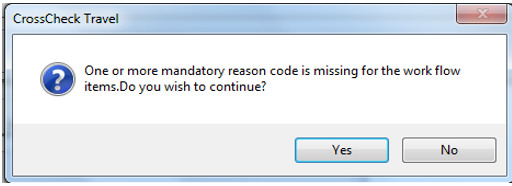
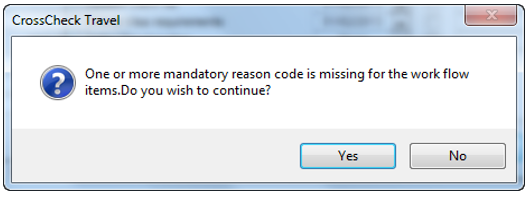
If the user attempts to Exit from the WorkFlow tab after only partially completing the remainder of the service types and not complete the mandatory reasons, a message will appear to ensure the user wishes to continue without updating the WorkFlow further.
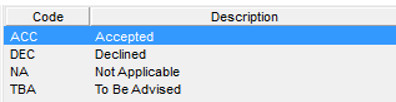
Predefined reason codes are set up in the database. The reason code "ACC" cannot be deleted, the reason codes can be made mandatory if required by the Supervisor.
Should the user need to update a work flow reason code, click on the icon if it is green. It will change to red, and the details can then be updated if necessary.
If the user clicks Save/Exit without updating the reason, a message will appear to advise one or more mandatory reason codes are missing, so the user can then decide whether to continue or not. The service type will remain in the WorkFlow tab to be actioned at a later time if Yes is selected. If user selects No the focus will go back to the WorkFlow tab so the reason code can then be added and Saved.
Once all Reasons have been completed, all items will appear with a green tick.
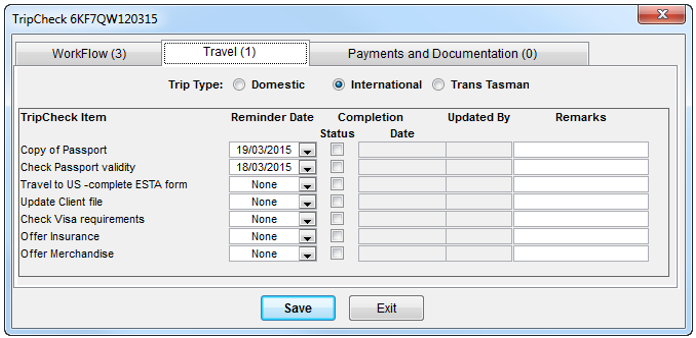
Travel tab
The TripCheck Items on the Travel and Payments and Documentation tabs are displayed as per the configuration in the TripCheck setup. The Supervisor decides the Agency requirements and whether to make this feature available.
Reminder dates are defaulted according to the Supervisor settings:
- None
- 1 day later
- 1 week later
- 2 weeks later
eg. Trip Check is activated 1 December 2012 and a new trip is created. The default setting is 1 day. The default reminder date for TripCheck on the trip file will be 2 December 2012. The consultant can then change the reminder date as required.
Trip created prior to the activation of TripCheck will display TripCheck items with a default date of “None”
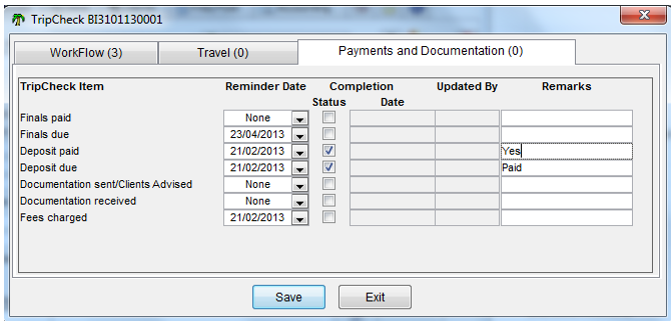
The user can select applicable reminder dates against the items or set the item as being Completed. The system will date stamp the activity with the current date and user. Free format text remarks can be added by the user.
If the item is not relevant to the user or if it does not require a reminder then the option “none” can be chosen for the reminder date.
Consultants can select a Sales Code within the TripCheck screen so that the items will be filtered based on the Sales Code that has been set against the item in Supervisor.
Any TripCheck item/s that match the items checked in Supervisor will show as active. The remaining TripCheck items (that do match the default Sales Code) will be marked as complete with comments of ‘Not Applicable’.
The Consultant will always have the ability to amend the Sales Code that has been set on the TripCheck items, and amend TripCheck items that have been marked as completed.
CCTE updates the name of the user who has actioned the TripCheck item whenever a reminder date is set.
Select Save when the TripCheck screen has been updated and Exit to return to the trip file. When the TripCheck is saved by clicking on the Save button, the information entered by the user will be saved for that trip.
Whenever a trip is updated with additional segments, and if at least one of the TripCheck items has past the earlier completion date, the trip will show the earlier completed item as “checked”.
It is the user’s responsibility to uncheck it and set a new reminder date as required. A message will be displayed to ensure the current completion date is to be reset.

When OK, the response below will appear on initial creation of TripCheck dates, or for any subsequent changes.
Should there be some mandatory reason codes missing for WorkFlow tab the user will be prompted to update the reason codes.
Payments and Documentation tab
The Payments and Documents tab works in the same manner as the Travel tab above.
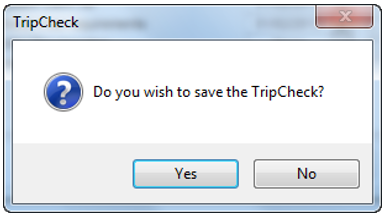
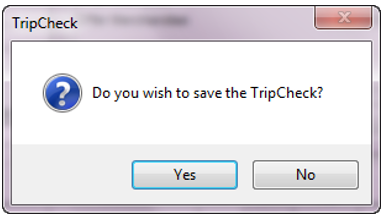
Clicking on the Exit button prompts a warning: Do you wish to save the TripCheck? Selecting Yes will save all changes. If No is selected the screen will close without saving changes and return to the trip file.
Trip File Action Buttons
The action buttons in the top right hand of a Trip file perform the following functions:
The Duplicate Trip  allows users to copy Trip file details into a new file. See “Creating a Trip file using Duplicate Trip Icon” in Module 5: Trip
The W icon  outputs the current itinerary details to Microsoft Word, using Itinerary style 4. See "Itinerary from MS Word Icon" in Module 9: Documentation
Trip Texts  provides a way to easily add comments to each segment before creating an itinerary. See "Trip Texts Tab" in Module 9: Documentation
Trip Search  opens the Trip search window. See "Trip Search" in Module 3: MyCCT
The Important Notes icon  opens a blank Important Note to enable the user to add a message.