CalypsoNet integration
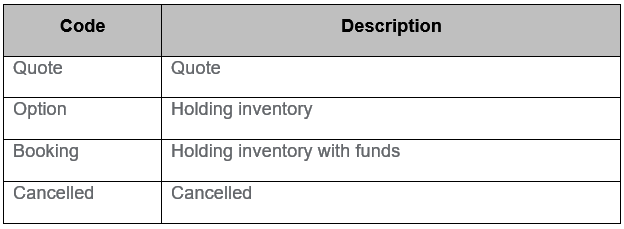
CalypsoNet is a travel wholesale system that allows Travel Agents to book travel products (such as air, land, or packaged content) with a variety of Travel Wholesalers. The CCTE CalypsoNet Integration enables agencies to import a CalypsoNet booking, made with one of the following wholesalers, seamlessly into CCTE:
- Qantas Holidays & Viva Holidays International
- QA Qantas Holidays & Viva Holidays Domestic
- Go Holidays
- Harvey’s Choice Holidays
CalypsoNet bookings can be downloaded and merged along with Travelport+ content into the same Trip file. Segments and quotes held in the CalypsoNet booking will be downloaded into the matching Trip.
A CalypsoNet booking may be imported in one of the following scenarios:
- A 100% CalypsoNet booking – i.e. air and/or land content from CalypsoNet;
- Air booked and ticketed in Smartpoint and land content from CalypsoNet.
- Air booked in Smartpoint and ticketed by a Consolidator or CalypsoNet Wholesaler and land content from CalypsoNet.
Note: Additional 3rd party content may be added manually by the user in the above scenarios.
Fields from the CalypsoNet booking are mapped to the appropriate CCTE fields. Not all fields can be populated in CCTE as the information may not be available from CalypsoNet or does not exist in the existing CCTE tables.
The imported CalypsoNet segments are ordered based on departure date and time provided the Auto order in the Services Types screen is checked. GDS, CalypsoNet and manual segment types will auto order as per the date time logic. However, there may be instances where the dates and time are not available in the data from CalypsoNet.
Departure dates, departure city, arrival date and arrival city are usually populated for all the segment types with a source against the segment of “C” to differentiate from the existing segment types.
Suppliers and Creditors must be manually entered by the consultant after download.
Product notes or descriptive information will also download into the Comments section of the segment.
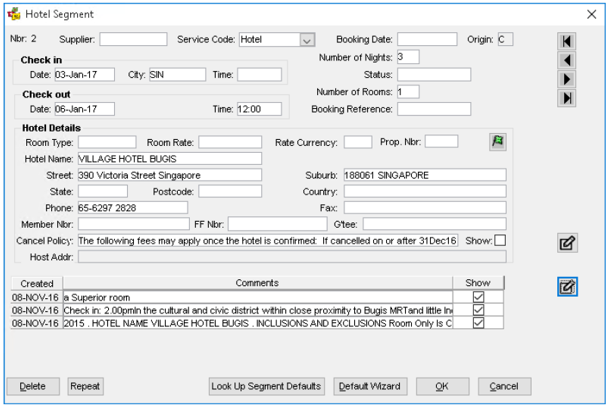
For hotel segments, the import file provides address details in a different format to that of CCTE. Addresses are populated in the street and suburb fields. If the length of the address fields exceeds the 35 character limit set for street and suburb, characters in excess of 70 characters will not be populated.
For car hire segments, the pickup location and drop off location each has a maximum character limit of 30 characters. If the name exceeds the character limit, it will be truncated.
When the product category is Modules, Cabin Bags or Accessories, a Miscellaneous segment will be created. Rail online booking fees also belong to this product category.
Importing from CalypsoNet
- A new trip file is not created when importing a CalypsoNet booking. The Trip File must already exist in CCTE, and then CalypsoNet booking data is ‘imported’. This Trip File will only require minimal data (i.e. Mandatory fields only) to create a ‘shell’ Trip File.
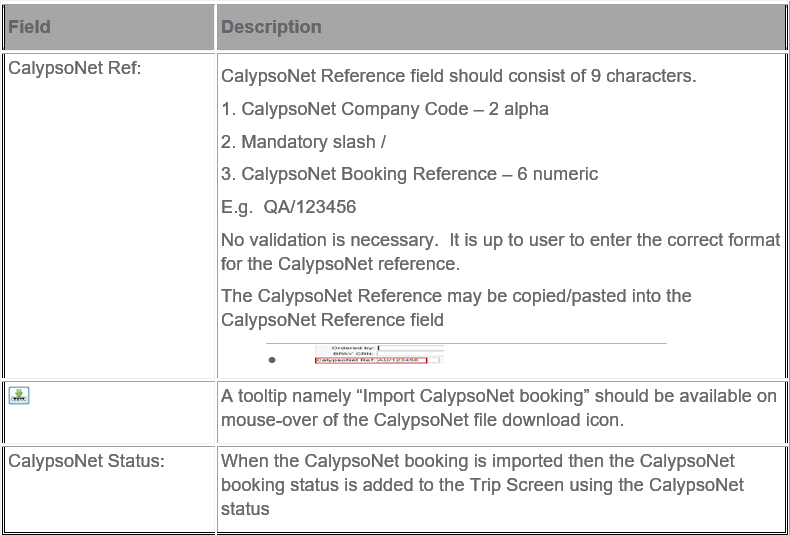
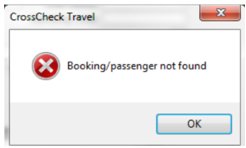
- The lead Passenger surname in CCTE Trip File should also match the lead Passenger’s surname in CalypsoNet. This is because retrieval of CalypsoNet booking requires the CalypsoNet Company Code + Booking Reference + Name. If there is a mismatch then the applicable error message will be shown at import.
- The CalypsoNet Booking reference is then added to the reference field
 and the Import function
  is selected.
 - The system will then save the Trip File and being the import process. When the CalypsoNet booking is imported then the CalypsoNet booking status is added to the Trip Screen using the CalypsoNet status.
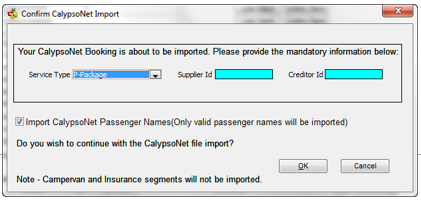
- On import into CCTE, you can select the Service Type, Supplier and Creditor within the import screen. It is the responsibility of the user to provide the supplier and creditor values for the segments (other than flights) and the package.
- It is the responsibility of the user to provide the room types/rates (for hotels), Car types and city codes when it is not available in the city code table.
- Passengers cannot be imported from CalypsoNet booking if the GDS file is already downloaded into the trip
- For each import the TOTAL of the CalypsoNet booking is added to the quote.
- In the booking import process the Product Code will uniquely identify the segment. If the Product Code and Product Description are the same for multiple hotel or tour segments and if all other segment information is the same for the product, the following message will be displayed:
“Unable to import the CalypsoNet booking as there are one or more duplicate hotel segments. There will not be any partial import of other segments and the entire trip will require a manual update.”
- A CalypsoNet booking can be reimported if changes have occurred. When a booking is re-imported a check box will display giving the option to create a new Quote. By default this is checked.

- If quotes exist for the trip and Re-import Quote is selected, a new quote will be created and the user will have to manually enter the Quote tab to delete old quotes or make them inactive. If the quotes in the system are identical, the system will prompt the Quote Maintenance screen and the appropriate action can be taken.
- If a cancelled CalypsoNet booking is re-imported the Trip Status will be updated to “Cancelled”. Quotes should be made manually inactive or deleted. Segments can be manually deleted after the deletion of the Quote.
Note: When air is booked via GDS then the Trip Status, Departure Date and Ticketing Date will be determined by Travelport+ (not CalypsoNet).
When air is booked via GDS then the option to import names is not available to the user (as the names will come from Travelport+).
CalypsoNet Confirmation of Import and/or Errors
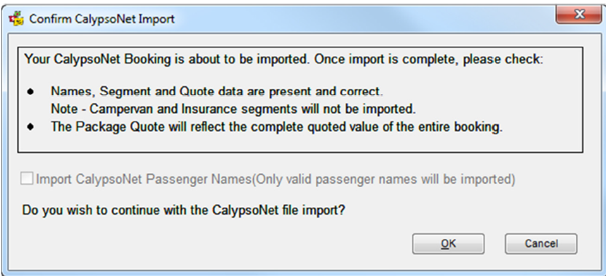
When the import function is invoked, the system will first save the available information on the screen. If there is any data validation error during the saving process, this will be notified to the user. If the validation is successful, a screen will appear which will include:
- Option to Import Names from CalypsoNet (radio button/check box)
(This is disabled if Smartpoint segments (segments with source of ‘G’) are present on the Trip). Names cannot be imported from CalypsoNet as Smartpoint flight segments are present.
- Successful Import requires CalypsoNet Company + Booking Reference + Lead Passenger Surname.
- The message box will have two buttons – OK and Cancel
- Ok - will proceed with import
- Cancel - will cancel entire import and User is returned to Trip File
Please note that the import CalypsoNet Passenger names checkbox must be disabled if a Smartpoint booking is downloaded first.
If CalypsoNet Booking import is unsuccessful then a further message box will appear to advise user that import has been unsuccessful.
- Where the names do no match, a warning will be displayed:
- If there is a change to Trip passenger names after the CalypsoNet import, the client code will need to be relinked after the import.
- Passenger names are required for the import. Where names have not been associated to the CalypsoNet booking the following message will be displayed.
“The CCTE import requires valid names for the Trip File. Please update the CalypsoNet booking with a valid passenger name before importing.
CalypsoNet Trip Status
When the CalypsoNet booking is imported then the CalypsoNet booking status is added to the Trip Screen using the CalypsoNet status.
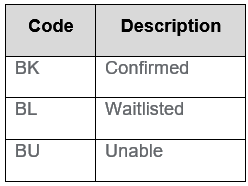
CalypsoNet Segment Status codes
The segment status for CalypsoNet codes that are non-GDS status codes include:
When CCTE Trip File holds Segments with a source of ‘C’ then the CalypsoNet booking reference field, status and the Import function are ‘locked’ and not editable.
If subsequently the CalypsoNet segments and quote are deleted, then the CalypsoNet booking reference field will be enabled again once the Trip File has been saved. This will allow a user to enter another CalypsoNet booking reference if required.
CalypsoNet Service types
Service Types with the following Service Codes have been created within CCTE to handle CalypsoNet imports:
- Package (P)
- Transfer (Z)
- Activity (Y)
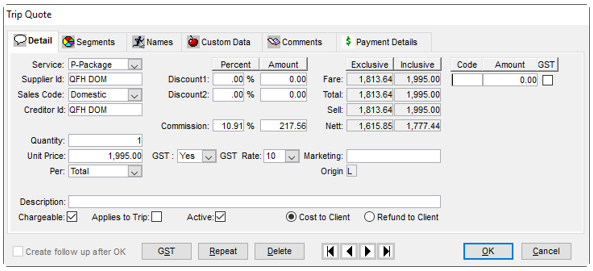
Package segment
Package is only used on import for quotes that are created from CalypsoNet. This is downloads as a consolidated total of all services in the quote or invoice from the wholesaler.
The package service type will be used for a CalypsoNet quote
Transfer segment
Instead of the standard number of units, the field reflects number of passengers.
Any description of the transfer segment should be updated in the comments section.
Activity Segment
When downloading the following CalypsoNet services, they will appear in CCTE as Service Type- Activity: The activity description is populated in the comments section
- Cooking instruction
- Diving
- Event
- Meals
- Scooter rental
- Show
- Ski package
- Spa package
- Sport
- Ticket/admission
- Wedding
- Rent a yacht
Segments Tab
The Segments tab provides access to all itinerary details related to the current Trip file. Segments can be manually added or generated automatically through a download from Smartpoint.
The segment summary window provides an overview of the itinerary and a Source code of L means this segment was created locally and a G means it was downloaded from Smartpoint.
Highlighting any line will display a summary of the segment information in the lower half of the screen.
Double clicking on a line will open the segment input window where any of the details can be viewed, edited or deleted.
For further details, see "Working with Segments" in Module 5: Trip File.
Fees Tab
Fees created in this area can then be converted into a Quote item or directly into a Cheque Requisition. For any Fees to be charged to customers, the agency administrator needs to setup standard fee types in CrossCheck Travel Enterprise which will become available for all users in your office. See CCTE Finance User Guide.
The number of Fee Types that can be setup is unlimited, but they must be linked to one of these fees related Service Types.
Using the Fees Tab
The Fees Tab allows you to allocate multiple fees of different types to the Trip file.
These fees will normally be manually entered however, merchant fees can be automatically created after entering a Credit Card receipt.
To set up the merchant fees automatic creation, both the Credit Card table and the Fees table must be updated. For more information see CCTE Finance User Guide.
To charge a Fee to the passenger(s) on the Trip File, click on the Fees Tab and select the appropriate Fee.
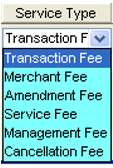
In the Fee field is a drop-down list of Fees Rules created by your agency administrator. These will appear in alphabetical order of the Fee Codes created, see CCTE Finance User Guide.
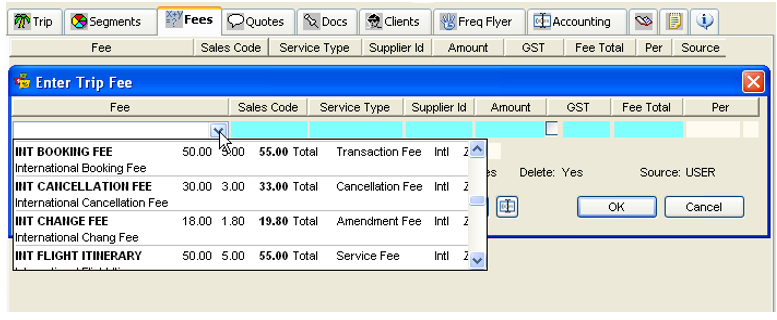
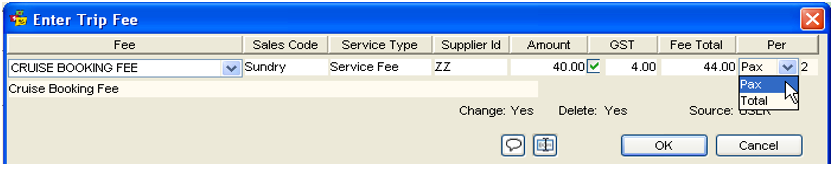
The selection of one of these Fee Codes will retrieve all the associated Fee data into the screen. This information can then be edited if needed, so that amounts or descriptions can be altered to customise the fee for each Trip File.
You can also change the Per field to calculate a fee per passenger. The quantity will be automatically calculated from the number of passengers on the Trip file.
When a Credit Card receipt is entered on to a Trip file, the merchant fee will be created in the Fees tab.

From within the Trip Fee window, a Quote OR a Cheque Requisition can be generated if required.

The choice between these two options is likely to be dependent on the type of customer being charged.
For a Corporate customer, you are likely to go straight into creating a Cheque Requisition (then Invoice this transaction) while for a retail customer, a Quote could be created so that these amounts can be included in the overall Quotation to the customer.
Otherwise, the Fees can be saved without creating either a Quote or a Cheque Requisition.
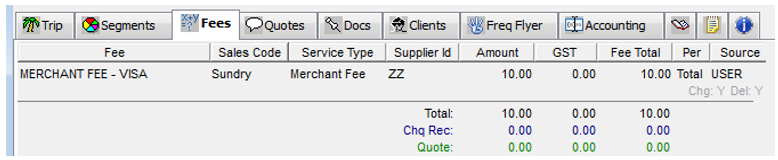
When the Service Fee items have been saved, they will display on the Trip Fees tab as individual items, with a total amount given below. Existing fees can be re-opened and edited if necessary.
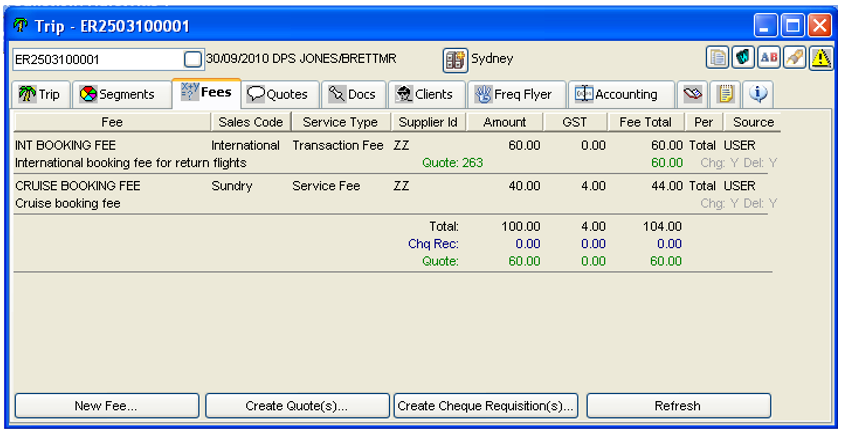
Alternatively, the four buttons at the bottom of the Fees tab can be used to perform the following tasks:
A new fee can be added to the Trip File at any time.
Create Quote(s)
A Quote will be created for the selected Fee (which will be highlighted in dark blue). The Quote transaction number will display on the right-hand side of the Fee Tab.

Create Cheque Requisition(s)
A Cheque Requisition will be created in the Accounting area of the Trip file for the selected fee (which will be highlighted in dark blue). The Chq Rec transaction number will display on the right-hand side of the Fee Tab.

Flexible Commission Rate on Fees
It is now possible to set up some Fee types so that the Commission Rate is a percentage less than 100%. This option would be used when the agency is not deriving the total revenue from the fee being charged to the customer.
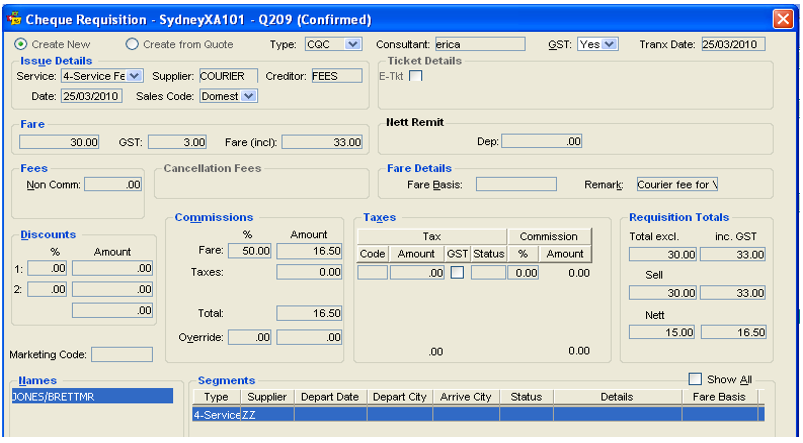
e.g. A standard courier fee is ($15.00 plus GST) charged to the Travel Agency and the Agency adds on an additional $15.00 so that cost to the customer is a total of $30.00 plus $3.00 GST.
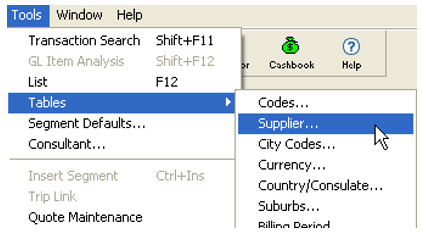
To set up a Fee in this way, the applicable Commission Percentage rate needs to be entered in the Supplier Tables. To access these tables, Select Tools/Tables/Supplier.
Select the appropriate supplier, enter the default commission level, then Save and OK
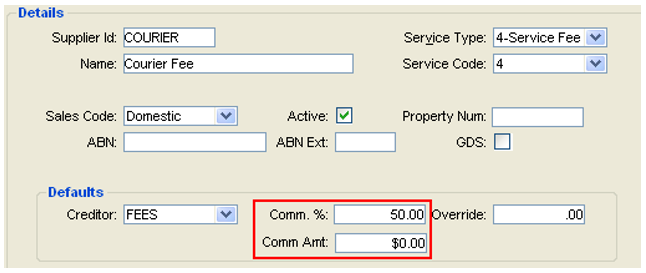
When this Fee is used by the standard methods, the Fee Total will be the full amount of the fee being charged to the customer.
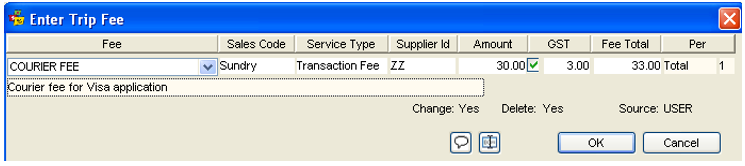
A Cheque Requisition subsequently created from the Service Fee will generate a transaction that has the applicable amount of commission but also a Net Amount payable to the Creditor. The amount payable to the Creditor can later be included in a Payment entry incorporating other outstanding amounts.
Deleting of Fees
It is possible to delete a Fee that has a Quote or Cheque Requisition attached, but you must first delete the related Quote or reverse the Cheque Requisition.
When a Quote is being deleted, the system will check whether this Quote was originally created from a Trip Fee. If it was generated from a Fee, the following prompt will appear so that the user can delete the original fee as part of this process.
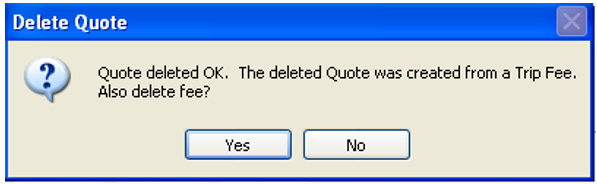
Click on Yes to complete the process.
When reversing a Cheque Requisition that was created from a Fee, no prompt will appear. However, you can then go into the Fee tab and delete the fee by highlighting it then pressing Ctrl+D.
Quotes Tab
The Quotes tab stores detailed quotes for passengers and produces high quality quotation documents. The quote can also be used to generate Ticket and Cheque Requisitions (see"Ticket and Cheque Requisitions" in Module 6: Trip Accounting Part 1) and to produce Invoices and Credit Notes.

The lightning bolt button gives direct access to the Quick Trip functionality. See "Trip File and Client File Linkage" in Module 5: Trip File.
For further information on the Quotes tab see "Working with Quotes" in Module 5: Trip File.
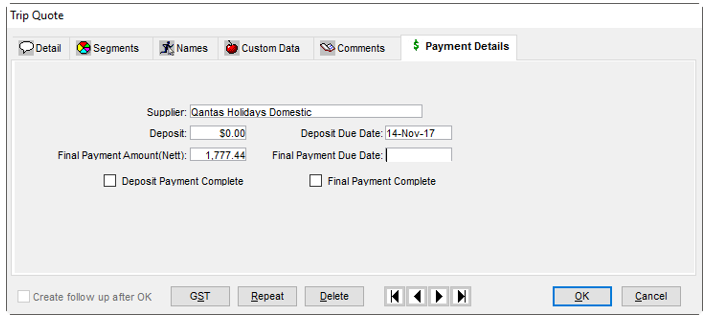
Quotes Payment Tab
Quote Payments tab allows for Deposit due and Finals due and can be switched on for selected user groups by Supervisor to track when payments are due. The auto population of the Deposit Due field and Finals due field on the Trip Quote screen is based on the segment departure date in the trip file.
The Supplier tables once populated by Supervisor will stipulate the Deposit Due amount and when
Finals are Due (…. Days prior to departure), see CCTE Finance User Guide.
The Finals Due field should be calculated based on the number of days prior to the earliest segment departure date attached to the Quote. The earliest departure date of the trip segment is used up irrespective of how the segments are ordered.
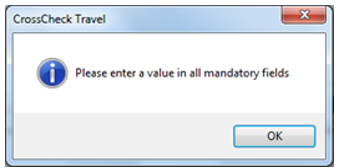
When Mandatory field is not updated a notification, message will appear:
The text fields are auto-populated by picking up the information from the quotes screen and supplier table. These text fields except for the supplier field are editable by the user. These fields are mandatory depending on the configuration by the supervisor.
The deposit payment and final payment complete checkboxes need to be actioned by the user. ‘Deposit Due Date not paid’ means there is no tick on the ‘Deposit Paid box’ in the quotes screen. ‘Final Due Date not paid’ means there is no tick on the ‘Final Paid box.’ In the quotes screen
All other buttons at the bottom of the screen behave as they do on all other quote tabs.
Any subsequent changes to the payment details after there has been a change to the initial quote will need to be manually changed.
Docs Tab
The Document tab provides a record of all documents issued for a Trip file. Each item is automatically stamped with the date and time of creation and the consultant ID. The re-issue of a document does not override a previously stored item.
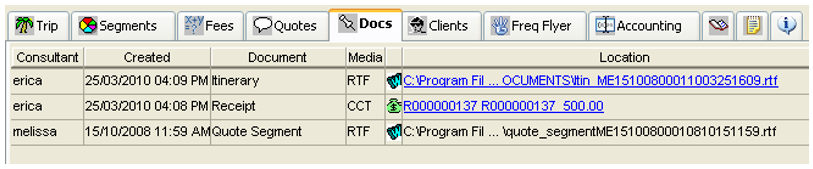
CCTE will save the document at the location when it is saved or emailed as WORD or PDF. It will also record the history of the documents which were saved, printed or emailed. The history will display in the DOCS tab page on TRIP profiles for its documents. The saved document can be viewed by clicking on the hyperlink.
Link documents or files to the Trip and Client files
An external document (e.g. a pdf, a .doc file, a scanned image etc.) can be linked to a Trip File or to a Client File within CCTE. This is done via a link to a default folder, the path of which can be setup in the Supervisor module. Documents are not uploaded to the database, CCTE will store a hyperlink which points to the file in the user’s chosen folder or shared path. For more details, see Module 4, Client/Docs Tab.
Reprinting Documents
Any item under this tab can be opened via the hyperlink in the Location column and reprinted.
Deleting a Document
Any non-accountable document can be deleted from this tab by clicking on the line to highlight it and then press the Ctrl+D keys.
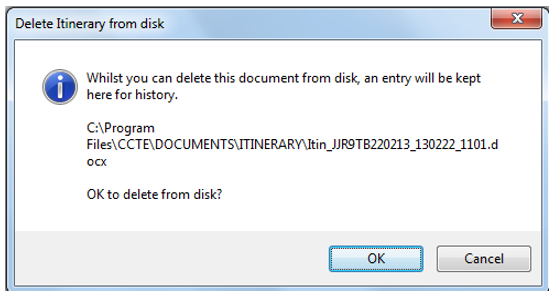
Click OK to continue and delete.
The selected line will remain on the Docs tab but will be ‘greyed’ and the hyperlink is inactive.
Note: The Itinerary, Quote and Statement of Account documents reflect Itinerary Segments and Quote costs as at the date and time they were issued. If Segments and Quotes are changed existing documents are not updated. A new copy of the applicable document should be issued as required.
Clients Tab
The Clients tab displays a list of all clients that have been linked to this Trip.

Frequent Flyer Tab
For further details, see "Trip File and Client File Linkage" in Module 5: Trip File.
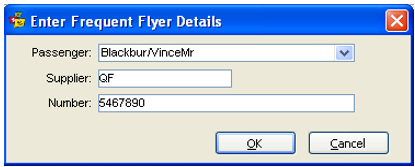
The Frequent Flyer tab displays information on Frequent Flyer programs associated with the trip file. This information can be passed through automatically from the download procedure or can be added manually. Up to ten Frequent Flyer or membership numbers can be uploaded and downloaded.

To add Frequent Flyer information manually:
- Click in the New icon on the standard toolbar or type Ctrl+N.
- Select the Passenger name from the list and enter the relevant Supplier and Number.
- Click OK to save the details. Repeat this for each passenger and Frequent Flyer program.
Accounting Tab
The Accounting tab lists all accounting transactions in relation to the Trip file. The details at the bottom of the screen assist with financial analysis.
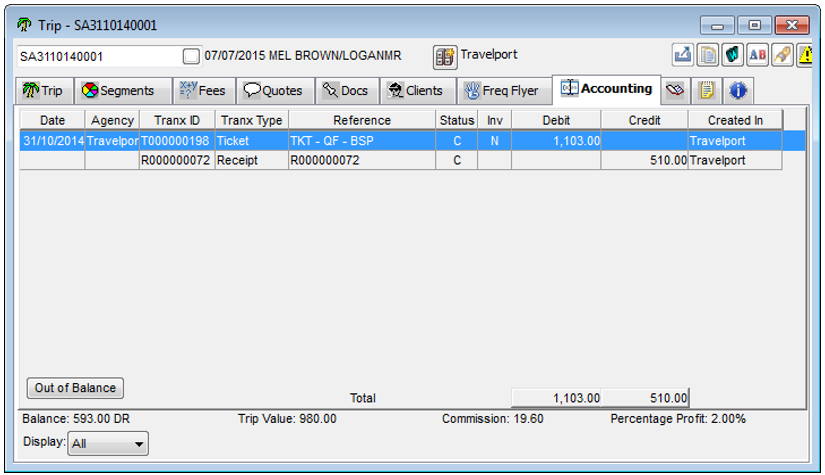
For details about creating accounting transactions, see Module 6: Trip Accounting Part 1 and Module 8: Trip Accounting Part 2.
Clicking on the Out of Balance button will open a screen where consultants can record the reasons for the file not balancing. This function needs to be activated in the administrator settings and codes entered in Tables. For more details, see Module 6: Trip Accounting Part 1.
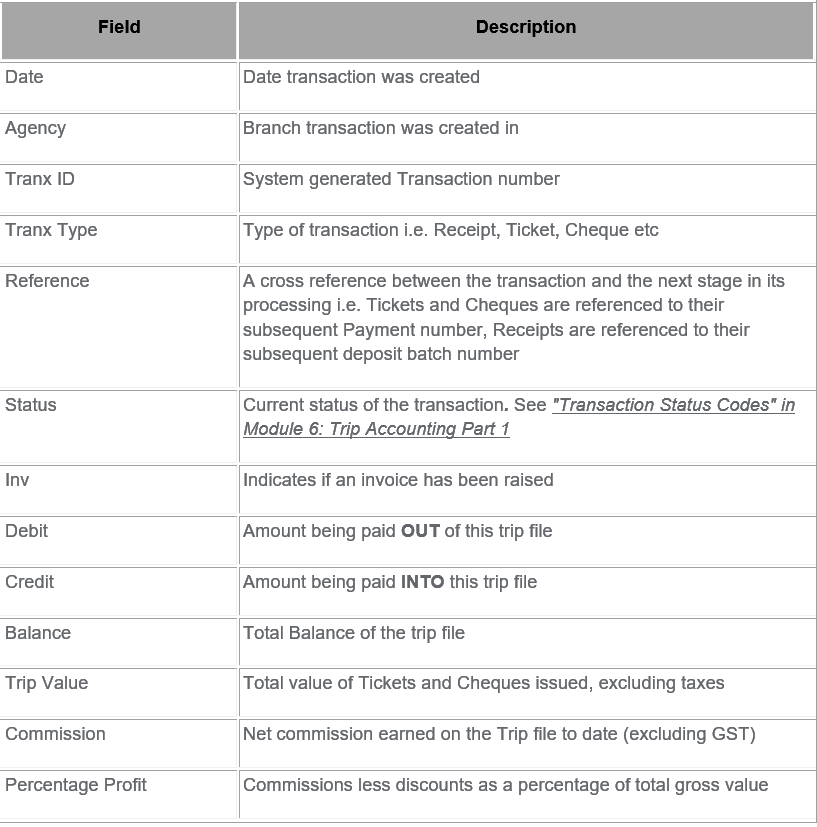
Comments Tab

The Comments tab is used to record any additional information relating to a Trip file. The tabs on the left hand side of the screen divide Comments into two categories:
- User - Those entered by the User
- Host - Those downloaded from Smartpoint
User Tab
Select the User tab and enter any free text comments.

Host Tab
When the Trip file has been created via a download from Smartpoint, data from various Booking File fields is automatically placed into the Host Comments screen.
Workflow Action Items Tab
The Workflow Action Items tab is used to list all Action Items that have been created for the currently selected Trip file. See "Action Items" in Module 3.

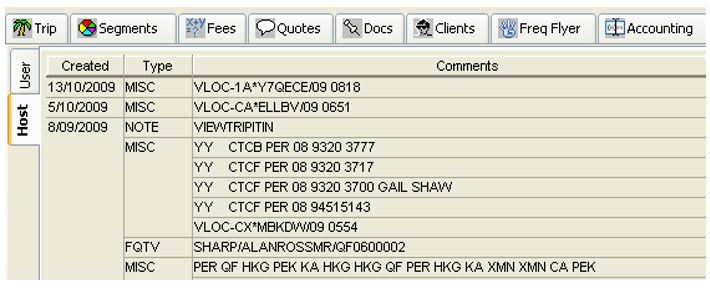
Overview Tab
The Overview tab provides summary of all activities in the Trip file.
The upper section shown in blue includes the consultant name, the file status and an itinerary summary along with any Booking reference numbers taken from the Trip tab.
The lower section contains User and Host Comments and all accounting transactions on this file. Every entry has the user name, date and time attached, and symbols to assist in identifying the type of entry.
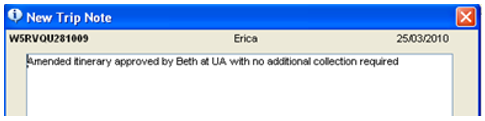
Manual Addition
Notes can be added to this tab by clicking on the Overview tab and pressing CTRL + N or by clicking on the New icon on the toolbar. This is a free text screen. Type your note and click OK to save this addition.
Deleting
Entries cannot be deleted from the Overview tab however if a User Comment is deleted under the Comment tab it will also be removed from the Overview tab.
Downloading to a Manually Created Trip File
Once a trip file has been manually created, segment information can be downloaded without creating an entirely new Trip file. This is useful where a client may have booked a land package and then returned to ask for flights to be booked.
To add the segment information into the Trip file:
Book the required segments in Smartpoint and ensure the file is saved. Make a note of the Record Locator.
Open the manually created trip file in CCTE and enter the record locator (exactly as it given in Smartpoint) into the Booking File field on the Trip tabs Summary section, and save the Trip file.

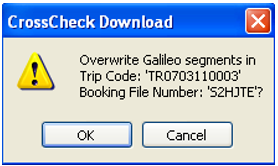
Re-open Smartpoint and retrieve booking file (if not already open). Select the download button and a prompt appears, confirming the choice to download into an existing manually created Trip file.
If the name in the Trip file does not match the name in the Smartpoint file exactly, the download will copy the name from Smartpoint over the name in the original Trip file.
The new segment is automatically added under the Segment tab, with the Source code of G for GDS.

Note: If quotes have been created against the manually created trip file, these may require adjustment to include the new segment information. See "Working with Quotes" in Module 5: Trip File.