Opening Client Files
Client files contain information on travellers such as contacts, passport details and preferences. Each Client files store information about one traveller, however CCTE provides the ability to associate Clients (such as husband and wife or business colleagues).
Client files can be accessed using any of the following methods:
- Clicking the Client file icon on the standard CCTE toolbar.

- Using the MyCCT pre-set or Client Search folders. See "Clients" in Module 3: MyCCT.

Creating Client Files
With no other files open in CCTE, click the New icon on the standard toolbar to open the New dialogue box.
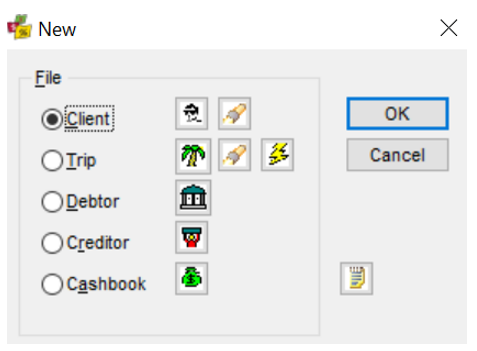
Client file is the default setting. Click OK to open a new Client File window.
In the new window, blue fields indicate mandatory information.

The recommended procedure to complete a Client file is to enter the mandatory fields, save the new file (making the additional tabs available), then complete other non-mandatory areas.
- Type the clients Family Name (Surname)
- Recommended to add Middle Name at this time (needed for Passport Docs information)
- Type the client’s first or Given Name
- Click the Save Icon on the Standard Toolbar
A unique Client Code is created for the record when it is saved and is displayed in the top left field (eg. ARCHDAV001).
The Client Code is constructed using:
- The first 4 characters of the Surname
- The first 3 characters of the Given Name
- A system assigned number.
As the Client file is now saved, the non-mandatory fields on the Client tab and other tabs can be completed.

A tick box is available in the CCTE Client module to identify where a customer has no middle name. This assists agents in not having to reconfirm the correct name with the passenger each time they book. By having the ability to select the tick box ‘No Middle Name’ it easily identifies the customer has no middle name.
When a tick exists in the tick box the Middle Name field should be greyed out and blank. The user should not be able to enter any characters in the Middle Name field. If the tick box is not ticked the Middle Name field must not be greyed out and the user should be able to enter characters in the Middle Name field.
If the Middle Name field has been populated and then the ‘No Middle Name’ tick box is selected the data in the Middle Name field will no longer display, it will be blank.
The tick box behaviour appears on the following screens:
- New client screen
- Client file created from Trip file
- Copying a client file
- Retrieving a current client file
Contact Details and Addresses
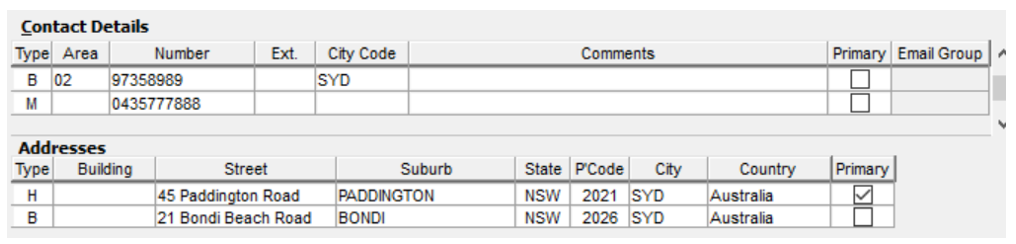
If the Type is ‘A’,’B’, ‘C’, ‘F’,’H’, ‘M’, ‘O’, ‘P’,’R’, ‘S’ or ‘T’ then the user will be able to make one value as Primary and if the Type is ‘E’ then user will be able to select one value for ‘E’ as primary as well. This will be applicable to all other modules as well, including Trip, Debtor and Creditor.
Email Group functionality allows the Agency to specify a group of email recipients, rather than just a single email address, for certain financial documents – see Email Group.
Contact Details
|
Field |
Description |
||
|
Type |
Phone contact type, e.g. Home, Business, Mobile, Fax, Email. F12 (or double click) to access selection list. When a Debtor is entered in the Company Details field, their phone number will automatically be entered in this section as the Business number |
||
|
Area |
Area code |
||
|
Number |
Phone or fax number |
||
|
Ext. |
Extension number, where applicable |
||
|
City Code |
City code of phone location - use the three letter IATA codes - if left blank this field defaults to the Branch city code |
||
|
Free format comments field |
|||
|
Primary |
Tick this box if this phone number is the Primary number to use – one value is also to be selected for ‘E’ as primary as well |
Address Fields
|
Field |
Description |
|
Type |
Address type, e.g. H for Home, B for Business. F12 (or double click) can be used to access selection list. When a Debtor is entered in the Company Details field, any address items completed in that file will be transposed into this section |
|
Building |
Free format field to record a building name, or floor level |
|
Street |
Free format field to record the street number and name. If a post box address is to be added, populate the PO Box number in this field (e.g. PO Box 123) |
|
Suburb |
Type in the suburb name and tab to the next field. Upon tabbing out of the field the State and Post Code fields are completed automatically. |
|
P’Code |
Normally system generated based on the Suburb input |
|
City |
If required a city name can be added |
|
Country |
Country of address, if required |
|
Primary |
Tick this box if this Address is the Primary one and is to be used for all documentation for the Client |