Some of the Setup-Only tabs will have default information already included as recommended by Travelport, whereas others will require the supervisor to enter choices for this Network.
Skip To:
Main Tab
Setup Tab
Security Tab
Documents Tab
Custom Fields Tab
Mandatory Trip Fields Tab
Mandatory Quick Trip Fields
Main Tab
Enter an Organisation Code. This code must be 3 characters. It is not linked to any other fields so can be the user’s choice.
Enter an Organisation Name. This is a free text field and is not linked to any other fields.
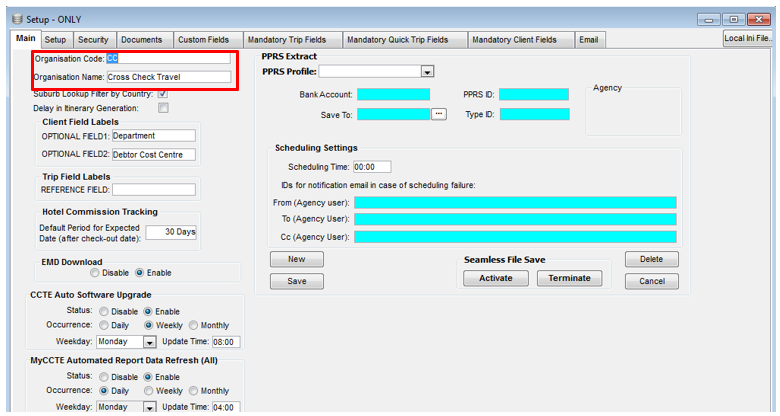
Suburb Lookup Filter by Country – allows Suburb table within CCTE to filter by country, i.e. AU or NZ
Delay in Itinerary Generation – if this is ticked it may slow itinerary production, unticked by default
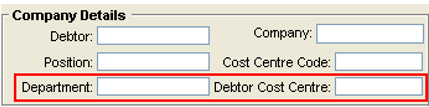
Client Field Labels
The Client Profile has two fields that can be customised for Agency Specific Data. These fields are on the face of the Client Profile in the Company Details area.
To save your entries, click on the Save icon on the main toolbar or press the CTRL+S keys.
Trip Reference Labels/Field
This is a Search functionality, currently not in use.
Hotel Commission Tracking
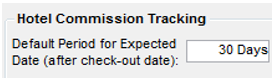
The default period for when Hotel Commission is expected to be received is 7 Days. This can be updated in Security -> Setup-Only -> Main -> “Expected date”
– See Hotel Commission Tracking in CCTE Consultant User Guide for further information.
Electronic Miscellaneous Download (EMD) Configuring for Download
Users have the ability to enable or disable the download Ancillary Services with EMD in the CCTE database.
The following will be captured in the Supervisor>Main tab. An option called ‘EMD Download’.
There are 2 radio buttons:
- Disable – the download and re-download for Ancillary Services and EMDs will not be created on download.
- Enable – the download and re-download for Ancillary Services and EMDs will be created on download.

The default option will be set to enable.
When the EMD is enabled, this will automatically create Ancillary Services in Tools/Tables/Service Types so that segments and ticket requisitions can be created.
Auto Software Upgrade
This feature is available from CCTE V12.3 onwards.
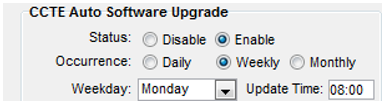
- User is able to Configure Auto update feature in CCTE from setup screen.
- User has the ability to Enable and Disable the Auto update feature.
- Occurrence of Auto update can be set to be Daily, Weekly and Monthly.
- Disable is the default status.
- When user changes the Status to Enable, the value for default changes to Weekly for Occurrence, Monday for Weekdays and 8:00 AM for Update Time.
Note: In case user selects the day which doesn’t fall in that particular month, then the system should automatically trigger the update on the last day of the month.
- The CCTE Server will trigger the Automatic update to check if a new version of CCTE is available.
- A prompt will appear on the server advising the user that a new version is available and prompting the user to upgrade.
Note: All users should exit from CCTE application prior to running this upgrade.
MyCCTE Automated Report Data Refresh (All)
As an Agency Manager/Supervisor the user has the ability to schedule an automated refresh of data for MyCCTE Reports (Sales & Debtor). This section details the requirements to configure the frequency and time of the automated refresh of MyCCT Reports (Sales and Debtor).
- The automated Sales and Debtor data is refreshed using the following rules:
- If set to run Daily then the auto refresh will pick up transactions with a date stamp of the day before and the current day.
- If set to run Weekly then the auto refresh will pick up transactions with a date stamp of the previous 7 days including current date.
- If set to run Monthly then the auto refresh will pick up transactions with a date stamp from the 1st of the previous month.
- The auto refresh process will also determine the default date range that appears in the MyCCT Report Data screen. The user will still have the option to amend the date range as required. The default date range will be as follows:
- From Date = this will default to date of the last successful auto refresh of ALL reports.
- To Date = current date.
- Successful data refresh – a date and time stamp will be added to the MyCCT Report Data screen to display the date and time of the last successful data refresh. This applies to each of the report options within the screen (Sales/Debtor/All).
- Failed execution of data refresh. When the batch process fails to update the MyCCTE Report data then no error message is created, and no notification is required to the user. The ‘MyCCTE report data screen will not be updated, however will display the date and time of the last successful This applies to each of the report options within the screen (Sales/Debtor/All).
- A failure of data refresh will occur if the CCTE Server is shut down when the refresh is due to run.
Refresh MyCCTE Report data screen will display the date and time of the last successful auto or manual refresh for ALL reports. The text is to be displayed as in the following format: XXXXX Data last refreshed: dd/mm/yyyy hh:mm.
When a manual refresh is selected for a particular report then the XXXXX last refreshed date and time will only be updated for the selected report. The other reports will retain the previous successful refresh date and time. If a user selects Debtor report for manual refresh then the DebtorData last refreshed: dd/mm/yyyy hh:mm stamp is applied to the Debtor report screen (if the refresh was successful).
If a user selects Sales report for manual refresh then the SalesData last refreshed: dd/mm/yyyy hh:mm stamp is applied to the Sales report screen (if the refresh was successful).
If a user selects All report for manual refresh then the AllData last refreshed: dd/mm/yyyy hh:mm stamp is only applied to the All report screen (if the refresh was successful).
Setup Tab
Some of the Setup-Only tabs will have default information already included as recommended by Travelport, whereas others will require the Supervisor to enter choices for this network. Do NOT attempt to adjust this without assistance from your Travelport representative.
The Setup tab screen is divided into 6 separate sections, with tabs for the following areas on the left-hand side of the screen:
- Creditor Reconciliation
- Accounting
- Ageing
- End of Period
- Trip Balance Nanny
- PCI
- API
- Transactions
Creditor Auto Reconciliation
Auto reconciliation for BSP and other Creditors
The Creditor Auto Reconciliation allows the agency to import a HOT (BSP) or .CSV (Other Creditors) file format containing the details of a creditor return into CCTE. CCTE will then analyse the data against creditor file transactions to provide the user with reports on which CCTE transactions do/do not match and why.
Within this function there is the opportunity to set a per transaction Threshold. The Threshold is the amount of allowable difference (positive or negative) in the balance payable of each ticket (i.e. in CCTE vs in the CSV or HOT file) which your agency is comfortable to write off to commission. This generally would cover minor discrepancies with an ADM or ACM transaction automatically created in the Trip File for the difference (impacting commission only).
The Creditor Auto Reconciliation threshold must be set in the Branch Setup-ONLY – Setup - Creditor Reconciliation area. All Creditors your agency plans to reconcile in this manner will need to be selected in this screen and have the threshold set (even if it is zero).
To add new creditors, click Control + N or the New menu item in the Creditor Reconciliation tab.
Double-click to select the creditor. Select file type. For BSP select the .HOT file option. For all non-BSP creditors, select .CSV. Enter the acceptable Threshold Amount for each creditor (note this can be updated at a later stage if required). Click Save on the menu or Control + S to commit the setting to the database.
More details regarding using this facility are contained in the standard part of the manual, Creditor Auto Reconciliation.
Accounting
This screen displays the date ranges for the financial accounting periods. If the defaults (set for a July to June financial year) are not suitable, these should be modified upon initial setup and PRIOR to the creation of any transactions. When modifying these date ranges, ensure there are no overlapping dates or date omissions.
Ageing
This screen displays up to three aged balance periods for both Debtors and Creditors.
The default settings can be changed as required.
- The Debtor aging periods determine the aging period for the debtor aged trial balance report and Debtor statement(s)
- The Creditor ageing periods determine the ageing periods for the Creditor aged trial balance.
End of Period
This screen displays a chart to allow selection of reports to be produced at the end of each accounting period, ie. End of Month. Click on a report to turn it on or off. The tick ( ) indicates that the report is required.
This screen is where the End of Month reminders can be switched off for an entire user group, and where the user can choose to print Debtor Statements with a zero balance by ticking this item.
PCI
The PCI tab allows the agency to set up CCTE to meet PCI Compliance standards. Further information on this feature is available in Product Advisory 3340: CrossCheck Travel Enterprise CCTE v18.5.
API
This tab is currently used by specific CCTE users. Please contact your Travelport Account Manager for further information on this functionality if required.
Trip Balance Nanny
The selection in this screen affects the prompts that appear when an attempt is made to close a Trip file that is out of balance.
- The Any Balance Allowed option makes no restrictions and allows the user to close from the Trip accounting screens.
- Selecting 'Balance always zero, reason required', means if a Trip file is in debit or credit a reason must be entered before the file can be closed.
- Selecting Balance greater than zero, reason required, means a reason must be entered. However, if the file is in Credit it can be closed without entering a reason.
- Selecting either of the reason required options causes a prompt to appear in the trip file with balance.
When attempting to exit from the Accounting tab of a Trip an appropriate reason would need to be selected. This reason will then appear on an Outstanding Trip Balance Report.
- Selecting either of the ‘can’t exit trip’ options means that the file can only be closed if it has a zero balance or credit, and no reason is required.
- Selecting either of the ‘can’t exit trip’ options will activate a prompt, and an entry to correct the balance must be made in order to close the trip file.
Transactions
This screen is only used during the initial set up of CCTE in your office. It allows transaction starting numbers to be set so that any existing number sequence from a previous system can be taken up, e.g. Invoices, Credit Notes, and Receipts.
This process should only take place prior to any transactions being entered into CCTE. After the initial set up of the system it should not be altered.
Security Tab
Your manager or supervisor can allow access to specific user groups in CCTE to functions such as creating Adjustments, banking procedures, and using the MyCCT reports.
The Security tab allows complete modules, or individual menu items to be enabled or disabled for specified user groups, and cannot be selected for individual workstations.
Contact your Travelport representative for assistance with setting up this tab to suit your agency or to obtain a copy of the CCTE Security Guide (available to Managers only please refer to your Travelport Account Manager).
Security - GST
Security > General > Menu Name: Process
This security was originally set up for NZ agents when GST rate changed during the transition period.
Security setting to update the Document Save Location
Security > General > Menu Name: Process
The Document Save location and Server File Mapping which are set in home branch also appear under
My CCT Splash\Others\Agencies – See CCTE Consultant User Guide - Other Folder.
The Document Save location which is set in a consultant profile and the TPLATE.RTF location under My CCT Splash \Others\My Details - See CCTE Consultant User Guide.
View and update (if permitted) the Document Save location which is set in their profile under Tools -> Consultant - See CCTE Consultant User Guide, Other Folder.
Security setting to allow Take-up Adjustment Types
Security > General > Menu Name: Process
Take-up Adjustment types within the Creditor, Debtor and Trip modules are switched off by default. This is because if misused, it can lead to accounting issues at a later date. By selecting this field against the specific consultant type, it will allow that group of consultants to select Take-up from the Type Code dropdown in adjustments.
The Take-up Adjustment type should only ever be used by those sites completing a Financial Take-up. This is usually done by a Travelport representative or the agency bookkeeper/accountant.
Security setting to allow movements between Control Accounts
Security > Cashbook > Menu Name: Process
By default, agents cannot deselect the Control Account check box of the Cashbook tab of control accounts. The reason for this is because it can impact the integrity of the accounting data and has led to accounting issues in some cases.
If an agency needs to move money from a control account, the security setting must be switched on to give the consultant access.
By checking the box for particular consultant types, the group can then uncheck the Control Account field thus allowing adjustments to and from the account. It is recommended that these fields are left unchecked in Supervisor.
PCI Compliancy for Credit Card Masking
CCTE has the capability to comply with the Payment Card Industry (PCI) data security standards. CCTE offers two standards of compliancy:
PCI level 1
- Protecting stored card holder data by Encryption & Masking.
- Providing secure authentication features from the Supervisor settings.
- Connection Security by implementing SSL in Internet Inter-ORB Protocol for three Tier (EAServer Environment)
- Connection Security by securing Transport layer in two tier (ODBC Environment)
PCI Level 2
- To be fully PCI compliant the agency must have an Agency SSL Certificate generated by Travelport and entered into your CCTE database. The Certificate is essentially a file that certifies simply that “your agency is who you say you are”. Travelport is a certificate authority (CA) that can verify the certificate is legitimate.
Once the certificate is loaded, if a CCTE Client computer tries to connect to the CCTE Server using a different certificate, the connection is refused. The certificates must be renewed annually at a cost.
All Credit Card details are masked
Credit Card Numbers in CCTE screens (Entry column and Drop down fields) will be masked based on the configuration in the Supervisor Settings.
When masked, the Credit Card Number will display the first six and last four digits. The card will be masked in the following screens:
- Client - Cards Tab
- Debtor - Cards Tab
- Invoice Details
- Debtor Receipt
- Trip Receipt
- Trip Refund
- Trip Refund to Passenger
- Trip Notes
- Trip Overview
- Cashbook- Miscellaneous Receipts
- Cashbook – Deposit Batch
- Creditor – BSP Reconciliation
Credit Card Masking SETUP
Settings to configure masking at the user group level
Security > General > Menu Name: Process
By default the Credit Card Numbers will display as unmasked to all users.
As part of PCI Compliance measures, this function should be switched on/activated in the Agency Setup Security Tab however this is not sufficient in to meet PCI compliance in isolation. The measures your agency must take to meet full compliance can be found in Product Advisory 3340: CrossCheck Travel Enterprise CCTE v18.5.
Once masking has been activated all credit cards in the system will display as follows:
Client Cards Tab
Debtor Cards Tab
Functionality to add a new Credit Card remains the same, however if this security setting is activated in the supervisor settings, the Client Card details the card will be masked to the user when retrieved. A user will then not be able to update the Credit Card Number. To do so they will need to delete the row and create a new entry instead.
Credit Card Masking on Accounting Documents
A manual Credit Card Number can be entered on the Debtor Receipt and it will automatically be masked.
On Invoice Details, Trip Receipt, Trip Refund and Trip Refund to Passenger screens the credit card number can be entered manually and it will automatically be masked.
On an Invoice from a downloaded PNR, the Credit Card Number cannot be manually updated and the number will be masked. When selecting a card from a Dropdown, the credit card number will display as masked and cannot be updated.
Example - Retail Receipt
There are instances when a Credit Card Number and expiry date may be entered randomly into a PNR notepad in Smartpoint. It is not recommended to do this as this does not conform to PCI compliancy.
If a card number is entered here the number will not be encrypted in CCTE as there is no identifier in the notepad for recognising a particular entry as containing Credit Card detail.
Travelport also strongly recommends against storing Credit Card data in any unmasked fields in CCTE as this will not conform to PCI compliancy.
Card details in Reports and Documents that are masked
The Credit Card Number will be masked in all documents and reports. Data will be masked in the following reports:
- Client Details
- Debtor-CCCF Statements
- Bank Reconciliation Report
- Unbatched Receipts Report
- Cashbook-Payments Listing Report
- Cashbook – Bank Deposit Report
- Debtor – DIY Reports
- Creditor – BSP Reconciliation – Non matching report
Security - Allow Transaction Reversal
If a User Group is permitted to Reverse transactions, this needs to be switched in the Supervisor module under General\Process and tick the applicable User Group to allow this.
Security > General > Menu Name: Process
Security – Include Trip Adjustment in SOA
- A menu item in Security allows a user rights to check an adjustment for inclusion as a payment in a Statement of Account (Comments & Segments).
- A user with Supervisor rights can check or uncheck the new Security item for user groups.
- A check box on Trip adjustment is unchecked by default but can be checked by a permitted user at the time of creation. The check box will disabled for user groups that are not permitted to include Trip Adjustment in SOA.
- The inclusion of the adjustment is reflected in the Statement of account as a payment, DR or CR, when the option to include in SOA is selected. See Module 5, Trip File Adjustments.
Security > Trip > Menu Name: Process
Security – Mandatory Quote Payment Tab
Trip Quote screen can display and capture additional information including deposit amount, deposit due date, final payment amount and final payment due date. This will assist with tracking future sales and due dates for deposits and supplier payments. The consultant is able to indicate the completion of deposit and final payments, and this can then be reported on.
The Quote Payment details will be switched off for all user groups by default. If any user group requires these fields to be mandatory the Supervisor will tick for the appropriate user groups.
Each supplier will need to store a Suppliers payment terms for deposit amount and finals due. These details should support the auto population of the Deposit Due field and Finals due field on the Trip Quote screen based on the segment departure date in the trip file. If this information is not updated in the Supplier table, the Quotes payment details tab would not display any data in these fields. A user would need to manually update the fields. See Tables/Suppliers in this Guide.
Security > Trip > Menu Name: Process
Security - Debtor Unallocate
When this item is ticked the user can click on the Unallocate button displayed under the Debtor account tab. This function will remove the allocation from the Debtor receipt. In order for Unallocation to be available in Debtor file, this needs to be ticked under the Debtor Module Menu Name of Process.
Security > Debtor > Menu Name: Process
Security – Change of Bank Account
To enable ability to change bank account
Security > Cashbook > Menu Name: Process
- Change Bank Account
- Manage historical Deposits & Statements
Security – FeeNett Receipts and eNett Payments
The ability to process FeeNett Receipts integration and to process eNett Payments to Creditors is selected in this area.
Security > MyCCT > Menu Name: File
Security – MyCCT - Add to MyFiles
The ability to create add to the MyFiles folders can be restricted in this area.
Security > MyCCT > Menu Name: File
Security - MyCCT Reports
Change the Menu Name to Reports to view the windows based reports available in MyCCT in the upper section of the displayed list as shown below. Other reports listed in this screen are those available from the Menu bar.
The default setting is for all user groups to have access to all reports, however this can be altered and the change saved.
Security > MyCCT > Menu Name: Reports
Security – Segment Defaults
For Segment Defaults reports: Under Security->MyCCT->Reports->Trip
Note: Unlike other Reports which require updating in each Module, i.e. General, Client, etc under Menu Name, this particular Report does not.
For Segment Defaults report wizard: Security->Trip->Process.
The Look Up for Segment Defaults does not require updating as it is readily available.
Documents Tab
The Documents tab gives the supervisor the ability to select the styles and to be able to add prefixes and suffixes to a wide range of documents and reports. The selected setting can apply to all Agencies or Branches or individual branches in the network, See Prefix/Suffix.
CCTE will save the document at the location when it is saved or emailed as WORD or PDF. It will also record the history of the documents which were saved, printed or emailed. The history will display in the DOCS tab page on TRIP, DEBTOR, CREDITOR, CLIENT (and COMPANY profiles – See Debtor Hierarchy Guide, Answer 28042 in Ask Travelport. The user can view the saved document by clicking on the hyperlink.
Documents Tab - Branch
Branch Level: A tab “Documents” is available on the “Branch” screen, any Prefix/Suffix created for a document from this screen will only be linked to the branch the user is in.
A checkbox “Agency default” is on the “Branch” screen to allow the option to select a Prefix/Suffix from the “Setup-Only” screen (Agency Level). If this checkbox is selected (checked) for a document then Prefix/Suffixes will be selected from the “Setup-Only” Screen and Prefix/Suffix text boxes on the “Branch” screen will be disabled.
For a Single Branch agency, “Agency default” remains ticked within “Branch” screen so that Prefix/Suffix are created on documents using this default setting.
By default Prefix/Suffixes will be selected from “Setup-Only” screen (Agency level) and all the checkboxes
under “Agency default” will be checked (selected).
If a document on the Branch screen “Agency default” checkbox is checked (selected) and Prefix/Suffix is not setup for that document at the Agency level, then the prefix/Suffix will be blank at the branch level.
Documents Tab - Database
Agency Level: All branches will have the same Prefix/Suffix text and alignment from the SETUP-ONLY Documents tab, See CCTE Accounts Management Multi Branch Guide - unless Documents have been set to individual Branches.
To change the default for a Branch when using Multi Branching, please see CCTE Accounts Management Multi Branch Guide. To enable the Prefix/Suffix text box for individual branches, the “Agency default” box would need to be unticked for that document.
For any document types the logo will no longer be required to be added to as it is already in the tplate.rtf document.
Setting up Prefix/Suffix at Agency & Branch levels
The agency supervisor can set the “Prefix” and “Suffix” at the Agency level (Documents Tab in Setup-Only screen). These settings default to all the branches.
Alternatively the “Prefix” and “Suffix” can be set at each branch level as required, see CCTE Accounts Management Multi Branch Guide, Answer 42425 in Ask Travelport.
Agency settings for all branches: Setup-ONLY > Documents Tab.
At Branch level, use the Agency default for Network settings, or uncheck for Branch customisation.
Note: A Prefix/Suffix created for a document from the Setup will apply to all branches in the database where Agency Default is ticked.
Branch Settings for individual Branches: Branch – XXX > Documents:
Agency default needs to be unticked if wish to individualise per Branch and not use Agency default
–See CCTE Accounts Management Multi Branch Guide.
Note: A Prefix/Suffix created for a document from this screen will apply only to that branch, Agency Default will need to be unticked.
- Where the “Prefix” and “Suffix” is created on the Setup-Only screen (Agency Level) by default it will be set across all branches. The Prefix/Suffix will be disabled on the individual branch document tabs where the setting is Agency Default.
- The Branch screen will show the Agency Default for each document as being checked. The Agency Default for a document can be unchecked and customised for a particular branch from this screen. See CCTE Accounts Management Multi Branch Guide.
Formatting Prefix/Suffix
In the “Prefix” and “Suffix” text boxes on the Setup-Only and Branch screen, the agency supervisor can:
- Input unlimited text.
- Format the text from the available formatting options of bold, italic, underline, text colour and alignment.
Note:
- Prefix /Suffix alignment columns have been removed from the Setup-Only and Branch screens.
- To manage existing data a line break has been inserted at the end of each Prefix/Suffix line.
- Arial, Times New Roman, Calibri, Verdana and Tahoma fonts must be installed on the user’s computer.
Sample screenshot of Agency (Network) level
Procedure
- Select the Type required: Documents, Accounting or Reports.
- Highlight the individual document or report required.
- Tick or untick Include Header.
- Tick or untick Include Logo.
- Select the Prefix position.
- Select the Suffix position.
- Enter a Prefix and Suffix in the lower part of the screen.
- Format Prefix or Suffix as required.
- Click on the Save icon.
Itineraries
Tick the Itinerary style required. This style will become the default itinerary style for all CCTE users. Select Include Header and Logo if required.
Adding Prefix and Suffix Entries
Every document can have a prefix and suffix attached as a default setting.
The procedure to create these entries is:
- Highlight the item required in the upper section of the screen
- Type in or cut and paste the Prefix or Suffix If extra lines are needed press Ctrl+N with the cursor in this field
- Click on the Save button on the toolbar or press Ctrl+S to save your entry
Both Prefix and Suffix entries can be pasted from other documents or an entry created for one document can be copied to another using the buttons aligned to these fields.
Click on the Copy button which is available for both Prefix and Suffix entries to reuse an entry.
Text can be copied from any other source and pasted into either the Prefix or Suffix fields.
Any displayed entry can be removed using the Clear button.
Document Save Pathing
The agency supervisor can configure:
- The document saving location for each branch or individual user.
- Mapping of the database server location for a branch.
- User group permissions to modify the document saving location.
In CCTE, the user can:
- View the default document save location and database server mapping that has been set in their home branch
- View the document saving location that has been set in their profile
- View the TPLATE.RTF location in their profile
- Update their document save location, if permitted – SeeSecurity Guide (available for Managers only, please contact the Agency Account Executive )
- View the history of saved, printed or emailed documents in the DOCS tab page on TRIP, DEBTOR, CREDITOR, CLIENT (and COMPANY profiles – See Debtor Hierarchy Guide, Answer 28042 in Ask Travelport
- Access the saved documents via hyperlink in the DOCS tab page
This can be done in CCTE and viewed in the branch and consultant setup screens.
Documents can be saved to any user specified location and maintain the document history within a Trip file.
The location selected can be anywhere on the local or shared network computer.
CCTE will automatically update the location on each user profile from their home branch. The agency supervisor can also set the location for an individual user if required.
If permitted by the agency supervisor, individual users will also be able to set their own preferred location from Tools\Consultant – See CCTE Consultant User Guide, Consultant Options.
For more detailed instructions please see Document Save and Email Setup Process Guide.
Custom Fields Tab
The Custom Field is recommended for use by agencies with a high percentage of corporate travellers and is accessed in the Fare Saving Report.
Custom Data can be accessed and entered in Tickets, Cheque Requisitions and Quotes. Access to this data is set in Custom Fields tab, by changing the Required field to Yes.
If the Fare Saving Report is only required for specific Debtors, mark the Required column as No. Then go into the Debtor file requiring the report and change this entry to Yes under the Custom Fields tab. An individual Debtor’s Required field cannot be changed to No, if the Branch has been set to Yes.
Customs Field codes are entered through Tables. See Module 3: Tables.
Adding a New Custom Field
Some companies might require more information be extracted using this facility.
Any number of Custom field entries can be established in the Supervisor settings and the corresponding codes entered in Tables. If the user adds new Custom fields corresponding reporting structures will need to be added. Contact your Travelport representative for assistance.
To create a new Custom Field:
- Click on the Custom Field tab and then the New icon or press Ctrl+N.
- Enter the Field Name and Label with clear titles and an instruction in Microhelp.
- Set the Field Length.
- Select the Field Type for the attached scroll (Character, Date, Number, Time or Currency)
- Select to link to either the Standard or Custom Look-up codes, which have been entered through Tables. The entries attached to the LookupCode field adjust to match the Link To entry. Select from the scroll list.
- Highlight the Service Types relevant to this Code. Each time one of the highlighted segment types has a ticket/cheque requisition or quote created for that segment the Custom button will become available. The Custom screen must be completed in order to save that window. Without selecting the Service Type the entry is not attached to any Trip functionality.
- Click OK.
Changing Custom Fields
Retrieve the Define Custom Field screen, by double clicking on any line under the Custom fields tab and make changes to your entry as required.
Implications of Custom Fields
Once the Custom Fields are switched to Yes:
- The Quote, Cheque and Ticket Requisitions screens will have a Custom button available.
- A Quote, Cheque or Ticket Requisition cannot be exited without completing the Custom Data. The following warning displays if this attempt is made:
- Click the Close button.
- Click on the Custom button shown below and complete the Custom Date fields.
- Click OK.
Note: When the custom data is activated a quote is generated on completion of ticket confirmation. Where a quote already exists, the confirmation of the ticket with custom fields activated will result in a duplication of the quote. With this enhancement, duplication of quotes is unavoidable as a quote will be created from the Filed Fare at the time of download and another quote will be generated when the ticket is confirmed. To handle this situation, the existing Quote Maintenance screen (of duplicate quotes) is triggered to allow the user to delete any duplicate quotes.
Mandatory Trip Fields Tab
The Mandatory Trip Fields tab allows the supervisor to select which fields are to be mandatory for the entire agency.
There are three default mandatory fields which cannot be altered. To create additional mandatory fields, double click in the field and click the Save icon.
To remove a mandatory field, use the same method.
Trip files can be retrieved by Destination, making this a useful mandatory field.
Mandatory Quick Trip Fields Tab
Agencies can now run a report that details Quote to Booking statistics. In order to track this, configurations are required in CCTE to update the “Trip Status” and mandate the creation of Follow Up Workflow Action items. See Trip Tracking Quote to Booking.
The agency supervisor can set Quick Trip fields as mandatory in the Setup Only screen > Mandatory Quick Trips Field Tab.
The “Follow Up Mandatory for Quick Trip used to create Trip Files” checkbox should be checked to make the Follow up reminder mandatory for Quick Trip creation.
Once this has been checked the user must fill in the mandatory fields when a trip file is created via Quick Trip in CCTE.
If any of the service fields are clicked on twice the field will appear in cyan which means it is mandatory. Double click on the cyan to remove it.
Trip Table Maintenance will also need to be updated for this functionality to work. Reports can also be run to track this process - See Trip Tracking Quote to Booking and Trip Ratio Report.
If this field is unticked a message will appear:
Mandatory Client Fields Tab
This tab allows the Supervisor to select the fields in a Client Profile that are to be mandatory for the entire agency.
There are two default mandatory fields which cannot be altered.
To make a field mandatory, double click on the required field and click Save. To remove a mandatory field, repeat the above step. The Other ID field will only appear with the user sign in if it has been switched on under the Security tab.
A tick box is available in the CCTE Client module to identify where a customer has no middle name. This assists agents in not having to reconfirm the correct name with the passenger each time they book. By having the ability to select the tick box ‘No Middle Name’ it easily identifies the customer has no middle name.
The tick box is positioned after the Middle Name field. The default is no tick. It is up to the user to select the tick when required. A tool tip will appear when the mouse tip is positioned over the tick box with the Words “Check the box if Client has no middle name.”
The fields from the marketing tab of the Client file have been included in the middle of this screen so that they can be included in the mandatory selection.
Email Tab
This functionality enables documents to be emailed directly from CCTE in either Word or PDF format.
Configuration of email settings
A screen has been created under Setup Options to enter Email Server details. Only a supervisor has access to this screen. Please consult your technical specialist if the user needs assistance to obtain this information.
Please see Document Save and Email Setup Process Guide.
Setup required for the CCTE email process
Each branch profile will have the default mapping drive Y: set in the Server File Mapping field. If the mapping has not been updated as detailed below, then documents will be saved to the location mapped with Y drive.
As all emails are saved to the mail server before being sent, the Supervisor must map the drivce on each client machine. This only needs to be done once, once mapped it is recommended to logout and reconnect to ensure the settings are correct.
- If the Database Server machine from where the mail needs to be sent does not have the access on the SMTP server, an error will display “Unable to send the Email. Please check your permissions”.
Consultant setup – If consultants want to be identified as the author of the sent emails the supervisor can enter the consultants email address in the consultant Maintenance screen.
When email hyperlink is ticked in Branch it is possible to double click on hyperlinked email addresses throughout the CCTE application to open an email to that email address.
Sending emails - When generating a document, select the ‘Output to” drop down and choose either PDF EMAIL or WORD EMAIL. The document will be sent as an attachment in the format selected.
After selecting Output to PDF Email / WORD Email, the screen below will appear, if Narratives have been added to the document and this is ticked, will take the user to the screen to select required narratives, See Tables\Narratives.
Select Generate and all email addresses in the traveller’s profiles will be available for selection.
Multiple email addresses can be selected by clicking in the check box. If there are no email addresses in any of the profiles an error message will be displayed.
If email address is invalid, an error will be displayed.
Email from Branch Email ID – If this box is checked the email will be sent from the branch email address. If not selected the default is the Email of the consultant that has created the trip.
Copy to Consultant – If consultant email has been set up this will automatically generate a copy of the email.
Additional email addresses can be manually added. Multiple addresses should be separated by a semi colon (;).
The subject line - is defaulted to the following but can be edited by the consultant before sending:
- Invoice from <Agency Name> - < Main Passenger Name> - <Trip Departure Date>
- Visa Latter, Car Voucher, Hotel Voucher <Document Name>-< Main Passenger Name> - <Trip Departure Date>
- Other Segment Vouchers <Document Name with segment name>-< Main Passenger Name> - <Trip Departure Date>
- All other - <Document Name> from <Agency Name> dated <Transaction Date>
Summary of Steps to Set up Email
Please see Document Save and Email Setup Process Guide.
- In the CCT.ini enter the client file path under key EmailPathClient of [MISC] Section
- In the CCT.ini enter the Server file path under key EmailPathServer of [MISC] Section
- This EmailPathServer path should be the mapped with the file path of the server. It should be mapped from the same location that was defined in the Server File Path in the Email Tab of setup screen
- From the dropdown Output To of the document screen from where the email is sent, select WORD EMAIL / PDF EMAIL. And click on generate
- An email select screen will open
- Select the email address/es that the email is to be sent to and check CC if required
- If the email is to be sent from the branch rather than the consultant check ‘Email from Branch Email id’
- Check copy to consultant if a copy of the email is required
- Enter manual email addresses if required
- Amend subject line if required
- After the email has been generated, the document will be saved in the folder indicated by the path that has been defined in the cct.ini file under key EmailPathClient of [MISC] Section
- After saving this on the Client machine it will also copy the file on the server machine at the path which is defined in the cct.ini under key EmailPathServer of [MISC] Section
- Click the ok button and the email will be sent. If the document is related to the Trip, details of the email generation will be available in the Docs Tab of the Trip under the Email Tab. As below.
For further information on Emailing documents from CrossCheck Travel Enterprise please see Module 9: Documentation in CCTE Consultant User Guide, Answer 27133 in Ask Travelport.